This tutorial will show you how to enable or disable Sticky Notes delete confirmation for your account in Windows 10 and Windows 11.
The Microsoft Sticky Notes app is the simple way to quickly save something for later, so you can stay in the flow. With Sticky Notes, you can create notes, type, ink or add a picture, add text formatting, stick them to the desktop, move them around there freely, close them to the Notes list, and sync them across devices and apps like OneNote Mobile, Microsoft Launcher for Android, and Outlook for Windows.
Note deletion is permanent. It cannot be undone.
You can minimize the chance of deleting notes by mistake by making sure you've turned on the note deletion warning.
Reference:
Delete a sticky note - Microsoft Support
Contents
- Option One: Disable Sticky Notes Delete Confirmation from Delete Confirmation Prompt
- Option Two: Enable or Disable Sticky Notes Delete Confirmation from Notes List
1 While deleting a note, check the Don't ask me again box before you click/tap on the Delete button. (see screenshots below)
1 Open the Sticky Notes app. (see screenshot below)
2 Click/tap on the Settings (gear) button in Sticky Notes Notes list. (see screenshot below)
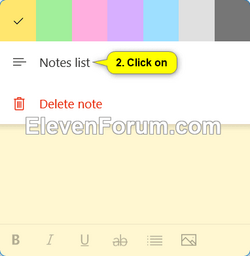
If only a single note is displayed instead of the Notes list, then click/tap on the Menu (3 dots) button on the note, and click/tap on Notes list.


3 Turn On (default) or Off Confirm before deleting for what you want. (see screenshot below)
That's it,
Shawn Brink
Related Tutorials
- Create New Sticky Notes in Windows 11
- Sign in or Sign out of Microsoft Sticky Notes in Windows 11
- Manually Sync Sticky Notes in Windows 11
- Enable or Disable Insights for Sticky Notes in Windows 11
- Change Color of Sticky Notes in Windows 11
- Keyboard Shortcuts for Sticky Notes in Windows 11
- Delete Sticky Notes in Windows 11
Last edited:


