Integrate new OOBE bypass (ms-cxh:localonly) in a autounattend.xml script??


rafaelsouzams

Member
Local time
1:57 AM
Posts
14
OS
Windows 11
Hello everyone!
Seeing the news about the new OOBE bypass, and comparing it with the current script of the Autounattend.xml generated by the Chenegans website, I came to the conclusion that the new bypass is faster and more efficient than XML automation
But here comes the question: is it possible to integrate the start ms-cxh:localonly command inside the autounattend.xml file? This would combine the best of both worlds and make our lives so much faster!

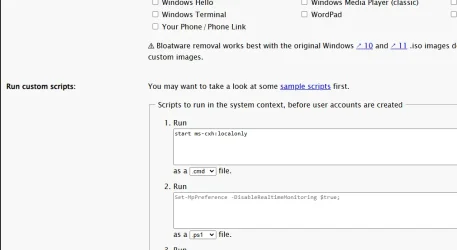
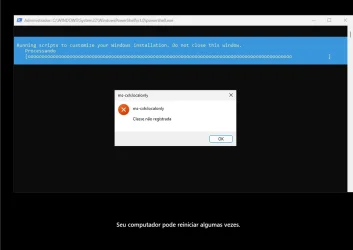
I tried to insert the command into the oersona scripting sessionI tried to insert the command in the Custom scripts session From the cheneggans website, but as you can see in the pictures, it didn't work for me, so I came to ask for help to see if anyone knows another way!
 
Windows Build/Version
26120

Attachments

  • image (2).webp
    image (2).webp
    31.5 KB · Views: 1
  • image (1).webp
    image (1).webp
    19.5 KB · Views: 1

My Computer

System One

  • OS
    Windows 11
    Computer type
    PC/Desktop
    Manufacturer/Model
    Asus
    CPU
    Core i9 10900
    Motherboard
    Asus Z490-H Gaming
    Memory
    64gb
    Graphics Card(s)
    RTX 4070TI
    Hard Drives
    Samsung Evo 970 1Tb
1. The correct command is "cmd /c start ms-cxh:localonly".

Windows 11 x64-2025-04-01-22-54-29.webp

2. Schneegan's can only create commands which run in specialize pass, or FirstLogon. Both are stages which execute before OOBE (specialize) or after OOBE (FirstLogon), so neither one can help you.

3. If you're already doing autounattend.xml, then you can create a Local Account which bypasses the MS Account requirement. And Rufus or Schneegan's will do this automation for you. The JavaScript bypass is only useful when you're not using unattended files.
 

My Computer

System One

  • OS
    Windows 7
@rafaelsouzams,

Below is a sample answer file. This one does the following:

1) Bypass Win 11 system requirements (can be used on systems that do pass requirements as well)
2) Creates a local user account
3) Eliminates the need for networking during installation (ok if network is enabled)
4) Bypasses the installation of quality updates during Windows setup

It DOES NOT perform a completely unattended installation.

If you want other samples, for example, one that nothing but create a local user account, let me know and I can provide you with such.

XML:
<?xml version="1.0" encoding="utf-8"?>

<!--
Last updated on Mar 21, 2025

The purpose of this answer file is to bypass the Windows 11 system requirement checks, create a local user account, bypass
the automatic installation of quality updates during setup, and eliminate the need for an internet connection during setup.
It does NOT perform an unattended installation of Windows.

It includes a Windows 10 / 11 Pro key.

It will create a local user account named "WinUser" with a full name of "Windows User" and a password of "Password1".

END OF NOTES
-->

<unattend xmlns="urn:schemas-microsoft-com:unattend">
    <settings pass="windowsPE">
        <component name="Microsoft-Windows-Setup" processorArchitecture="amd64" publicKeyToken="31bf3856ad364e35" language="neutral" versionScope="nonSxS" xmlns:wcm="http://schemas.microsoft.com/WMIConfig/2002/State" xmlns:xsi="http://www.w3.org/2001/XMLSchema-instance">
            <UserData>
                <ProductKey>
                    <Key>VK7JG-NPHTM-C97JM-9MPGT-3V66T</Key>
                </ProductKey>
                <AcceptEula>true</AcceptEula>
            </UserData>
            <RunSynchronous>
                <RunSynchronousCommand wcm:action="add">
                    <Order>1</Order>
                    <Path>reg add HKLM\System\Setup\LabConfig /v BypassTPMCheck /t reg_dword /d 0x00000001 /f</Path>
                </RunSynchronousCommand>
                <RunSynchronousCommand wcm:action="add">
                    <Order>2</Order>
                    <Path>reg add HKLM\System\Setup\LabConfig /v BypassSecureBootCheck /t reg_dword /d 0x00000001 /f</Path>
                </RunSynchronousCommand>
                <RunSynchronousCommand wcm:action="add">
                    <Order>3</Order>
                    <Path>reg add HKLM\System\Setup\LabConfig /v BypassRAMCheck /t reg_dword /d 0x00000001 /f</Path>
                </RunSynchronousCommand>
            </RunSynchronous>
        </component>
    </settings>
    <settings pass="oobeSystem">
        <component name="Microsoft-Windows-Shell-Setup" processorArchitecture="amd64" publicKeyToken="31bf3856ad364e35" language="neutral" versionScope="nonSxS" xmlns:wcm="http://schemas.microsoft.com/WMIConfig/2002/State" xmlns:xsi="http://www.w3.org/2001/XMLSchema-instance">
            <UserAccounts>
                <LocalAccounts>
                    <LocalAccount wcm:action="add">
                        <Password>
                            <Value>UABhAHMAcwB3AG8AcgBkADEAUABhAHMAcwB3AG8AcgBkAA==</Value>
                            <PlainText>false</PlainText>
                        </Password>
                        <DisplayName>Windows User</DisplayName>
                        <Group>Administrators</Group>
                        <Name>WinUser</Name>
                    </LocalAccount>
                </LocalAccounts>
            </UserAccounts>
            <OOBE>
                <HideWirelessSetupInOOBE>true</HideWirelessSetupInOOBE>
                <UnattendEnableRetailDemo>false</UnattendEnableRetailDemo>
                <HideEULAPage>true</HideEULAPage>
                <HideOEMRegistrationScreen>true</HideOEMRegistrationScreen>
                <HideOnlineAccountScreens>true</HideOnlineAccountScreens>
                <ProtectYourPC>1</ProtectYourPC>
            </OOBE>
            <FirstLogonCommands>
                <SynchronousCommand wcm:action="add">
                    <Order>1</Order>
                    <CommandLine>powershell.exe -Command &quot;Get-NetAdapter | Enable-NetAdapter -Confirm:$false&quot;</CommandLine>
                </SynchronousCommand>
            </FirstLogonCommands>
        </component>
    </settings>
    <settings pass="specialize">
        <component name="Microsoft-Windows-Deployment" processorArchitecture="amd64" publicKeyToken="31bf3856ad364e35" language="neutral" versionScope="nonSxS" xmlns:wcm="http://schemas.microsoft.com/WMIConfig/2002/State" xmlns:xsi="http://www.w3.org/2001/XMLSchema-instance">
            <RunSynchronous>
                <RunSynchronousCommand wcm:action="add">
                    <Order>1</Order>
                    <Path>powershell.exe -Command &quot;Get-NetAdapter | Disable-NetAdapter -Confirm:$false&quot;</Path>
                </RunSynchronousCommand>
            </RunSynchronous>
        </component>
    </settings>
    <cpi:offlineImage cpi:source="catalog://godzilla/datadiskmy data/01 - software/06 - windows deployment tools/catalog files for windows sim/windows 11 pro 24h2 catalog file/install_windows 11 pro.clg" xmlns:cpi="urn:schemas-microsoft-com:cpi" />
</unattend>
 

My Computers

System One System Two

  • OS
    Win11 Pro 24H2
    Computer type
    PC/Desktop
    Manufacturer/Model
    Self-built
    CPU
    Intel i7 11700K
    Motherboard
    ASUS Prime Z590-A MB
    Memory
    64GB (Waiting for warranty replacement of another 64GB for 128GB total)
    Graphics Card(s)
    No GPU - Built-in Intel Graphics
    Sound Card
    Integrated
    Monitor(s) Displays
    HP Envy 32
    Screen Resolution
    2560 x 1440
    Hard Drives
    1 x 1TB NVMe SSD
    1 x 2TB NVMe SSD
    1 x 4TB NVMe SSD
    3 x 512GB 2.5" SSD
    1 x 4TB 2.5" SSD
    5 x 8TB Seagate Barracuda HDD
    PSU
    Corsair HX850i
    Case
    Corsair iCUE RGB 5000X mid tower case
    Cooling
    Noctua NF-S12A chromax.black.swap case fans (Qty. 7) & Home Computer Specifications, Configuration, and Usage Notes General Specifications ASUS Prime Z590-A motherboard, serial number M1M0KC222467ARP Intel Core i7-11700K CPU (11th Gen Rocket Lake / LGA 1200 Socket) 128GB Crucial Ballistix RGB DDR4 3200 MHz DRAM (4 x 32GB) Corsair iCUE RGB 5000X mid tower case Noctua NH-D15 chromax.black CPU cooler Noctua NF-S12A chromax.black.swap case fans (Qty. 7) & Corsair LL-120 RGB Fans (Qty. 3)
    Keyboard
    Corsair K70 Max RGB Magnetic Keyboard
    Mouse
    Logitech MX Master 3
    Internet Speed
    1Gb Up / 1 Gb Down
    Browser
    Edge
    Antivirus
    Windows Defender
    Other Info
    The five 8TB drives and three 512GB SSDs are part of a DrivePool using StableBit DrivePool software. The three SSDs are devoted purely to caching for the 8TB drives. All of the important data is stored in triplicate so that I can withstand simultaneous failure of 2 disks.

    Networking: 2.5Gbps Ethernet and WiFi 6e
  • Operating System
    Win11 Pro 23H2
    Computer type
    Laptop
    Manufacturer/Model
    Lenovo ThinkBook 13x Gen 2
    CPU
    Intel i7-1255U
    Memory
    16 GB
    Graphics card(s)
    Intel Iris Xe Graphics
    Sound Card
    Realtek® ALC3306-CG codec
    Monitor(s) Displays
    13.3-inch IPS Display
    Screen Resolution
    WQXGA (2560 x 1600)
    Hard Drives
    2 TB 4 x 4 NVMe SSD
    PSU
    USB-C / Thunderbolt 4 Power / Charging
    Mouse
    Buttonless Glass Precision Touchpad
    Keyboard
    Backlit, spill resistant keyboard
    Internet Speed
    1Gb Up / 1Gb Down
    Browser
    Edge
    Antivirus
    Windows Defender
    Other Info
    WiFi 6e / Bluetooth 5.1 / Facial Recognition / Fingerprint Sensor / ToF (Time of Flight) Human Presence Sensor
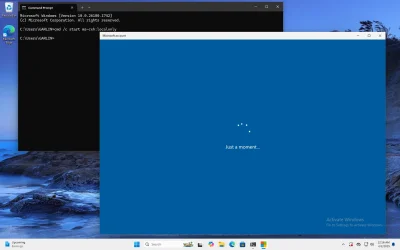
Interestingly, if you run the start command from normal Windows – it does create a new account for you.

But the pop-up screen never exits since it's probably expecting the rest of OOBE to happen.

Windows 11 x64-2025-04-02-00-16-47.webp
 

My Computer

System One

  • OS
    Windows 7
@rafaelsouzams,

Below is a sample answer file. This one does the following:

1) Bypass Win 11 system requirements (can be used on systems that do pass requirements as well)
2) Creates a local user account
3) Eliminates the need for networking during installation (ok if network is enabled)
4) Bypasses the installation of quality updates during Windows setup

It DOES NOT perform a completely unattended installation.

If you want other samples, for example, one that nothing but create a local user account, let me know and I can provide you with such.

XML:
<?xml version="1.0" encoding="utf-8"?>

<!--
Last updated on Mar 21, 2025

The purpose of this answer file is to bypass the Windows 11 system requirement checks, create a local user account, bypass
the automatic installation of quality updates during setup, and eliminate the need for an internet connection during setup.
It does NOT perform an unattended installation of Windows.

It includes a Windows 10 / 11 Pro key.

It will create a local user account named "WinUser" with a full name of "Windows User" and a password of "Password1".

END OF NOTES
-->

<unattend xmlns="urn:schemas-microsoft-com:unattend">
    <settings pass="windowsPE">
        <component name="Microsoft-Windows-Setup" processorArchitecture="amd64" publicKeyToken="31bf3856ad364e35" language="neutral" versionScope="nonSxS" xmlns:wcm="http://schemas.microsoft.com/WMIConfig/2002/State" xmlns:xsi="http://www.w3.org/2001/XMLSchema-instance">
            <UserData>
                <ProductKey>
                    <Key>VK7JG-NPHTM-C97JM-9MPGT-3V66T</Key>
                </ProductKey>
                <AcceptEula>true</AcceptEula>
            </UserData>
            <RunSynchronous>
                <RunSynchronousCommand wcm:action="add">
                    <Order>1</Order>
                    <Path>reg add HKLM\System\Setup\LabConfig /v BypassTPMCheck /t reg_dword /d 0x00000001 /f</Path>
                </RunSynchronousCommand>
                <RunSynchronousCommand wcm:action="add">
                    <Order>2</Order>
                    <Path>reg add HKLM\System\Setup\LabConfig /v BypassSecureBootCheck /t reg_dword /d 0x00000001 /f</Path>
                </RunSynchronousCommand>
                <RunSynchronousCommand wcm:action="add">
                    <Order>3</Order>
                    <Path>reg add HKLM\System\Setup\LabConfig /v BypassRAMCheck /t reg_dword /d 0x00000001 /f</Path>
                </RunSynchronousCommand>
            </RunSynchronous>
        </component>
    </settings>
    <settings pass="oobeSystem">
        <component name="Microsoft-Windows-Shell-Setup" processorArchitecture="amd64" publicKeyToken="31bf3856ad364e35" language="neutral" versionScope="nonSxS" xmlns:wcm="http://schemas.microsoft.com/WMIConfig/2002/State" xmlns:xsi="http://www.w3.org/2001/XMLSchema-instance">
            <UserAccounts>
                <LocalAccounts>
                    <LocalAccount wcm:action="add">
                        <Password>
                            <Value>UABhAHMAcwB3AG8AcgBkADEAUABhAHMAcwB3AG8AcgBkAA==</Value>
                            <PlainText>false</PlainText>
                        </Password>
                        <DisplayName>Windows User</DisplayName>
                        <Group>Administrators</Group>
                        <Name>WinUser</Name>
                    </LocalAccount>
                </LocalAccounts>
            </UserAccounts>
            <OOBE>
                <HideWirelessSetupInOOBE>true</HideWirelessSetupInOOBE>
                <UnattendEnableRetailDemo>false</UnattendEnableRetailDemo>
                <HideEULAPage>true</HideEULAPage>
                <HideOEMRegistrationScreen>true</HideOEMRegistrationScreen>
                <HideOnlineAccountScreens>true</HideOnlineAccountScreens>
                <ProtectYourPC>1</ProtectYourPC>
            </OOBE>
            <FirstLogonCommands>
                <SynchronousCommand wcm:action="add">
                    <Order>1</Order>
                    <CommandLine>powershell.exe -Command &quot;Get-NetAdapter | Enable-NetAdapter -Confirm:$false&quot;</CommandLine>
                </SynchronousCommand>
            </FirstLogonCommands>
        </component>
    </settings>
    <settings pass="specialize">
        <component name="Microsoft-Windows-Deployment" processorArchitecture="amd64" publicKeyToken="31bf3856ad364e35" language="neutral" versionScope="nonSxS" xmlns:wcm="http://schemas.microsoft.com/WMIConfig/2002/State" xmlns:xsi="http://www.w3.org/2001/XMLSchema-instance">
            <RunSynchronous>
                <RunSynchronousCommand wcm:action="add">
                    <Order>1</Order>
                    <Path>powershell.exe -Command &quot;Get-NetAdapter | Disable-NetAdapter -Confirm:$false&quot;</Path>
                </RunSynchronousCommand>
            </RunSynchronous>
        </component>
    </settings>
    <cpi:offlineImage cpi:source="catalog://godzilla/datadiskmy data/01 - software/06 - windows deployment tools/catalog files for windows sim/windows 11 pro 24h2 catalog file/install_windows 11 pro.clg" xmlns:cpi="urn:schemas-microsoft-com:cpi" />
</unattend>

@hsehestedt

Thank you very much for your cooperation, but I don't think this is exactly what I need!

I already know the website https://schneegans.de/windows/unattend-generator/ and I know that it has options to force the use of a local account, without internet, and bypassing requirements, but what I want is a little different:

The new script that was widely publicized recently (start ms-cxh:localonly) not only allows the creation of a local user, but also manages to skip all the following steps of the OOBE much faster and more efficiently than previous methods, such as those that the unattend-generator itself provides! That's why I would like to include ms-cxh:locanonly in the Autounatted file, because it still has its value, such as configuring the initial installation process (with that purple screen, to enter the Windows key and disk partitioning for example).

So just to be clear, I love the current possibilities of autounatted, but I believe it could be much better if we could insert ms-cxh:locanonly into it, to further speed up the Windows installation procedure! So that's my goal!
 

My Computer

System One

  • OS
    Windows 11
    Computer type
    PC/Desktop
    Manufacturer/Model
    Asus
    CPU
    Core i9 10900
    Motherboard
    Asus Z490-H Gaming
    Memory
    64gb
    Graphics Card(s)
    RTX 4070TI
    Hard Drives
    Samsung Evo 970 1Tb
So just to be clear, I love the current possibilities of autounatted, but I believe it could be much better if we could insert ms-cxh:locanonly into it, to further speed up the Windows installation procedure! So that's my goal!
I don't understand. Forgive me if I'm being a little slow - have not had coffee yet. That's my excuse :-)

My mental block is simply that an autounattend can skip all those parts anyway so the need for integration of that command makes no sense to me.

Or are you saying that you think an unattended setup will finish faster with that option integrated in? For me, I would actually rather it take a minute longer so I don't have to sit around and wait for it to get to that screen where I would need to respond. I just start unattended installation and when I come back 5 minutes later Windows is completely installed.
 

My Computers

System One System Two

  • OS
    Win11 Pro 24H2
    Computer type
    PC/Desktop
    Manufacturer/Model
    Self-built
    CPU
    Intel i7 11700K
    Motherboard
    ASUS Prime Z590-A MB
    Memory
    64GB (Waiting for warranty replacement of another 64GB for 128GB total)
    Graphics Card(s)
    No GPU - Built-in Intel Graphics
    Sound Card
    Integrated
    Monitor(s) Displays
    HP Envy 32
    Screen Resolution
    2560 x 1440
    Hard Drives
    1 x 1TB NVMe SSD
    1 x 2TB NVMe SSD
    1 x 4TB NVMe SSD
    3 x 512GB 2.5" SSD
    1 x 4TB 2.5" SSD
    5 x 8TB Seagate Barracuda HDD
    PSU
    Corsair HX850i
    Case
    Corsair iCUE RGB 5000X mid tower case
    Cooling
    Noctua NF-S12A chromax.black.swap case fans (Qty. 7) & Home Computer Specifications, Configuration, and Usage Notes General Specifications ASUS Prime Z590-A motherboard, serial number M1M0KC222467ARP Intel Core i7-11700K CPU (11th Gen Rocket Lake / LGA 1200 Socket) 128GB Crucial Ballistix RGB DDR4 3200 MHz DRAM (4 x 32GB) Corsair iCUE RGB 5000X mid tower case Noctua NH-D15 chromax.black CPU cooler Noctua NF-S12A chromax.black.swap case fans (Qty. 7) & Corsair LL-120 RGB Fans (Qty. 3)
    Keyboard
    Corsair K70 Max RGB Magnetic Keyboard
    Mouse
    Logitech MX Master 3
    Internet Speed
    1Gb Up / 1 Gb Down
    Browser
    Edge
    Antivirus
    Windows Defender
    Other Info
    The five 8TB drives and three 512GB SSDs are part of a DrivePool using StableBit DrivePool software. The three SSDs are devoted purely to caching for the 8TB drives. All of the important data is stored in triplicate so that I can withstand simultaneous failure of 2 disks.

    Networking: 2.5Gbps Ethernet and WiFi 6e
  • Operating System
    Win11 Pro 23H2
    Computer type
    Laptop
    Manufacturer/Model
    Lenovo ThinkBook 13x Gen 2
    CPU
    Intel i7-1255U
    Memory
    16 GB
    Graphics card(s)
    Intel Iris Xe Graphics
    Sound Card
    Realtek® ALC3306-CG codec
    Monitor(s) Displays
    13.3-inch IPS Display
    Screen Resolution
    WQXGA (2560 x 1600)
    Hard Drives
    2 TB 4 x 4 NVMe SSD
    PSU
    USB-C / Thunderbolt 4 Power / Charging
    Mouse
    Buttonless Glass Precision Touchpad
    Keyboard
    Backlit, spill resistant keyboard
    Internet Speed
    1Gb Up / 1Gb Down
    Browser
    Edge
    Antivirus
    Windows Defender
    Other Info
    WiFi 6e / Bluetooth 5.1 / Facial Recognition / Fingerprint Sensor / ToF (Time of Flight) Human Presence Sensor
What happens if we run "cmd /c start ms-cxh:localonly" from Unattended mode?

After WinPE exits, there are (4) possible ways to run an unattended command:
- specialize pass, before OOBE starts​
- scheduled task creating during specialize​
- SetupComplete.cmd, after OOBE ends​
- FirstLogon command when you're logged on for the first time​

The last two stages are too late to prevent you from reaching the MS Account screen. A scheduled task could run the command right around the time OOBE starts, but accurate timing is hard to control. The task might run too early, or too late.

1. start ms-cxh:localonly doesn't work from specialize pass. It's too early because Windows isn't done installing.

Windows 11 x64-2025-04-02-15-41-34.webp

2. Running the manual command from OOBE's first screen implies you're skipping over the Language, Keyboard, Region and Computer Name choices.

Which may be fine if you wanted the same defaults as the ISO edition you're installing. But some users knowingly install the English (US) ISO, even though they're not US-based users. Skipping the rest of OOBE may not be a time saving fix, since you'll have to enter Settings to change the language, keyboard and locale.

Windows 11 x64-2025-04-02-16-07-55.webp

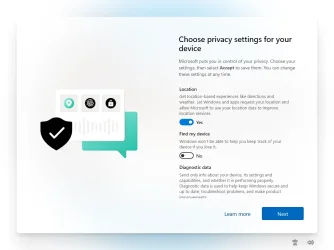
3. You still have to run the W11 Privacy screen. Which can be skipped using the unattended file.

Windows 11 x64-2025-04-02-16-10-14.webp

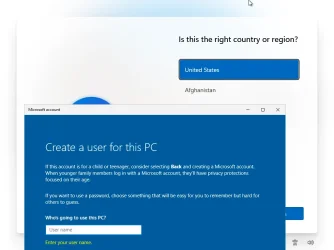
In the end, running the W10 "Create a user for this PC" process is an imperfect fix. Yes it avoids the MS Account screen, but also creates other problems because it shortcuts the OOBE process.
 

My Computer

System One

  • OS
    Windows 7
I don't understand. Forgive me if I'm being a little slow - have not had coffee yet. That's my excuse :-)

My mental block is simply that an autounattend can skip all those parts anyway so the need for integration of that command makes no sense to me.

Or are you saying that you think an unattended setup will finish faster with that option integrated in? For me, I would actually rather it take a minute longer so I don't have to sit around and wait for it to get to that screen where I would need to respond. I just start unattended installation and when I come back 5 minutes later Windows is completely installed.
The main factor is the speed at which this happens!

I did a comparison here, using a virtual machine, and created a snapshot just before entering the OOBE screen.
The first time I let only the automated script run, and the second time I let the same script run but I manually intervened to type the ms-cxh command, and as you can see, even with manual intervention, which in itself is slower than something pre-configured, the installation with it was almost 2x faster! It took 3 minutes to complete everything and get to the desktop, while the traditional automated took almost 6 minutes to get the same result!

You can see both side by side in this video I made.


My Computer

System One

  • OS
    Windows 11
    Computer type
    PC/Desktop
    Manufacturer/Model
    Asus
    CPU
    Core i9 10900
    Motherboard
    Asus Z490-H Gaming
    Memory
    64gb
    Graphics Card(s)
    RTX 4070TI
    Hard Drives
    Samsung Evo 970 1Tb
O que acontece se corrermos "cmd /c start ms-cxh:localonly"do modo autônomo?

Após a saída do WinPE, existem (4) maneiras possíveis de executar um comando autônomo:
- especialize-se no passe antes do início do OOBE​
- criação de tarefas agendadas durante a especialização​
- SetupComplete.cmd, após o término do OOBE​
- Comando FirstLogon quando você estiver conectado pela primeira vez​

Os dois últimos estágios são tarde demais para evitar que você alcance a tela da Conta MS. Uma tarefa agendada pode executar o comando na hora em que o OOBE for iniciado, mas é difícil controlar o tempo preciso. A tarefa pode ser muito cedo ou muito tarde.

1. iniciar ms-cxh: apenas local não funciona a partir de specialize pass. É muito cedo porque o Windows não terminou de instalar.

View attachment 130185

2. Executar o comando manual na primeira tela do OOBE implica que você está ignorando as opções de idioma, teclado, região e nome do computador.

O que pode ser bom se você quiser os mesmos padrões da edição ISO que está instalando. Mas alguns usuários instalam conscientemente o Inglês (EUA) ISO, embora não sejam usuários baseados nos EUA. Ignorar o resto do OOBE pode não ser uma solução que economiza tempo, pois você terá que inserir Configurações para alterar o idioma, o teclado e a localidade.

View attachment 130186

3. Você ainda precisa executar a tela Privacidade do W11. Que pode ser ignorado usando o arquivo autônomo.

View attachment 130187

No final, executar o processo W10 "Criar um usuário para este PC" é uma correção imperfeita. Sim, evita a tela da conta MS, mas também cria outros problemas porque abrevia o processo OOBE.

In the test I showed just above, I had none of these problems! The language question came perfect for me, since I downloaded an ISO in my language from the Microsoft website!
Thanks to the autonated, no privacy configuration was requested, and I also had no problem with other possible configurations that are made in the OOBE.

It seems to me that they combine very well if they work together, I just need to find out how to automate it!
 

My Computer

System One

  • OS
    Windows 11
    Computer type
    PC/Desktop
    Manufacturer/Model
    Asus
    CPU
    Core i9 10900
    Motherboard
    Asus Z490-H Gaming
    Memory
    64gb
    Graphics Card(s)
    RTX 4070TI
    Hard Drives
    Samsung Evo 970 1Tb
There are 3 key facts to understand.

1. OOBE is written to run at a higher visual layer than normal Windows processes as a security measure. Think of the normal desktop, you can have overlapping windows which can cover other windows, or be hidden behind them. On the Lock or Logon screen, it blocks all other windows from appearing. The same thing happens with OOBE.

If you run a windowed process, it runs "behind" OOBE and cannot show itself. When you type Shift-F10, the window manager will allow backgrounded processes to appear above the OOBE screen. Now with Shift-F10 breaking the "barrier", you can Alt-Tab to switch between new windows. Unless you have an automated way of sending Shift-F10 to Windows, running "cmd /c start ms-cxh:localonly" will be trapped behind the OOBE screen.

2. This hack works because MS never removed the legacy W10 "Create a user for this PC" script from OOBE. W11 doesn't use this code any more, instead it uses a different set of scripts. When the W10 scriot exits, it doesn't resume where OOBE paused but jumps ahead (because it's a mis-matched version). W11 never expected this version of the W10 script to be running. This is your 2-3 minutes of saved time.

3. Skipping the same OOBE screens can be done in the unattended file.
Code:
        <settings pass="oobeSystem">
                <component name="Microsoft-Windows-Shell-Setup" processorArchitecture="amd64" publicKeyToken="31bf3856ad364e35" language="neutral" versionScope="nonSxS" xmlns:wcm="http://schemas.microsoft.com/WMIConfig/2002/State" xmlns:xsi="http://www.w3.org/2001/XMLSchema-instance">
                        <OOBE>
                                <HideEULAPage>true</HideEULAPage>
                                <HideLocalAccountScreen>true</HideLocalAccountScreen>
                                <HideOnlineAccountScreens>true</HideOnlineAccountScreens>
                                <HideWirelessSetupInOOBE>true</HideWirelessSetupInOOBE>
                                <NetworkLocation>Work</NetworkLocation>
                                <ProtectMyPC>3</ProtectMyPC>
                        </OOBE>
                </component>
        </settings>
 

My Computer

System One

  • OS
    Windows 7
Great stuff. I've had to create a separate folder now called "Cool Stuff Learned from Garlin" because I keep learning new stuff from you.

Thanks for all your efforts. It is greatly appreciated.
 

My Computers

System One System Two

  • OS
    Win11 Pro 24H2
    Computer type
    PC/Desktop
    Manufacturer/Model
    Self-built
    CPU
    Intel i7 11700K
    Motherboard
    ASUS Prime Z590-A MB
    Memory
    64GB (Waiting for warranty replacement of another 64GB for 128GB total)
    Graphics Card(s)
    No GPU - Built-in Intel Graphics
    Sound Card
    Integrated
    Monitor(s) Displays
    HP Envy 32
    Screen Resolution
    2560 x 1440
    Hard Drives
    1 x 1TB NVMe SSD
    1 x 2TB NVMe SSD
    1 x 4TB NVMe SSD
    3 x 512GB 2.5" SSD
    1 x 4TB 2.5" SSD
    5 x 8TB Seagate Barracuda HDD
    PSU
    Corsair HX850i
    Case
    Corsair iCUE RGB 5000X mid tower case
    Cooling
    Noctua NF-S12A chromax.black.swap case fans (Qty. 7) & Home Computer Specifications, Configuration, and Usage Notes General Specifications ASUS Prime Z590-A motherboard, serial number M1M0KC222467ARP Intel Core i7-11700K CPU (11th Gen Rocket Lake / LGA 1200 Socket) 128GB Crucial Ballistix RGB DDR4 3200 MHz DRAM (4 x 32GB) Corsair iCUE RGB 5000X mid tower case Noctua NH-D15 chromax.black CPU cooler Noctua NF-S12A chromax.black.swap case fans (Qty. 7) & Corsair LL-120 RGB Fans (Qty. 3)
    Keyboard
    Corsair K70 Max RGB Magnetic Keyboard
    Mouse
    Logitech MX Master 3
    Internet Speed
    1Gb Up / 1 Gb Down
    Browser
    Edge
    Antivirus
    Windows Defender
    Other Info
    The five 8TB drives and three 512GB SSDs are part of a DrivePool using StableBit DrivePool software. The three SSDs are devoted purely to caching for the 8TB drives. All of the important data is stored in triplicate so that I can withstand simultaneous failure of 2 disks.

    Networking: 2.5Gbps Ethernet and WiFi 6e
  • Operating System
    Win11 Pro 23H2
    Computer type
    Laptop
    Manufacturer/Model
    Lenovo ThinkBook 13x Gen 2
    CPU
    Intel i7-1255U
    Memory
    16 GB
    Graphics card(s)
    Intel Iris Xe Graphics
    Sound Card
    Realtek® ALC3306-CG codec
    Monitor(s) Displays
    13.3-inch IPS Display
    Screen Resolution
    WQXGA (2560 x 1600)
    Hard Drives
    2 TB 4 x 4 NVMe SSD
    PSU
    USB-C / Thunderbolt 4 Power / Charging
    Mouse
    Buttonless Glass Precision Touchpad
    Keyboard
    Backlit, spill resistant keyboard
    Internet Speed
    1Gb Up / 1Gb Down
    Browser
    Edge
    Antivirus
    Windows Defender
    Other Info
    WiFi 6e / Bluetooth 5.1 / Facial Recognition / Fingerprint Sensor / ToF (Time of Flight) Human Presence Sensor

Latest Support Threads

Back
Top Bottom