This tutorial will show you how to upgrade the configuration version of one or more Hyper-V virtual machines at once in Windows 10 and Windows 11.
Hyper-V enables running virtualized computer systems on top of a physical host. These virtualized systems can be used and managed just as if they were physical computer systems, however they exist in virtualized and isolated environment. Special software called a hypervisor manages access between the virtual systems and the physical hardware resources. Virtualization enables quick deployment of computer systems, a way to quickly restore systems to a previously known good state, and the ability to migrate systems between physical hosts.
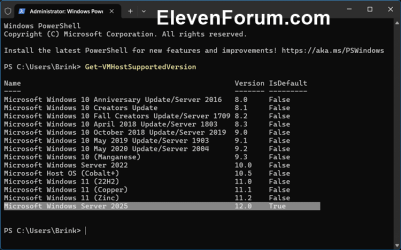
When you create a virtual machine, it's created with the default configuration version.
When you move or import a virtual machine to a computer that runs Hyper-V on Windows 10/11, the virtual machine's configuration isn't automatically updated. This means that you can move the virtual machine back to a Hyper-V host that runs a previous version of Windows or Windows Server. But, this also means that you can't use some of the new virtual machine features until you manually update the configuration version.
You can only import a virtual machine if the Hyper-V host supports that configuration version. Typically, this means that you can import a virtual machine to a Hyper-V host running a newer version of Hyper-V, but you cannot import a virtual machine created on a newer version of Hyper-V to an older version of Hyper-V. If the VM's configuration version is not listed as supported for your Hyper-V host OS, you either have to upgrade the VM configuration version to a newer version or create a new VM of the same generation using the existing virtual hard disks before you can start the VM.

The virtual machine configuration version represents the compatibility of the virtual machine's configuration, saved state, and snapshot files with the version of Hyper-V. When you update the configuration version, you change the file structure that is used to store the virtual machines configuration and the checkpoint files. You also update the configuration version to the latest version supported by that Hyper-V host. Upgraded virtual machines use a new configuration file format, which is designed to increase the efficiency of reading and writing virtual machine configuration data. The upgrade also reduces the potential for data corruption in the event of a storage failure.
You can make the latest Hyper-V features available on your virtual machines by upgrading the configuration version.
Reference:

Upgrade virtual machine version in Hyper-V on Windows or Windows Server
You cannot downgrade a virtual machine configuration version after you have upgraded it.
You must be signed in as an administrator to upgrade the configuration version of a Hyper-V virtual machine.
- Option One: See Default Configuration Version your Hyper-V Host Supports
- Option Two: Upgrade Configuration Version for Hyper-V Virtual Machine in Hyper-V Manager
- Option Three: Upgrade Configuration Version for Specific Hyper-V Virtual Machine in PowerShell
- Option Four: Upgrade Configuration Version for All Hyper-V Virtual Machines in PowerShell
Windows 10/11 on your computer is the Hyper-V Host OS, and the virtual machine is the guest.
1 Open Windows Terminal (Admin), and select Windows PowerShell.
2 Copy and paste the command below into Windows Terminal (Admin), and press Enter. (see screenshot below step 3)
Get-VMHostSupportedVersion -Default3 The Version (ex: "12") listed is the default configuration version for your computer (host) used to upgrade virtual machines.
1 Open Hyper-V Manager (virtmgmt.msc).
2 Select the virtual machine (ex: "Windows 11 Home") in the middle pane you want to upgrade the configuration version. (see screenshot below)
3 Perform one of the following actions below to rename the virtual machine:
- Click/tap on Upgrade Configuration Version in the right "Actions" pane.
- Click/tap on Action on the menu bar, and click/tap on Upgrade Configuration Version.
- Right click on the selected virtual machine in the middle pane, and click/tap on Upgrade Configuration Version.
If you do not have the Upgrade Configuration Version action available, then it means the virtual machine's configuration version is already at the maximum supported configuration version.
4 Click/tap on Upgrade to confirm. (see screenshot below)
5 You can now close Hyper-V Manager if you like.
1 Open Windows Terminal (Admin), and select Windows PowerShell.
2 Copy and paste the command below into Windows Terminal (Admin), and press Enter. (see screenshot below step 3)
Get-VM3 Make note of the virtual machine name (ex: "Windows 11 Home") you want to upgrade configuration Version (ex: "10.0"). (see screenshot below)
4 Type the command below into Windows Terminal (Admin), and press Enter. (see screenshot below)
Update-VMVersion "<VM Name>" -ForceSubstitute <VM Name> in the command above with the virtual machine name (ex: "Windows 11 Home") from step 3 you want to upgrade configuration version.
Substitute <New VM Name> in the command above with the new name (ex: "W11 Home") you want for this virtual machine.
For example: Update-VMVersion "Windows 11 Home" -Force"
5 You can now close Windows Terminal (Admin) if you like.
1 Open Windows Terminal (Admin), and select Windows PowerShell.
2 Copy and paste the command below into Windows Terminal (Admin), and press Enter. (see screenshot below)
Get-VM | Update-VMVersion -Force3 You can now close Windows Terminal (Admin) if you like.
You will see a warning for any virtual machine(s) no update was performed to let you know its configuration version is already at the maximum supported configuration version.
That's it,
Shawn Brink


