This tutorial will show you how to set up and create a Windows 11 virtual machine with Hyper-V on a Windows 10 or Windows 11 PC.
Windows 11 has all the power and security of Windows 10 with a redesigned and refreshed look. It also comes with new tools, sounds, and apps. Every detail has been considered. All of it comes together to bring you a refreshing experience on your PC.
Hyper-V enables running virtualized computer systems on top of a physical host. These virtualized systems can be used and managed just as if they were physical computer systems, however they exist in virtualized and isolated environment. Special software called a hypervisor manages access between the virtual systems and the physical hardware resources. Virtualization enables quick deployment of computer systems, a way to quickly restore systems to a previously known good state, and the ability to migrate systems between physical hosts.
Hyper-V is only available on 64-bit versions of Windows 10/11 Pro, Enterprise, and Education. It is not available on the Home edition.
Hyper-V Enhanced Session Mode is only available if you installed Windows 10/11 Pro, Enterprise, or Education as the VM.
Windows 11 minimum system requirements:
- Processor: 1 gigahertz (GHz) or faster with 2 or more cores on a compatible 64-bit processor or System on a Chip (SoC)
- Intel ("Intel VT" or "VT-x") or AMD ("AMD-V") CPU virtualization enabled in BIOS/UEFI
- RAM: 4 gigabyte (GB)
- Storage: 64 GB or larger storage device
- System firmware: UEFI, Secure Boot capable
- TPM: Trusted Platform Module (TPM) version 2.0
- Graphics card: Compatible with DirectX 12 or later with WDDM 2.0 driver or higher
- Display: High definition (720p) display that is greater than 9” diagonally, 8 bits per color channel

How to run a Windows 11 VM on Hyper-V | Microsoft Community Hub

Step-By-Step: Enabling Hyper-V for Use on Windows 11
You must be signed in as an administrator to create a Hyper-V virtual machine.
Here's How:
1 The following items will need to be enabled in the system BIOS/UEFI:
- Intel ("Intel VT" or "VT-x") or AMD ("AMD-V") CPU virtualization.
- Hardware Enforced Data Execution Prevention.

System requirements for Hyper-V on Windows and Windows Server
2 If you haven't already, you will need to download a Windows 11 ISO file.
3 If you haven't already, you will need to enable Hyper-V. (see screenshot below)
4 Open Hyper-V Manager (virtmgmt.msc).
5 Right click or press and hold on the host computer (ex: "BRINKDESKTOP") in the left pane of Hyper-V Manager, click/tap on New, and click/tap on Virtual Machine. (see screenshot below)
6 Click/tap on Next in the "New Virtual Machine Wizard". (see screenshot below)
7 Type a name (ex: "Windows 11 VM") you want for this virtual machine. (see screenshot below)
8 Perform the following steps if you want to specify a different location to store this virtual machine: (see screenshots below)
Click/tap on Next instead if you do not want to change the location.
- Check Store the virtual machine in a different location.
- Click/tap on the Browse button.
- Navigate to and select the drive or folder you want to store the virtual machine.
- Click/tap on Select Folder.
- Click/tap on Next.
9 Select (dot) Generation 2, and click/tap on Next. (see screenshot below)
10 Specify the memory size in MB (ex: "4096") you want, check (default) or uncheck Use Dynamic Memory for this virtual machine, and click/tap on Next. (see screenshot below)
Windows 11 requires a minimum of 4 GB (4096 MB) of RAM (memory)
If you uncheck Dynamic Memory, all the specified memory size is allocated from the host computer.
If you check Dynamic Memory, the specified memory size is only allocated from the host computer as needed.
11 Select Default Switch for the virtual machine network connection, and click/tap on Next. (see screenshot below)
12 Click/tap on Next. (see screenshot below)
13 Perform the following steps to select the Windows 11 ISO file from step 2: (see screenshots below)
- Select (dot) Install an operating system from a bootable image file.
- Click/tap on the Browse button.
- Navigate to and select the Windows 11 ISO file.
- Click/tap on Open.
- Click/tap on Next.
14 Click/tap on Finish. (see screenshot below)
15 In Hyper-V Manager (virtmgmt.msc), right click or press and hold on this virtual machine's name (ex: "Windows 11 VM") from step 7, and click/tap on Settings. (see screenshot below)
16 Perform the following steps in Security Settings: (see screenshot below)
- Click/tap on Security in the left pane of Settings.
- Check Enable Secure Boot.
- Check Enable Trusted Platform Module.
- Click/tap on Apply.
17 Perform the following steps in Processor Settings: (see screenshot below)
- Click/tap on Processor in the left pane of Settings.
- Specify at least 2 for the Number of virtual processors.
- Click/tap on Apply.
18 Perform the following steps in Checkpoints Settings: (see screenshot below)
Checkpoints can be useful to revery virtual machines to a previous state if needed like a system image.
Checkpoints can use a lot of disk space, so you may want to disable (uncheck) checkpoints for this virtual machine if you do not want to use checkpoints to save space.
- Click/tap on Checkpoints in the left pane of Settings.
- Check (default) or uncheck Enable checkpoints for what you want.
- Click/tap on OK.
19 In Hyper-V Manager (virtmgmt.msc), double click/tap on this virtual machine's name (ex: "Windows 11 VM") from step 7 to connect to it. (see screenshot below)
20 Click/tap on Start in the virtual machine. (see screenshot below)
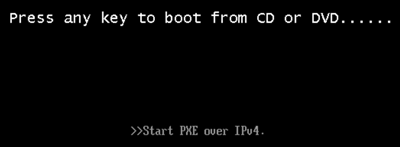
21 When you see Press any key to boot from CD or DVD., press any key to boot from the ISO specified in step 13. (see screenshot below)
You will only have a few seconds to do this.
If you miss the time to press any key and see >>Start PXE over IPv4 like below, then perform the steps below to restart the virtual machine and try again:
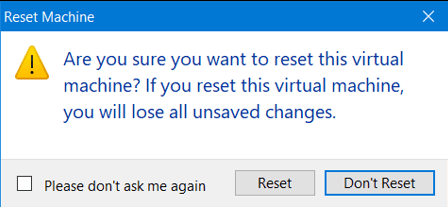
1) Click/tap on Action on the menu bar of the virtual machine, and click/tap on Reset.
2) Click/tap on Reset in the confirmation prompt.


22 When Windows Setup starts in the virtual machine, you can continue at step 5 in this tutorial (click on link) to install Windows 11. (see screenshots below)
That's it,
Shawn Brink


