This tutorial will show you how to change your DNS Server address and enable DNS over TLS (DoT) in Windows 11.
A DNS (Domain Name System) server is the service that makes it possible for you to open a web browser, type a domain name and load your favorite websites.
DNS over HTTPS (DoH) is a protocol for performing remote Domain Name System resolution via the HTTPS protocol. A goal of the method is to increase user privacy and security by preventing eavesdropping and manipulation of DNS data by man-in-the-middle attacks by using the HTTPS protocol to encrypt the data between the DoH client and the DoH-based DNS resolver. Windows 11 includes built-in support for DoH.
Starting with Windows 11 build 25158 (24H2), DNS over TLS (DoT) testing is now available for Windows DNS client query protection. The setup requires some command line use and is recommended for advanced networking users.
DNS over TLS (DoT) is an alternative encrypted DNS protocol to DNS over HTTPS (DoH). Where DoH treats DNS traffic as one more HTTPS data stream over port 443, DoT dedicates port 853 to encrypted DNS traffic and runs directly over a TLS tunnel without HTTP layering underneath. This may result in a small performance improvement depending on the network environment at the cost of the flexibility HTTPS-based protocols can provide.
References:
DNS over TLS vs. DNS over HTTPS | Secure DNS

DNS-over-TLS | Public DNS | Google for Developers
 developers.google.com
DNS over TLS available to Windows Insiders | Microsoft Community Hub
 techcommunity.microsoft.com
You must be signed in as an administrator to change the DNS server address and enable DoT.
Here's How:
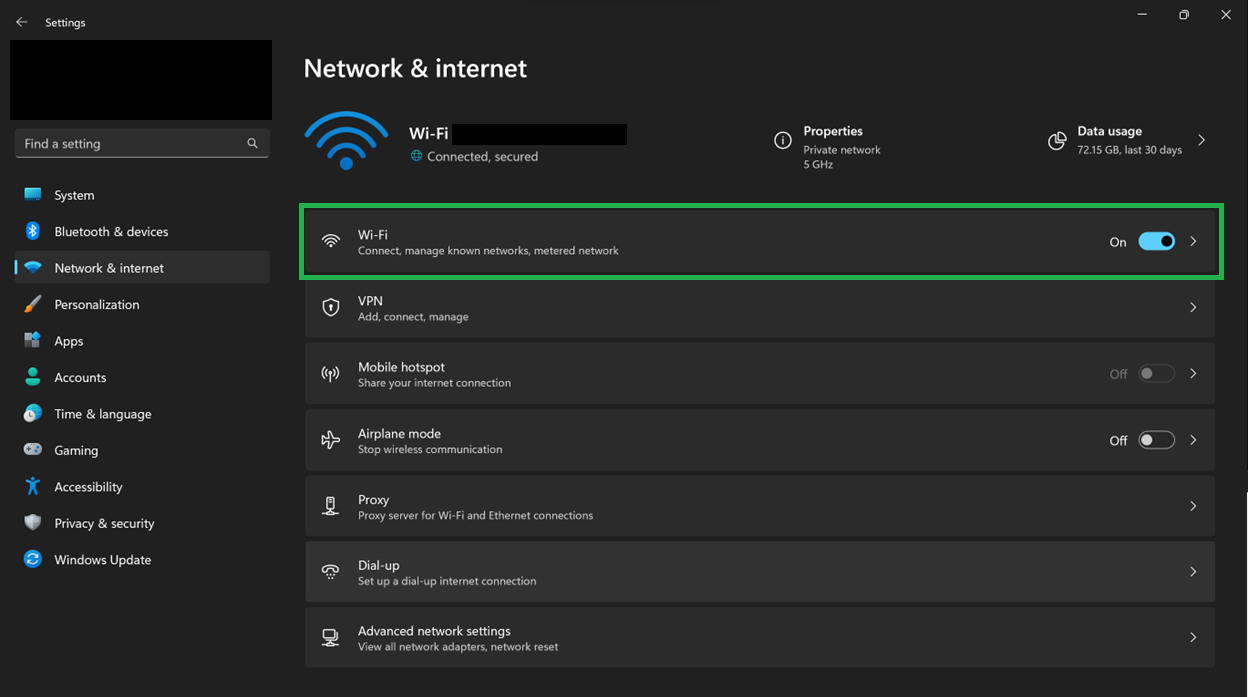
1 Open Settings (Win+I).
2 Click/tap on Network & internet on the left side. (see screenshot below)
3 Do step 4 (current), step 5 (specific), or step 6 (all Wi-Fi) below for which network connection or adapter you want to enable DoT for.
This will be for a network connection you are currently connected to.
If you have a The DNS settings for all Wi-Fi networks have been set. The settings below won't be saved. type message, then it means you used step 6 that overrides this setting. You can click/tap on the Change DNS settings for all Wi-Fi networks link instead, and then click/tap on the Edit button in step 6.
This will be for a network connection you do not have to be currently connected to.
- For Ethernet, click/tap on the connection you want to enable DoT for.
- For Wi-Fi, click/tap on Manage known networks, and click/tap on the known Wi-Fi network connection you want to enable DoT for.
If you have a The DNS settings for all Wi-Fi networks have been set. The settings below won't be saved. type message, then it means you used step 6 that overrides this setting. You can click/tap on the Change DNS settings for all Wi-Fi networks link instead, and then click/tap on the Edit button in step 6.
This will include all connections you make from the selected Wi-Fi network adapter.
This will override what is set for a network connection in step 4 and/or step 5.
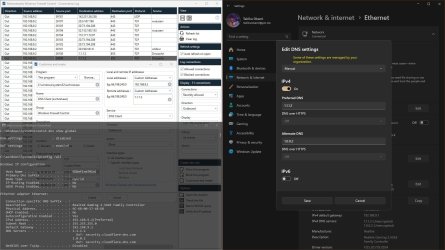
7 Select Manual in the drop menu at the top. (see screenshots below step 10)
DoT DNS server | Preferred DNS for IPv4 |
|---|---|
| Cloudflare | 1.1.1.1 |
| Google Public DNS | 8.8.8.8 |
| Quad9 | 9.9.9.9 |
DoT DNS server | Alternate DNS for IPv4 |
|---|---|
| Cloudflare | 1.0.0.1 |
| Google Public DNS | 8.8.4.4 |
| Quad9 | 149.112.112.112 |
DoT DNS server | Preferred DNS for IPv6 |
|---|---|
| Cloudflare | 2606:4700:4700::1111 |
| Google Public DNS | 2001:4860:4860::8888 |
| Quad9 | 2620:fe::fe |
DoT DNS server | Alternate DNS for IPv6 |
|---|---|
| Cloudflare | 2606:4700:4700::1001 |
| Google Public DNS | 2001:4860:4860::8844 |
| Quad9 | 2620:fe:::9 |
10 When finished, click/tap on Save. (see screenshots below)
11 Verify the IPv4 DNS servers and IPv6 DNS servers you specified above all show as (Unencrypted). (see screenshot below)
If one shows as (Encrypted), then you will need to go back and select Off in the DNS over HTTPS drop menu for the DNS server address.
12 Open Windows Terminal (Admin), and select either Windows PowerShell or Command Prompt.
13 Copy and paste the command below into Windows Terminal (Admin), and press Enter to enable DoT settings. (see screenshot below step 15)
netsh dns add global dot=yes14 Type the command below into Windows Terminal (Admin), and press Enter. (see screenshot below step 15)
netsh dns add encryption server=<DNS server address> dothost=: autoupgrade=yesThe dothost field equal to “:” means that the default DoT port will be used (853) and the domain name presented in the server’s TLS certificate will not be validated. To ensure proper validation of the connection, provide the expected domain name of the DoT server (the connection will use DoT’s designated port 853 without needing to specify it, as custom ports are not supported yet).
Substitute <DNS server address> in the command above with the actual DNS server addresses you specified and shown in step 11.
You will need to repeat this command for the IPv4 preferred DNS (ex: "1.1.1.1"), IPv4 alternate DNS (ex: "1.0.0.1"), IPv6 preferred DNS (ex: "2606:4700:4700::1111"), and IPv6 alternate DNS (ex: "2606:4700:4700::1001") server addresses you specified and shown in step 11.
For example:
netsh dns add encryption server=1.1.1.1 dothost=: autoupgrade=yes
netsh dns add encryption server=1.0.0.1 dothost=: autoupgrade=yes
netsh dns add encryption server=2606:4700:4700::1111 dothost=: autoupgrade=yes
netsh dns add encryption server=2606:4700:4700::1001 dothost=: autoupgrade=yes
15 Copy and paste the command below into Windows Terminal (Admin), and press Enter to flush the DNS resolver cache. (see screenshot below)
ipconfig /flushdns16 Copy and paste the command below into Windows Terminal (Admin), and press Enter to verify if DoT is enabled. (see screenshot below step 17)
netsh dns show global17 Verify DoT settings show as enabled. (see screenshot below)
If DoT settings shows as disabled, then re-run the netsh dns add global dot=yes command, and repeat step 16 to verify.
18 Copy and paste the command below into Windows Terminal (Admin), and press Enter to verify DoT encryption. (see screenshot below)
netsh dns show encryption19 Scroll down and look for the IPv4 preferred DNS (ex: "1.1.1.1"), IPv4 alternate DNS (ex: "1.0.0.1"), IPv6 preferred DNS (ex: "2606:4700:4700::1111"), and IPv6 alternate DNS (ex: "2606:4700:4700::1001") server addresses you specified and shown in step 11. (see screenshot below)
The output should contain:
- Encryption settings for <DNS server address>
- DNS-over-TLS host set to either : or 853
- Auto-upgrade set to Yes
- UDP-fallback set to No.
20 You can now close Settings and Windows Terminal (Admin) if you like.
That's it,
Shawn Brink