Win Update KB5050009 Windows 11 Cumulative Update build 26100.2894 (24H2) - Jan. 14


UPDATE 1/28:


 Microsoft Support:

January 14, 2025 - KB5050009 (OS Build 26100.2894)​

For information about Windows update terminology, see the article about the types of Windows updates and the monthly quality update types. For an overview of Windows 11, version 24H2, see its update history page.

Note Follow @WindowsUpdate to find out when new content is published to the Windows release health dashboard.

Important: Windows updates do not install Microsoft Store application updates. If you are an enterprise user, see Microsoft Store apps - Configuration Manager. If you are a consumer user, see Get updates for apps and games in Microsoft Store.

Tip: See the release notes for Windows Server 2025.


Highlights

  • This update addresses security issues for your Windows operating system.

Improvements

This security update includes improvements that were a part of update KB5048667 (released December 10, 2024). Below is a summary of the key issues that this update addresses when you install this KB. If there are new features, it lists them as well. The bold text within the brackets indicates the item or area of the change we are documenting.
  • [Windows Kernel Vulnerable Driver Blocklist file (DriverSiPolicy.p7b)] This update adds to the list of drivers that are at risk for Bring Your Own Vulnerable Driver (BYOVD) attacks.
If you installed earlier updates, only the new updates contained in this package will be downloaded and installed on your device.
For more information about security vulnerabilities, please refer to the Security Update Guide website and the January 2025 Security Updates.

Windows 11 servicing stack update (KB5050387)- 26100.2890​

This update makes quality improvements to the servicing stack, which is the component that installs Windows updates. Servicing stack updates (SSU) ensure that you have a robust and reliable servicing stack so that your devices can receive and install Microsoft updates. To learn more about SSUs, see Simplifying on-premises deployment of servicing stack updates.

Known issues in this update

Applies toSymptomWorkaround
All usersWe’re aware of an issue where players on Arm devices are unable to download and play Roblox via the Microsoft Store on Windows.Players on Arm devices can play Roblox by downloading the title directly from www.Roblox.com.
All usersFollowing the installation of the October 2024 security update, some customers report that the OpenSSH (Open Secure Shell) service fails to start, preventing SSH connections. The service fails with no detailed logging, and manual intervention is required to run the sshd.exe process.

This issue is affecting both enterprise, IOT, and education customers, with a limited number of devices impacted. Microsoft is investigating whether consumer customers using Home or Pro editions of Windows are affected.
Customers can temporarily resolve the issue by updating permissions (ACLs) on the affected directories. Follow these steps:
  1. Open PowerShell as an Administrator.
  2. Update the permissions for C:\ProgramData\ssh and C:\ProgramData\ssh\logs to allow full control for SYSTEM and the Administrators group, while allowing read access for Authenticated Users. You can restrict read access to specific users or groups by modifying the permissions string if needed.
    Use the following commands to update the permissions:
    $directoryPath = "C:\ProgramData\ssh" $acl = Get-Acl -Path $directoryPath $sddlString = "O:BAD:PAI(A;OICI;FA;;;SY)(A;OICI;FA;;;BA)(A;OICI;0x1200a9;;;AU)" $securityDescriptor = New-Object System.Security.AccessControl.RawSecurityDescriptor $sddlString $acl.SetSecurityDescriptorSddlForm($securityDescriptor.GetSddlForm("All")) Set-Acl -Path $directoryPath -AclObject $acl
  3. Repeat the above steps for C:\ProgramData\ssh\logs.
Microsoft is actively investigating the issue and will provide a resolution in an upcoming Windows update. Further communications will be provided when a resolution or additional workarounds are available.
IT adminsDevices that have certain Citrix components installed might be unable to complete installation of the January 2025 Windows security update. This issue was observed on devices with Citrix Session Recording Agent (SRA) version 2411. The 2411 version of this application was released in December 2024.

Affected devices might initially download and apply the January 2025 Windows security update correctly, such as via the Windows Update page in Settings. However, when restarting the device to complete the update installation, an error message with text similar to “Something didn’t go as planned. No need to worry – undoing changes” appears. The device will then revert to the Windows updates previously present on the device.

This issue likely affects a limited number of organizations as version 2411 of the SRA application is a new version. Home users are not expected to be affected by this issue.
Citrix has documented this issue, including a workaround, which can be performed prior to installing the January 2025 Windows security update. For details, see Citrix’s documentation.

Microsoft is working with Citrix to address this issue and will update this documentation once a resolution is available.

How to get this update

Before you install this update

Microsoft combines the latest servicing stack update (SSU) for your operating system with the latest cumulative update (LCU). For general information about SSUs, see Servicing stack updates and Servicing Stack Updates (SSU): Frequently Asked Questions.

Install this update
To install this update, use one of the following Windows and Microsoft release channels.

AvailableNext Step
YesNone. This update will be downloaded and installed automatically from Windows Update and Microsoft Update.
YesBefore you install this update
To get the standalone package(s) for this update, go to the Microsoft Update Catalog website. This KB contains one or more MSU files that must be installed in order.


Install this update
Method 1: Install all MSU files together

Download all MSU files for KB5050009 from Microsoft Update Catalog and place them in the same folder (for example, C:/Packages). Use Deployment Image Servicing and Management (DISM.exe) to install the target update. DISM will use the folder specified in PackagePath to discover and install one or more prerequisite MSU files as needed.


Updating Windows PC
To apply this update to a running Windows PC, run the following command from an elevated Command Prompt:

DISM /Online /Add-Package /PackagePath:c:\packages\Windows11.0-KB5050009-x64.msu

Or, run the following command from an elevated Windows PowerShell prompt:
Add-WindowsPackage -Online -PackagePath "c:\packages\Windows11.0-KB5050009-x64.msu"

Updating Windows Installation media
To apply this update to Windows Installation media, see Update Windows installation media with Dynamic Update.


To add this update to a mounted image, run the following command from an elevated Command Prompt:
DISM /Image:mountdir /Add-Package /PackagePath:Windows11.0-KB5050009-x64.msu

Or, run the following command from an elevated Windows PowerShell prompt:
Add-WindowsPackage -Path "c:\offline" -PackagePath "Windows11.0-KB5050009-x64.msu" -PreventPending


If you want to remove the LCU
To remove the LCU after installing the combined SSU and LCU package, use the DISM/Remove-Package command line option with the LCU package name as the argument. You can find the package name by using this command: DISM /online /get-packages.

Running Windows Update Standalone Installer (wusa.exe) with the /uninstall switch on the combined package will not work because the combined package contains the SSU. You cannot remove the SSU from the system after installation.

File information

For a list of the files that are provided in this update, download the file information for cumulative update 5050009.

For a list of the files that are provided in the servicing stack update, download the file information for the SSU (KB5050387) - version 26100.2890.


 Source:


Check Windows Updates


UUP Dump:

64-bit ISO download:


ARM64 ISO download:

 
Last edited:
Humm, double reboot. :think:
 

My Computer

System One

  • OS
    Windows 11 Pro
    Computer type
    PC/Desktop
    CPU
    Intel® Core™ i9-12900K Desktop Processor 16 (8P+8E)
    Motherboard
    Asus TUF Gaming Z790-PLUS WIFI D4
    Memory
    G.Skill Ripjaws V Series 32gb (2x16gb) DDR4 3200mhz
    Graphics Card(s)
    Asus Dual Geforce Rtx™ 3060 TI Edition 8gb Gddr6
    Monitor(s) Displays
    BenQ EW3270U 31.5” 3840x2160 UHD 16:9 HDR LED 4K LG 27UK850-W 27'' 4K UHD IPS LED Monitor with HDR10
    Screen Resolution
    3840x2160
    Hard Drives
    Samsung 990 with heatsink PRO PCIe 4.0 Gen 4 NVMe® SSD 1TB
    WD_BLACK SN850X NVMe M.2 2280 1TB PCI-Express 4.0
    Crucial T500 2TB Gen4
    Samsung 970 Evo M.2 2280 2tb Pcie Gen3. X4
    PSU
    Corsair AXi Series AX860i Digital 860W 80 PLUS PSU
    Case
    Fractal Meshify C ATX Mid Tower Case
    Keyboard
    Logi MX Keys
    Mouse
    Logi M705
    Internet Speed
    400 mbs
    Browser
    Firefox
    Antivirus
    Eset NOD32
    Other Info
    Love fast boots
Hi,
So you are installing the two .msu separately?
From what Is written by Microsoft it should "automatically" install the update in the correct sequence if both are in the same folder.
In any case - first thing I'll try to check the health (I think I made it as a test earlier today, but I had something like: "The source files could not be found" or something like that.

Later I will retest the whole .... BTW you've made a script to do the injection? :-)
Hi.

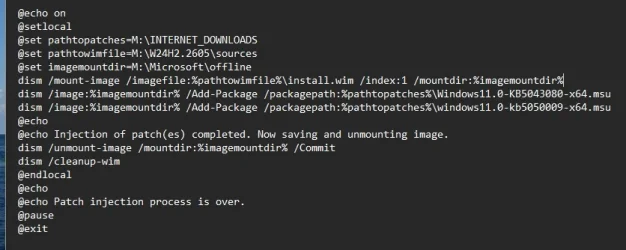
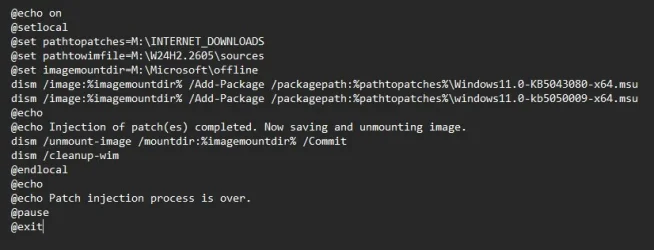
Correct. I made a simple script to inject the patches into the .wim file. The script is given below for your reference.

batch.webp
 

Attachments

  • batch.webp
    batch.webp
    33.9 KB · Views: 1

My Computers

System One System Two

  • OS
    Windows 11 Pro build 26100.2454 (24H2)
    Computer type
    PC/Desktop
    Manufacturer/Model
    Home Built
    CPU
    Intel i7-4790
    Motherboard
    Asus H97 Pro Gamer
    Memory
    Teams DDR3-1600
    Graphics Card(s)
    MSI Nvidia GeForce GTX 1050Ti
    Sound Card
    Realtek ALC1150
    Monitor(s) Displays
    LG Flatron E2250
    Screen Resolution
    1920 by 1080 pixels
    Hard Drives
    Crucial NVMe PCIe M2 500 GB (Windows 11 v.24H2); Samsung SSD Evo 870 500 GB (Windows 11 v.24H2);
    PSU
    Corsair HX850
    Case
    Gigabyte Solo 210
    Cooling
    Zalman CNPS7X Tower
    Keyboard
    Microsoft AIO Wireless (includes touchpad)
    Mouse
    HP S1000 Plus Wireless
    Internet Speed
    200 Mb fiber optic
    Browser
    Chrome; MS Edge
    Antivirus
    Windows Defender
  • Operating System
    MacOS 12 Monterey
    Computer type
    Laptop
    Manufacturer/Model
    Apple Macbook Air
    CPU
    Intel Core i5
    Memory
    8 GB
    Graphics card(s)
    Intel integrated
    Screen Resolution
    1440 by 900 pixels
    Hard Drives
    128 GB
    Mouse
    Microsoft Wireless
    Keyboard
    Built-in
    Internet Speed
    802.11 ac
    Browser
    Chrome; Safari
    Antivirus
    N/A
Do you use the Killer Control/Intelligence Center? If so, any problems?
I don't use the app so can't speak to it specifically short of the fact it's installed and seems to open properly.
 

My Computers

System One System Two

  • OS
    Windows 11 24H2
    Computer type
    Laptop
    Manufacturer/Model
    Alienware M17 R3
    CPU
    Intel Core i7-10750H (Comet Lake)
    Motherboard
    Alienware
    Memory
    32GB DDR4
    Graphics Card(s)
    NVIDIA GeForce RTX 2060 and Intel UHD Graphics
    Sound Card
    Realtek ALC3281-CG
    Monitor(s) Displays
    17"
    Screen Resolution
    3840x2160
    Hard Drives
    Micron 2300 NVMe 1TB
    PC SN530 NVMe WDC 512GB
    Mouse
    Logitech MX Master 3
    Internet Speed
    60mbps
    Browser
    Vivaldi and Firefox
    Antivirus
    MS Defender and Malwarebytes Free
  • Operating System
    Windows 11 24H2
    Computer type
    Laptop
    Manufacturer/Model
    Microsoft Surface Laptop 3
    CPU
    Intel Core i7-1065G7 (Ice Lake)
    Motherboard
    Microsoft Corp.
    Memory
    16GB DDR4
    Graphics card(s)
    Intel Iris Plus Graphics
    Sound Card
    Omnisonic Speakers with Dolby Audio
    Monitor(s) Displays
    13.5” PixelSense Touchscreen Display
    Screen Resolution
    2256x1504
    Hard Drives
    Toshiba Memory 512GB
    Mouse
    Surface Arc Mouse
    Internet Speed
    60 mbps
    Browser
    Vivaldi and Firefox
    Antivirus
    MS Defender and Malwarebytes Free
Well look what just came back in event viewer after this update.

1736912376406.webp

This used to be on upgrades from win 10 1803
 

My Computer

System One

  • OS
    Windows 11 Pro
    Computer type
    PC/Desktop
    CPU
    Intel® Core™ i9-12900K Desktop Processor 16 (8P+8E)
    Motherboard
    Asus TUF Gaming Z790-PLUS WIFI D4
    Memory
    G.Skill Ripjaws V Series 32gb (2x16gb) DDR4 3200mhz
    Graphics Card(s)
    Asus Dual Geforce Rtx™ 3060 TI Edition 8gb Gddr6
    Monitor(s) Displays
    BenQ EW3270U 31.5” 3840x2160 UHD 16:9 HDR LED 4K LG 27UK850-W 27'' 4K UHD IPS LED Monitor with HDR10
    Screen Resolution
    3840x2160
    Hard Drives
    Samsung 990 with heatsink PRO PCIe 4.0 Gen 4 NVMe® SSD 1TB
    WD_BLACK SN850X NVMe M.2 2280 1TB PCI-Express 4.0
    Crucial T500 2TB Gen4
    Samsung 970 Evo M.2 2280 2tb Pcie Gen3. X4
    PSU
    Corsair AXi Series AX860i Digital 860W 80 PLUS PSU
    Case
    Fractal Meshify C ATX Mid Tower Case
    Keyboard
    Logi MX Keys
    Mouse
    Logi M705
    Internet Speed
    400 mbs
    Browser
    Firefox
    Antivirus
    Eset NOD32
    Other Info
    Love fast boots
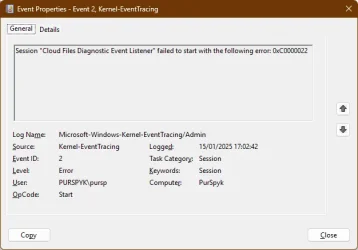
Updated, but now these 2 errors appear on each reboot in Event Viewer:

Session "Cloud Files Diagnostic Event Listener" failed to start with the following error: 0xC0000022

1736914842955.webp

and

Error setting traits on Provider {8444a4fb-d8d3-4f38-84f8-89960a1ef12f}. Error: 0xC0000001

1736914882287.webp
 

My Computer

System One

  • OS
    Windows 11
    Computer type
    PC/Desktop
    Manufacturer/Model
    Custom Built
    CPU
    Intel i9 14900KF
    Motherboard
    Asus z790 ProArt Creator WiFi
    Memory
    64GB Corsair Vengeance RGB
    Graphics Card(s)
    MSI 4090 Suprim X
    Sound Card
    Onboard
    Monitor(s) Displays
    1 x Asus 24". 1 x Asus 32"
    Screen Resolution
    1920x1080 & 2560 x 1440
    Hard Drives
    Multiple
    PSU
    Corsair 1200HX
    Case
    Corsair 7000D RGB
    Cooling
    Corsair H150I Capellix XT
    Keyboard
    Corsair K70 RGB MK.2
    Mouse
    Corsair M55 RGB Pro
    Internet Speed
    1000Mb/s
    Browser
    Edge
    Antivirus
    Windows Default
Well look what just came back in event viewer after this update.

View attachment 122089

This used to be on upgrades from win 10 1803

Updated, but now these 2 errors appear on each reboot in Event Viewer:

Session "Cloud Files Diagnostic Event Listener" failed to start with the following error: 0xC0000022

View attachment 122091

and

Error setting traits on Provider {8444a4fb-d8d3-4f38-84f8-89960a1ef12f}. Error: 0xC0000001

View attachment 122092
I may be misunderstanding the post of yours, but I do not (at least not yet) have those!
 

My Computer

System One

  • OS
    Windows 11
    Computer type
    PC/Desktop
    Manufacturer/Model
    Asus/Custom Build
    CPU
    Intel® Xeon® X5690 3.47GHz Six-Core
    Motherboard
    Asus P6T Deluxe v2
    Memory
    G.Skill PC3-12800 1600MHz 24GB
    Graphics Card(s)
    NVIDIA GeForce GTX 1050
    Sound Card
    SoundMAX ADI AD2000B HD Audio
    Monitor(s) Displays
    Acer T232HL Touch Screen
    Screen Resolution
    1920 x 1080 @ 60Hz
    Hard Drives
    6 Crucial MX500 SSD 1TB each.
    PSU
    Thermaltake Toughpower Gold 850W
    Case
    Thermaltake Armor VA8000SWA
    Cooling
    Thermaltake Air Cooling System
    Keyboard
    Illuminated Multimedia LED Keyboard
    Mouse
    M16 Dual Mode Illuminated Mouse - Bluetooth / 2.4 GHz Mode
    Internet Speed
    800 Mbps
    Browser
    Edge / Opera / Vivaldi / Chrome / Firefox / Brave
    Antivirus
    Windows Defender Security
I may be misunderstanding the post of yours, but I do not (at least not yet) have those!
Lucky, these errors only appeared now after this recent update. This was a clean install of Windows 24H2.
 

My Computer

System One

  • OS
    Windows 11
    Computer type
    PC/Desktop
    Manufacturer/Model
    Custom Built
    CPU
    Intel i9 14900KF
    Motherboard
    Asus z790 ProArt Creator WiFi
    Memory
    64GB Corsair Vengeance RGB
    Graphics Card(s)
    MSI 4090 Suprim X
    Sound Card
    Onboard
    Monitor(s) Displays
    1 x Asus 24". 1 x Asus 32"
    Screen Resolution
    1920x1080 & 2560 x 1440
    Hard Drives
    Multiple
    PSU
    Corsair 1200HX
    Case
    Corsair 7000D RGB
    Cooling
    Corsair H150I Capellix XT
    Keyboard
    Corsair K70 RGB MK.2
    Mouse
    Corsair M55 RGB Pro
    Internet Speed
    1000Mb/s
    Browser
    Edge
    Antivirus
    Windows Default
Also just to be sure I'm not doing a stupid mistake, could you please tell me which command do you use to inject the updates?
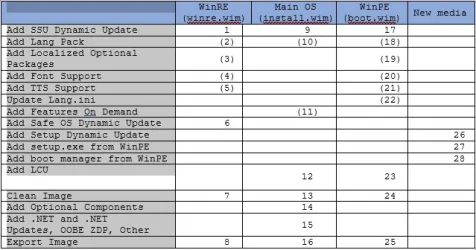
I do a lot more than slipstream in the Chekpoint and Incremental updates (this month those are KB5043080 and KB5050009). Take a look at the chart below. I update my image with ALL of the items in the chart EXCEPT those with numbers in parenthesis. Those items are optional language packs and similar features that I just don't deal with since I use only US English versions of Windows.

Image1.webp

Below is a small portion of my personal notes on this topic describing step-by-step my procedure. See the PDF within the attached ZIP file named "Updating Offline Windows Images.zip".

NOTE: Because these are my own personal notes, there may possibly be some items that are not 100% clear to you. Feel free to ask if you have any questions.

Because I update so many items, I have automated all of this. If you are only going to update a single edition of Windows, the batch file below should do all the heavy lifting for you. For example, if you have a Microsoft consumer editions ISO image, it contains 11 editions of Windows including Home, Pro, etc. The batch file will update ONLY one of these editions and create a new ISO image with just that one updated edition of Windows. Just make sure to read the comments at the start of the batch file because you will need to place updates in a very specific folder structure and you may need to modify some user defined variables as the notes will instruct you.

NOTE: Even if you don't plan to use the batch file, you may want to take a look at it because I have lots of comments and all the commands I use are clearly visible as plain text so it should be relativly easy to follow what I am doing.

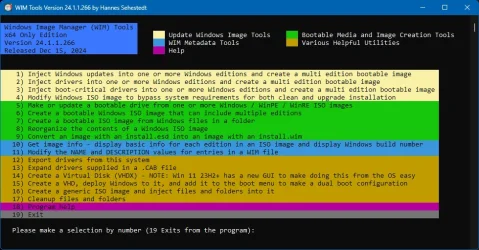
If you want an even more automated procedure that can update multiple editions, even from multiple separate ISO images, and combine them into a single ISO image. It can also do much, much more. Here is a screenshot of the main menu just to give you an idea of some of the features:

Image2.webp

You can find that project here (Select the WIM-Tools project):


Batch File:

Batch:
@echo off
cd /d %~dp0
cls


:::::::::::::::::::::::::::::::::::::::
:: Windows Image Updater             ::
::                                   ::
:: Version 6.0.4                     ::
::                                   ::
:: Oct 10, 2024 by Hannes Sehestedt  ::
:::::::::::::::::::::::::::::::::::::::


:::::::::::::::::::::::::::::::::::::::::::::::::::::::::::::::::::::::::::::::::::::::::::::::::::::::::
::                                                                                                     ::
:: PURPOSE OF THIS SCRIPT                                                                              ::
::                                                                                                     ::
:: This script will take one Windows edition in a Windows ISO image and inject Windows                 ::
:: updates into it. The updated edition of Windows will be saved to a new file containing              ::
:: just that one edition of Windows. As an example, assume that you have a retail Windows              ::
:: ISO image. This ISO image has multiple editions of Windows such as Win 11 Home, Pro, etc.           ::
:: Each edition of Windows has an index number associated with it.                                     ::
::                                                                                                     ::
:: For example, on the US English consumer edition ISO images from Microsoft, Windows 11 Pro is index  ::
:: number 6. To get a list of Windows editions and the index number associated with each edition, you  ::
:: can run this command:                                                                               ::
::                                                                                                     ::
:: dism /Get-WimInfo /WimFile:C:\Project\ISO_Files\Sources\install.wim                                 ::
::                                                                                                     ::
:: If located elsewhere, substitute the correct location of the install.wim file in the above command. ::
::                                                                                                     ::
:: This utility will perform the updates THE RIGHT WAY by updating all elements of the image           ::
:: including not only the cumulative update, but also the SSU (Servicing Stack Update), Safe           ::
:: OS Dynamic Update, Setup Dynamic Update, other updates such as .NET updates and Microcode           ::
:: updates, and will even allow you to add custom scripts to the Windows PE image. However,            ::
:: if you want to update only one item, such as the cumulative update, you can do that as well.        ::
::                                                                                                     ::
:: IMPORTANT: As noted, this script will only update one edition of Windows from an image. If          ::
:: you want to update multiple editions and combine them all into a single image, please               ::
:: message me as noted above. I can provide to you a tool that will allow you to update many           ::
:: Windows editions and combine them into a single image. That same tool also has many other           ::
:: features such as being able to inject drivers into an image, create bootable media, and many        ::
:: other tasks related to Windows Image Management.                                                    ::
::                                                                                                     ::
:: Please note that it is possible to also add updates such as language packs and other language       ::
:: related components to Windows images. This batch file does not apply those updates, however         ::
:: I can provide information regarding how to update those components if you need to do so.            ::
:::::::::::::::::::::::::::::::::::::::::::::::::::::::::::::::::::::::::::::::::::::::::::::::::::::::::


:::::::::::::::::::::::::::::::::::::::::::::::::::::::::::::::::::::::::::::::::::::::::::::::::::::::::::::::::::::
::                                                                                                                 ::
:: SUMMARY OF INSTRUCTIONS                                                                                         ::
::                                                                                                                 ::
::                                                                                                                 ::
:: 1) Read the instructions below to learn how to organize the folders that this project needs.                    ::
::                                                                                                                 ::
:: 2) Review the "User defined variables" section below and modify as needed.                                      ::
::                                                                                                                 ::
:: 3) Make sure that you have the Windows ADK installed. Only the Deployment Tools from the                        ::
::    ADK need to be installed.                                                                                    ::
:::::::::::::::::::::::::::::::::::::::::::::::::::::::::::::::::::::::::::::::::::::::::::::::::::::::::::::::::::::
::                                                                                                                 ::
:: DETAILED INSTRUCTIONS                                                                                           ::
::                                                                                                                 ::
:: Create the following folders before you run this batch file.                                                    ::
::                                                                                                                 ::
:: NOTE: The paths below assume the default settings of user defined variables. If you change those variables,     ::
:: Please alter the below paths accordingly.                                                                       ::
::                                                                                                                 ::
:: Do either one of the following:                                                                                 ::
::                                                                                                                 ::
:: 1) Create a folder and copy the contents of your Windows ISO image that you want to update to it.               ::
::                                                                                                                 ::
:: OR                                                                                                              ::
::                                                                                                                 ::
:: 2) Mount the ISO image by double-clicking it.                                                                   ::
::                                                                                                                 ::
:: For whichever of the above options you choose, note the location as the batch file will ask you for that        ::
:: location when you run it.                                                                                       ::
::                                                                                                                 ::
:: Create a folder under which you will place the Windows updates to be installed.                                 ::
::                                                                                                                 ::
:: NOTE: This location can be changed using the user defined variables below. In this example, we assume that      ::
:: location will be "C:\WinUpdates". Beneath that folder, create all of the following folders and place the        ::
:: updates described into that folder. All of these updates can be downloaded from the "Microsoft Update Catalog". ::
::                                                                                                                 ::
:: NOTE: All items are optional. For example, if you do not have a Safe OS Dynamic Update, simply leave that       ::
:: folder empty.                                                                                                   ::
::                                                                                                                 ::
:: The "PE_Files" folder can be used to place files that you want to copy to Windows setup. For example, I have a  ::
:: couple of scripts that I want to be available to Windows setup. Any files that you place here will be available ::
:: on drive X: during windows setup. Note that X: is the RAM Drive that Windows creates during setup. Since this   ::
:: is just about the first thing setup does, these files will be available very early in setup. IT IS EXTREMEMELY  ::
:: UNLIKELY that you will ever put anything in this folder unless you have a very specific reason for doing so. As ::
:: a result, you will typically leave this folder empty.                                                           ::
::                                                                                                                 ::
:: If you wish to DELETE files from Windows PE, for example, scripts that you previously added as described in the ::
:: above paragragh, please search this batch file for the text "delete files from WinPE" and follow the            ::
:: instructions found there. Once again, IT IS EXTREMEMELY UNLIKELY that you will need to do this.                 ::
::                                                                                                                 ::
:: When downloading updates from the Microsoft Update Catalog, please note that the "Safe OS Dynamic Update"       ::
:: will include "Windows Safe OS Dysnamic Update" in the "Products" column. The "Setup Dynamic Update" will        ::
:: simply be called a "Dynamic Update" in this same column.                                                        ::
::                                                                                                                 ::
:: Once again, note that the "C:\WinUpdates" portion of the paths below can be changed using the user defined      ::
:: variables that are described below.                                                                             ::
::                                                                                                                 ::
:: C:\WinUpdates\LCU       <--- Place Latest Cumulative Update in this folder. DON'T use a DYNAMIC version.        ::
:: C:\WinUpdates\SSU       <--- Place a Standalone SSU in this folder if one is available. These are not common.   ::
:: C:\WinUpdates\Other     <--- Place other updates (for example .NET and OOBE ZDP Updates) in this folder.        ::
:: C:\WinUpdates\SafeOS_DU <--- Place the latest Safe OS Dynamic Update in this folder.                            ::
:: C:\WinUpdates\Setup_DU  <--- Place the latest Setup Dynamic Update in this folder.                              ::
:: C:\WinUpdates\PE_Files  <--- Place any files such as scripts that you want copied to WinPE here.                ::
::                                                                                                                 ::
:: IMPORTANT: Please note that for each type of update, you should only download the latest update of that type    ::
:: because updates are cumulative. However, there are two exceptions to this rule:
::
:: 1) The OOBE ZDP updates are NOT cumulative, so you should download ALL available updates of that type and place ::
:: them in the Other folder.                                                                                       ::
::                                                                                                                 ::
:: 2) Windows 11 24H2 introduces checkpoint and incremental updates for the LCU (Latest Cumulative Update). If you ::
:: locate a cumulative update for Windows in the Microsoft update catalog and you find that it shows two files to  ::
:: download rather than just one, this indicates that there is both a checkpoint and an incremental update.        ::
:: Download both and save them in the LCU folder. However, you only need the most recent cumulative update whether ::
:: that consists of just one file or two files.                                                                    ::
::                                                                                                                 ::
:: Be aware that there may sometimes be no update of a certain type available. As an example, Safe OS updates do   ::
:: not get released every month, so it is possible that there is no update of that type available, especially soon ::
:: after the release of a new version of Windows.                                                                  ::
:::::::::::::::::::::::::::::::::::::::::::::::::::::::::::::::::::::::::::::::::::::::::::::::::::::::::::::::::::::


:::::::::::::::::::::::::::::::::::::::::::::::::::::::::::::::::::::::::::::::::::::::::::::::::::::::::::::::::::::::::
::                                                                                                                     ::
:: USER DEFINED VARIABLES                                                                                              ::
::                                                                                                                     ::
:: Below you will find a description of variables that you can set. You should check each one to make sure that it     ::
:: fits your needs. The actual variables are found below the description section. Please note that spaces in path      ::
:: names or file names are perfectly fine. you should NOT use quotes to enclose file names or paths even if there      ::
:: are spaces in the names.                                                                                            ::
::                                                                                                                     ::
:: IndexNum - Set "IndexNum" to the index number corresponding to the Windows edition you want to update. By default   ::
::    we have this set to "6" which corresponds to Windows 10 or 11 Pro when using the standard retail edition ISO     ::
::    image from Microsoft. To get a list of Windows editions and the index number associated with each edition, you   ::
::    can run this command:                                                                                            ::
::                                                                                                                     ::
::       dism /Get-WimInfo /WimFile:C:\Project\ISO_Files\Sources\install.wim                                           ::
::                                                                                                                     ::
::    If located elsewhere, substitute the correct location of the install.wim file in the above command.              ::
::                                                                                                                     ::
:: ProjectFolder - Set "ProjectFolder" to the location where the project will be created. The batch file will create   ::
::    a number of folders under the project folder. Many of the files here are temporary files. Be aware that there    ::
::    will be a lot files. You can easily need 20GB or more of space in this location.                                 ::
::                                                                                                                     ::
:: WinUpdates - Set "WinUpdates" to the location of the Windows update files. Under this folder, you should create the ::
::    folder structure that is desribed above in the "DETAILED INSTRUCTIONS" section.                                  ::
::                                                                                                                     ::
:: EnableLogs - If you want logging to show what updates actually got installed into your WinRE.WIM, BOOT.WIM, and     ::
::    INSTALL.WIM files, set "EnableLogs" to "1". Otherwise, set it "0". This will cause two text files for each WIM   ::
::    to be created. The first is created after updates are applied, but before the cleanup of the image is performed. ::
::    The second is created after cleanup. As an example, after a combined LCU / SSU package is applied, you may see   ::
::    more than one SSU package in the log prior to the cleanup, however, after the cleanup, the older SSU should have ::
::    been removed. Note that for WinPE four files are created because a pair is created for each of the two indicies  ::
::    that get updated. The files are created in the same folder from which the batch file is run. You can normally    ::
::    leave this set to "0".                                                                                           ::
::                                                                                                                     ::
:: NewImageFileName - Set "NewImageFileName" to the name you want to use for the final ISO image to be created. Make   ::
::    sure to include the .ISO file extension. Spaces in the file name are okay.                                       ::
::                                                                                                                     ::
:: ADK_Location - Set this variable to the location of the "Deployment Tools" folder within the Windows ADK. You       ::
::    should only need to change this if you did not install to the default location.                                  ::
::                                                                                                                     ::
:: SaveWinRE - Set this to "1" if you wish to save a copy of the WinRE.wim file after it is updated. This can be       ::
::    helpful if you need to replace the WinRE.wim file in your Recovery Partition. This file could otherwise be       ::
::    difficult to obtain because it is located within another WIM file (the install.wim) so saving a copy after       ::
::    updating can be helpful. Setting this to "0" (or anything other than "1") will cause a copy of the file to       ::
::    not be saved.                                                                                                    ::
:::::::::::::::::::::::::::::::::::::::::::::::::::::::::::::::::::::::::::::::::::::::::::::::::::::::::::::::::::::::::


set IndexNum=6
set ProjectFolder=C:\Project
set WinUpdates=C:\WinUpdates\x64
set EnableLogs=0
set NewImageFileName=Windows.ISO
set ADK_Location=C:\Program Files (x86)\Windows Kits\10\Assessment and Deployment Kit\Deployment Tools
set SaveWinRE=0


:::::::::::::::::::::::::::::::::::
:: End of user defined variables ::
:::::::::::::::::::::::::::::::::::


::::::::::::::::::::::::::::::::::::::::::::::::::::::::::::::::::::::::::::::::::::::::::::::::::::::::::::
:: Check to see if this batch file is being run as Administrator. If it is not, then rerun the batch file ::
:: automatically as admin and terminate the initial instance of the batch file.                           ::
::::::::::::::::::::::::::::::::::::::::::::::::::::::::::::::::::::::::::::::::::::::::::::::::::::::::::::


(Fsutil Dirty Query %SystemDrive%>Nul)||(PowerShell start """%~f0""" -verb RunAs & Exit /B) > NUL 2>&1


::::::::::::::::::::::::::::::::::::::::::::::::
:: End Routine to check if being run as Admin ::
::::::::::::::::::::::::::::::::::::::::::::::::


::::::::::::::::::::::::::::::::::::::::::::::::::::::::::::::::::
:: Change the console mode to 120 columns wide by 25 lines high ::
::::::::::::::::::::::::::::::::::::::::::::::::::::::::::::::::::


mode con: cols=120 lines=25


:::::::::::::::::::::::::::::::::::
:: Display introductory comments ::
:::::::::::::::::::::::::::::::::::


echo It is VERY IMPORTANT that prior to running this batch file, you open it in an editor such as notepad and read the
echo following sections: PURPOSE OF THIS SCRIPT, SUMMARY OF INSTRUCTIONS, DETAILED INSTRUCTIONS. Make certain to set the
echo user defined variables as instructed.
echo.
echo If you have not done so, please press CTRL + C to terminate this batch file, and then run it again after you perform
echo the above steps.
echo.
pause


::::::::::::::::::::::::::::::::::::::::::::::::::::::::::::::::::::::::::::::::::::::::::::::::::::::::::::
:: Save the current location where this batch file is being run, then run the the "DandISetEnv.bat" file  ::
:: which sets environment variables for the ADK. This also changes the current directory, which we do NOT ::
:: want, so we will change it back to the current directory.                                              ::
::::::::::::::::::::::::::::::::::::::::::::::::::::::::::::::::::::::::::::::::::::::::::::::::::::::::::::


pushd %~dp0
call "%ADK_Location%\DandISetEnv.bat"
popd


::::::::::::::::::::::::::::::::::::::::::::::::::::::::::::::::::::::::::::::::::::::::::::::
:: Ask user for location of mounted ISO image or the directory containing the Windows files ::
::::::::::::::::::::::::::::::::::::::::::::::::::::::::::::::::::::::::::::::::::::::::::::::


:GetSourcePath

cls
echo Enter the path to the SOURCE where your Windows files are located below.
echo.
echo Note that these files can be located in a folder on your HDD, SSD, flash drive, etc. or they can be located on an ISO
echo image that you have mounted.
echo.
echo Tip: The path can end with or without a backslash (\). D:, D:\, D:\ISO_Files, D:\ISO_Files\ are all valid paths.
echo.

:GetSourcePath

set /p SourcePath="Enter source path: "

:: Add a trailing backslash (\) if one does not exist

IF NOT "%SourcePath:~-1%"=="\" (
set SourcePath=%SourcePath%\
)


:::::::::::::::::::::::::::::::::::::::::::::::::::::::::::::::::::::::::::::::::::::::::::::::::::::::::::::::::
:: Any valid Windows boot media will have a file called "boot\bootfix.bin" on the drive. This is true for both ::
:: single architecture images (x64 or x86) or for images with dual architectures. We will do a simple check to ::
:: see if such a file exists as a basic test for a valid source image location.                                ::
:::::::::::::::::::::::::::::::::::::::::::::::::::::::::::::::::::::::::::::::::::::::::::::::::::::::::::::::::


if NOT EXIST "%SourcePath%boot\bootfix.bin" (
cls
echo The location that you specified does not contain a valid Windows image. Please try another location. If you are
echo specifying a location on disk, please be sure to specify the location to the root of the Windows image. If you
echo are using an ISO image, you should double-click the ISO image to mount it and note the drive letter to which it
echo was mounted.
echo.
pause
goto GetSourcePath
)

:: Finally, all preparation is done. We can now begin the update process.

cls
echo ***************************************************************
echo **                                                           **
echo ** PLEASE BE PATIENT! Applying updates is a lengthy process. **
echo **                                                           **
echo ***************************************************************
echo.

:: Create the initial directory structure for this project

md "%ProjectFolder%\Mount" > NUL 2>&1
md "%ProjectFolder%\WinRE" > NUL 2>&1
md "%ProjectFolder%\WinRE_Mount" > NUL 2>&1
md "%ProjectFolder%\WinPE" > NUL 2>&1
md "%ProjectFolder%\WinPE_Mount" > NUL 2>&1
md "%ProjectFolder%\Assets" > NUL 2>&1
md "%ProjectFolder%\Temp" > NUL 2>&1
md "%ProjectFolder%\Base" > NUL 2>&1
md "%ProjectFolder%\SSU" > NUL 2>&1

:: Copy the ISO image files to base folder

echo ****************************************
echo * Copy Windows files to working folder *
echo ****************************************
echo.


::::::::::::::::::::::::::::::::::::::::::::::::::::::::::::::::::::::::::::::::::::::::::
:: Note: Because the source path end with a backslash, and this is seen as an escape    ::
:: when followed by the double quotes, we have to add a space before the double quotes. ::
:: Also, we need to make sure that the files we are working with are accessible, so     ::
:: we are stripping the read-only, hidden, and system attributes from the files.        ::
::::::::::::::::::::::::::::::::::::::::::::::::::::::::::::::::::::::::::::::::::::::::::


robocopy "%SourcePath% " "%ProjectFolder%\Base" /mir /a-:HSR > NUL

:: Mount the install.wim file

echo ****************************************
echo * Mounting main OS image (install.wim) *
echo ****************************************
echo.

DISM /mount-image /imagefile:"%ProjectFolder%\Base\sources\install.wim" /index:%IndexNum% /mountdir:"%ProjectFolder%\Mount" > NUL

:: Update Win RE

echo ******************************
echo * Updating WinRE (winre.wim) *
echo ******************************
echo.
echo    ***************************
echo    * Applying Standalone SSU *
echo    ***************************
echo.

copy /B "%ProjectFolder%\Mount\Windows\System32\Recovery\WinRE.wim" "%ProjectFolder%\WinRE" > NUL
DISM /mount-image /imagefile:"%ProjectFolder%\WinRE\WinRE.wim" /index:1 /mountdir:"%ProjectFolder%\WinRE_Mount" > NUL

DISM /Add-Package /Image:"%ProjectFolder%\WinRE_Mount" /PackagePath="%WinUpdates%\SSU" > NUL

echo    ************************************************
echo    * Applying SSU from combined LCU / SSU package *
echo    ************************************************
echo.

::::::::::::::::::::::::::::::::::::::::::::::::::::::::::::::::::::::::::::::::::::::::::::::::::::::::::::::::::
:: We are now applying the SSU from the combined SSU / LCU package. Note that since the SSU is contained within ::
:: the combined SSU / LCU package, we first need to extract the SSU from that package. Once we have extracted   ::
:: the SSU package, we can use it here and later when we also apply the SSU to WinPE (boot.wim) and the main    ::
:: Windows image (install.wim). We will not need to extract the SSU again since we are already doing so here.   ::
::::::::::::::::::::::::::::::::::::::::::::::::::::::::::::::::::::::::::::::::::::::::::::::::::::::::::::::::::

expand "%WinUpdates%\LCU\*.msu" /f:SSU*.cab "%ProjectFolder%\SSU" > NUL
DISM /Add-Package /Image:"%ProjectFolder%\WinRE_Mount" /PackagePath="%ProjectFolder%\SSU" > NUL

::::::::::::::::::::::::::::::::::::::::::::::::::::::::::::::::::::::::::::::::::::::::::::::::::::::::::::::
:: Microsoft documentation indicates that the LCU package does NOT get applied to the WinRE.wim. However,   ::
:: testing related to a Windows vulnerability in Jan of 2023 reveals that it is necessary to apply the LCU. ::
:: As a result, this batch file has been updated as of Jan 2023 to apply the SSU, LCU, and Safe OS Dynamic  ::
:: Updates.                                                                                                 ::
::::::::::::::::::::::::::::::::::::::::::::::::::::::::::::::::::::::::::::::::::::::::::::::::::::::::::::::

echo    ***********************************
echo    * Applying Safe OS Dynamic Update *
echo    ***********************************
echo.

DISM /Add-Package /Image:"%ProjectFolder%\WinRE_Mount" /PackagePath="%WinUpdates%\SafeOS_DU" > NUL

if %EnableLogs%==1 (
DISM /Get-Packages /image:"%ProjectFolder%\WinRE_Mount" > WinRE_Before_Cleanup.txt
)

echo    ************************************
echo    * Cleaning up old files from image *
echo    ************************************
echo.

DISM /Cleanup-Image /Image:"%ProjectFolder%\WinRE_Mount" /StartComponentCleanup > NUL

if %EnableLogs%==1 (
DISM /Get-Packages /image:"%ProjectFolder%\WinRE_Mount" > WinRE_After_Cleanup.txt
)

echo    ********************
echo    * Unmounting image *
echo    ********************
echo.

DISM /Unmount-Image /MountDir:"%ProjectFolder%\WinRE_Mount" /Commit > NUL

echo    *************************
echo    * Exporting WinRE image *
echo    *************************
echo.

DISM /Export-Image /SourceImageFile:"%ProjectFolder%\WinRE\WinRE.wim" /SourceIndex:1 /DestinationImageFile:"%ProjectFolder%\Assets\WinRE.wim" > NUL


:::::::::::::::::::::::::::::::::::::::::::::::::::::::::::::::::::::::::::::::::::::::::::::::::::::::::::::::::::::::::::::::::::::
:: It is possible that the user may wish to save a copy of the WinRE.wim file. As an example, in Jan 2023 a vulnerability required ::
:: that the WinRE on a running system be updated to avoid an exploit that could allow access to a BitLocker encrypted OS volume    ::
:: from the Recovery Environment. Unfortunatley, there may not be enough room on the Recovery volume to update this file in place. ::
:: If the users chooses to save the WinRE.wim, we will save a copy to the same place where the final ISO image is saved.           ::
:::::::::::::::::::::::::::::::::::::::::::::::::::::::::::::::::::::::::::::::::::::::::::::::::::::::::::::::::::::::::::::::::::::


if %SaveWinRE%==1 (
copy /B /Y "%ProjectFolder%\Assets\WinRE.wim" "%ProjectFolder%" > NUL
)

echo **********************************
echo * Updating main OS (install.wim) *
echo **********************************
echo.

echo    ***************************
echo    * Applying Standalone SSU *
echo    ***************************
echo.

DISM /Add-Package /Image:"%ProjectFolder%\Mount" /PackagePath="%WinUpdates%\SSU" > NUL

echo    ************************************************
echo    * Applying SSU from combined LCU / SSU package *
echo    ************************************************
echo.

DISM /Add-Package /Image:"%ProjectFolder%\Mount" /PackagePath="%ProjectFolder%\SSU" > NUL

echo    ****************
echo    * Applying LCU *
echo    ****************
echo.

DISM /Add-Package /Image:"%ProjectFolder%\Mount" /PackagePath="%WinUpdates%\LCU" > NUL

echo    ********************************************************
echo    * Move updated winre.wim back into mounted install.wim *
echo    ********************************************************
echo.

move /Y "%ProjectFolder%\Assets\WinRE.wim" "%ProjectFolder%\Mount\Windows\System32\Recovery" > NUL

if %EnableLogs%==1 (
DISM /Get-Packages /image:"%ProjectFolder%\Mount" > MainOS_Before_Cleanup.txt
)

echo    ************************************
echo    * Cleaning up old files from image *
echo    ************************************
echo.

DISM /Cleanup-Image /Image:"%ProjectFolder%\Mount" /StartComponentCleanup /ResetBase /ScratchDir:"%ProjectFolder%\Temp" > NUL

if %EnableLogs%==1 (
DISM /Get-Packages /image:"%ProjectFolder%\Mount" > MainOS_After_Cleanup.txt
)

echo    *************************************************************************************************
echo    * Install "Other" updates such as .NET and OOBE ZDP updates to the main OS image (install.wim). *
echo    *************************************************************************************************
echo.

DISM /Add-Package /Image:"%ProjectFolder%\Mount" /PackagePath="%WinUpdates%\Other" > NUL


:::::::::::::::::::::::::::::::::::::::::::::::::::::::::::::::::::::::::::::::::::::::::::::::::::::::::::::::
:: We could copy files from the mounted install.wim now but just as with the boot.wim we will delay doing so ::
:: until after the Setup Dynamic Update has been applied.                                                    ::
:::::::::::::::::::::::::::::::::::::::::::::::::::::::::::::::::::::::::::::::::::::::::::::::::::::::::::::::


echo **************************************
echo * Updating WinPE (boot.wim), index 1 *
echo **************************************
echo.

copy /B "%ProjectFolder%\Base\sources\boot.wim" "%ProjectFolder%\WinPE" > NUL
DISM /mount-image /imagefile:"%ProjectFolder%\WinPE\boot.wim" /index:1 /mountdir:"%ProjectFolder%\WinPE_Mount" > NUL

echo    ***************************
echo    * Applying Standalone SSU *
echo    ***************************
echo.

DISM /Add-Package /Image:"%ProjectFolder%\WinPE_Mount" /PackagePath="%WinUpdates%\SSU" > NUL

echo    ************************************************
echo    * Applying SSU from combined LCU / SSU package *
echo    ************************************************
echo.

DISM /Add-Package /Image:"%ProjectFolder%\WinPE_Mount" /PackagePath="%ProjectFolder%\SSU" > NUL

echo    ****************
echo    * Applying LCU *
echo    ****************
echo.

DISM /Add-Package /Image:"%ProjectFolder%\WinPE_Mount" /PackagePath="%WinUpdates%\LCU" > NUL

if %EnableLogs%==1 (
DISM /Get-Packages /image:"%ProjectFolder%\WinPE_Mount" > WinPE_Index1_Before_Cleanup.txt
)

echo    ************************************
echo    * Cleaning up old files from image *
echo    ************************************
echo.

DISM /Cleanup-Image /Image:"%ProjectFolder%\WinPE_Mount" /StartComponentCleanup > NUL

if %EnableLogs%==1 (
DISM /Get-Packages /image:"%ProjectFolder%\WinPE_Mount" > WinPE_Index1_After_Cleanup.txt
)

echo    ********************
echo    * Unmounting image *
echo    ********************
echo.

DISM /Unmount-Image /MountDir:"%ProjectFolder%\WinPE_Mount" /Commit > NUL

echo    **********************************
echo    * Exporting WinPE image, index 1 *
echo    **********************************
echo.

DISM /Export-Image /SourceImageFile:"%ProjectFolder%\WinPE\boot.wim" /SourceIndex:1 /DestinationImageFile:"%ProjectFolder%\Assets\boot.wim" > NUL

echo **************************************
echo * Updating WinPE (boot.wim), index 2 *
echo **************************************
echo.

DISM /mount-image /imagefile:"%ProjectFolder%\WinPE\boot.wim" /index:2 /mountdir:"%ProjectFolder%\WinPE_Mount" > NUL

echo    ***************************
echo    * Applying Standalone SSU *
echo    ***************************
echo.

DISM /Add-Package /Image:"%ProjectFolder%\WinPE_Mount" /PackagePath="%WinUpdates%\SSU" > NUL

echo    ************************************************
echo    * Applying SSU from combined LCU / SSU package *
echo    ************************************************
echo.

DISM /Add-Package /Image:"%ProjectFolder%\WinPE_Mount" /PackagePath="%ProjectFolder%\SSU" > NUL

echo    ****************
echo    * Applying LCU *
echo    ****************
echo.

DISM /Add-Package /Image:"%ProjectFolder%\WinPE_Mount" /PackagePath="%WinUpdates%\LCU" > NUL

echo    **************************************
echo    * Copy any user files to WinPE image *
echo    **************************************
echo.

robocopy "%ProjectFolder%\PE_Files" "%ProjectFolder%\WinPE_Mount" *.* /E > NUL

:: If you want to delete files from WinPE, such as scripts you may have added previously, uncommet the
:: line below and change the filename to the name of the file you want to delete. Add additional lines using
:: the same format if needed.

:: del "%ProjectFolder%\WinPE_Mount\MyScript.bat" /Q > NUL

if %EnableLogs%==1 (
DISM /Get-Packages /image:"%ProjectFolder%\WinPE_Mount" > WinPE_Index2_Before_Cleanup.txt
)

echo    ************************************
echo    * Cleaning up old files from image *
echo    ************************************
echo.

DISM /Cleanup-Image /Image:"%ProjectFolder%\WinPE_Mount" /StartComponentCleanup > NUL

if %EnableLogs%==1 (
DISM /Get-Packages /image:"%ProjectFolder%\WinPE_Mount" > WinPE_Index2_After_Cleanup.txt
)


:::::::::::::::::::::::::::::::::::::::::::::::::::::::::::::::::::::::::::::::::::::::::::::::::::::::::
:: We are going to delay exporting of the boot.wim index 2 until later so that we can copy files while ::
:: it is still mounted to the main media. We could this right now, but by delaying it until after the  ::
:: Setup Dynamic Update is applied, we can demonstrate that there are files that are out of sync after ::
:: all updates, including the Setup Dynamic Update, have been applied.                                 ::
:::::::::::::::::::::::::::::::::::::::::::::::::::::::::::::::::::::::::::::::::::::::::::::::::::::::::


echo ******************************
echo * Apply Setup Dynamic Update *
echo ******************************
echo.

Expand "%WinUpdates%\Setup_DU\*" -F:* "%ProjectFolder%\Base\Sources" > NUL

echo **************************************************
echo * Copy mismatched files to appropriate locations *
echo **************************************************
echo.


::::::::::::::::::::::::::::::::::::::::::::::::::::::::::::::::::::::::::::::::
:: The section below syncs files between Windows PE and the base media. It is ::
:: possible that some files which should be the same are not synced properly. ::
:: This section will correct that situation.                                  ::
::::::::::::::::::::::::::::::::::::::::::::::::::::::::::::::::::::::::::::::::


:::::::::::::::::::::::::::::::::::::::::::::::::::::::::::::::::::::::::::::::::::::::::::::::::::::::::::::::::::::::::::
:: These are the items that should be synced (In x64 Images):                                                            ::
::                                                                                                                       ::
:: From WinPE, Index 2, \Sources\Setup.exe > \Sources folder on base media.                                              ::
:: From WinPE, Index 2, \Windows\boot\efi\bootmgfw.efi > base media \efi\boot\bootx64.efi (replace the file bootx64.efi) ::
:: From WinPE, Index 2, \Windows\boot\efi\bootmgr.efi > base media \bootmgr.efi (replace the file bootmgr.efi)           ::
:::::::::::::::::::::::::::::::::::::::::::::::::::::::::::::::::::::::::::::::::::::::::::::::::::::::::::::::::::::::::::

copy /b /y "%ProjectFolder%\winpe_mount\sources\setup.exe" "%ProjectFolder%\Base\sources\setup.exe" > NUL
copy /b /y "%ProjectFolder%\winpe_mount\sources\setuphost.exe" "%ProjectFolder%\Base\sources\setuphost.exe" > NUL
copy /b /y "%ProjectFolder%\winpe_mount\windows\boot\efi\bootmgfw.efi" "%ProjectFolder%\Base\efi\boot\bootx64.efi" > NUL
copy /b /y "%ProjectFolder%\winpe_mount\windows\boot\efi\bootmgr.efi" "%ProjectFolder%\Base\bootmgr.efi" > NUL

echo ******************************************
echo * Unmounting index 2 of WinPE (boot.wim) *
echo ******************************************
echo.

DISM /Unmount-Image /MountDir:"%ProjectFolder%\WinPE_Mount" /Commit > NUL

echo    **********************************
echo    * Exporting WinPE Image, Index 2 *
echo    **********************************
echo.

DISM /Export-Image /Bootable /SourceImageFile:"%ProjectFolder%\WinPE\boot.wim" /SourceIndex:2 /DestinationImageFile:"%ProjectFolder%\Assets\boot.wim" > NUL

echo ****************************************
echo * Unmounting the Main OS (install.wim) *
echo ****************************************
echo.

DISM /Unmount-Image /MountDir:"%ProjectFolder%\Mount" /Commit > NUL

echo ***************************************
echo * Exporting the Main OS (install.wim) *
echo ***************************************
echo.

DISM /Export-Image /SourceImageFile:"%ProjectFolder%\Base\sources\install.wim" /SourceIndex:%IndexNum% /DestinationImageFile:"%ProjectFolder%\Assets\install.wim" > NUL

echo ******************************************************
echo * Move updated boot.wim and install.wim image folder *
echo * to replace the original files                      *
echo ******************************************************
echo.

move /Y "%ProjectFolder%\Assets\boot.wim" "%ProjectFolder%\Base\Sources" > NUL
move /Y "%ProjectFolder%\Assets\install.wim" "%ProjectFolder%\Base\Sources" > NUL

echo ******************************
echo * Create the final ISO image *
echo ******************************
echo.

oscdimg.exe -m -o -u2 -udfver102 -bootdata:2#p0,e,b"%ProjectFolder%\Base\boot\etfsboot.com"#pEF,e,b"%ProjectFolder%\Base\efi\microsoft\boot\efisys.bin" "%ProjectFolder%\Base" "%ProjectFolder%\%NewImageFileName%" > NUL 2>&1

:: Cleanup the temporary folders.

rd "%ProjectFolder%\Mount" /s /q > NUL
rd "%ProjectFolder%\winre" /s /q > NUL
rd "%ProjectFolder%\winre_mount" /s /q > NUL
rd "%ProjectFolder%\winpe" /s /q > NUL
rd "%ProjectFolder%\winpe_mount" /s /q > NUL
rd "%ProjectFolder%\assets" /s /q > NUL
rd "%ProjectFolder%\temp" /s /q > NUL
rd "%ProjectFolder%\Base" /s /q > NUL
rd "%ProjectFolder%\SSU" /s /q > NUL

echo Done! The ISO image has been saved as "%ProjectFolder%\%NewImageFileName%"
echo.
pause
If you have any questions at all, please do ask. I may not have all the answers readily available, but I've done a good bit with this so I have more than a rudimentary understanding of the topic but I continue to learn more every day :-). Between us, we should be able to figure this out.
 

Attachments

My Computers

System One System Two

  • OS
    Win11 Pro 24H2
    Computer type
    PC/Desktop
    Manufacturer/Model
    Self-built
    CPU
    Intel i7 11700K
    Motherboard
    ASUS Prime Z590-A MB
    Memory
    64GB (Waiting for warranty replacement of another 64GB for 128GB total)
    Graphics Card(s)
    No GPU - Built-in Intel Graphics
    Sound Card
    Integrated
    Monitor(s) Displays
    HP Envy 32
    Screen Resolution
    2560 x 1440
    Hard Drives
    1 x 1TB NVMe SSD
    1 x 2TB NVMe SSD
    1 x 4TB NVMe SSD
    3 x 512GB 2.5" SSD
    1 x 4TB 2.5" SSD
    5 x 8TB Seagate Barracuda HDD
    PSU
    Corsair HX850i
    Case
    Corsair iCUE RGB 5000X mid tower case
    Cooling
    Noctua NF-S12A chromax.black.swap case fans (Qty. 7) & Home Computer Specifications, Configuration, and Usage Notes General Specifications ASUS Prime Z590-A motherboard, serial number M1M0KC222467ARP Intel Core i7-11700K CPU (11th Gen Rocket Lake / LGA 1200 Socket) 128GB Crucial Ballistix RGB DDR4 3200 MHz DRAM (4 x 32GB) Corsair iCUE RGB 5000X mid tower case Noctua NH-D15 chromax.black CPU cooler Noctua NF-S12A chromax.black.swap case fans (Qty. 7) & Corsair LL-120 RGB Fans (Qty. 3)
    Keyboard
    Corsair K70 Max RGB Magnetic Keyboard
    Mouse
    Logitech MX Master 3
    Internet Speed
    1Gb Up / 1 Gb Down
    Browser
    Edge
    Antivirus
    Windows Defender
    Other Info
    The five 8TB drives and three 512GB SSDs are part of a DrivePool using StableBit DrivePool software. The three SSDs are devoted purely to caching for the 8TB drives. All of the important data is stored in triplicate so that I can withstand simultaneous failure of 2 disks.

    Networking: 2.5Gbps Ethernet and WiFi 6e
  • Operating System
    Win11 Pro 23H2
    Computer type
    Laptop
    Manufacturer/Model
    Lenovo ThinkBook 13x Gen 2
    CPU
    Intel i7-1255U
    Memory
    16 GB
    Graphics card(s)
    Intel Iris Xe Graphics
    Sound Card
    Realtek® ALC3306-CG codec
    Monitor(s) Displays
    13.3-inch IPS Display
    Screen Resolution
    WQXGA (2560 x 1600)
    Hard Drives
    2 TB 4 x 4 NVMe SSD
    PSU
    USB-C / Thunderbolt 4 Power / Charging
    Mouse
    Buttonless Glass Precision Touchpad
    Keyboard
    Backlit, spill resistant keyboard
    Internet Speed
    1Gb Up / 1Gb Down
    Browser
    Edge
    Antivirus
    Windows Defender
    Other Info
    WiFi 6e / Bluetooth 5.1 / Facial Recognition / Fingerprint Sensor / ToF (Time of Flight) Human Presence Sensor
One good thing about today's updates:

There has been a known issue with some fingerprint sensors not working over the past few months. My laptop was one of the ones affected with a Goodix fingerprint sensor. Today's updates have resolved that issue, at least on my system.
 

My Computers

System One System Two

  • OS
    Win11 Pro 24H2
    Computer type
    PC/Desktop
    Manufacturer/Model
    Self-built
    CPU
    Intel i7 11700K
    Motherboard
    ASUS Prime Z590-A MB
    Memory
    64GB (Waiting for warranty replacement of another 64GB for 128GB total)
    Graphics Card(s)
    No GPU - Built-in Intel Graphics
    Sound Card
    Integrated
    Monitor(s) Displays
    HP Envy 32
    Screen Resolution
    2560 x 1440
    Hard Drives
    1 x 1TB NVMe SSD
    1 x 2TB NVMe SSD
    1 x 4TB NVMe SSD
    3 x 512GB 2.5" SSD
    1 x 4TB 2.5" SSD
    5 x 8TB Seagate Barracuda HDD
    PSU
    Corsair HX850i
    Case
    Corsair iCUE RGB 5000X mid tower case
    Cooling
    Noctua NF-S12A chromax.black.swap case fans (Qty. 7) & Home Computer Specifications, Configuration, and Usage Notes General Specifications ASUS Prime Z590-A motherboard, serial number M1M0KC222467ARP Intel Core i7-11700K CPU (11th Gen Rocket Lake / LGA 1200 Socket) 128GB Crucial Ballistix RGB DDR4 3200 MHz DRAM (4 x 32GB) Corsair iCUE RGB 5000X mid tower case Noctua NH-D15 chromax.black CPU cooler Noctua NF-S12A chromax.black.swap case fans (Qty. 7) & Corsair LL-120 RGB Fans (Qty. 3)
    Keyboard
    Corsair K70 Max RGB Magnetic Keyboard
    Mouse
    Logitech MX Master 3
    Internet Speed
    1Gb Up / 1 Gb Down
    Browser
    Edge
    Antivirus
    Windows Defender
    Other Info
    The five 8TB drives and three 512GB SSDs are part of a DrivePool using StableBit DrivePool software. The three SSDs are devoted purely to caching for the 8TB drives. All of the important data is stored in triplicate so that I can withstand simultaneous failure of 2 disks.

    Networking: 2.5Gbps Ethernet and WiFi 6e
  • Operating System
    Win11 Pro 23H2
    Computer type
    Laptop
    Manufacturer/Model
    Lenovo ThinkBook 13x Gen 2
    CPU
    Intel i7-1255U
    Memory
    16 GB
    Graphics card(s)
    Intel Iris Xe Graphics
    Sound Card
    Realtek® ALC3306-CG codec
    Monitor(s) Displays
    13.3-inch IPS Display
    Screen Resolution
    WQXGA (2560 x 1600)
    Hard Drives
    2 TB 4 x 4 NVMe SSD
    PSU
    USB-C / Thunderbolt 4 Power / Charging
    Mouse
    Buttonless Glass Precision Touchpad
    Keyboard
    Backlit, spill resistant keyboard
    Internet Speed
    1Gb Up / 1Gb Down
    Browser
    Edge
    Antivirus
    Windows Defender
    Other Info
    WiFi 6e / Bluetooth 5.1 / Facial Recognition / Fingerprint Sensor / ToF (Time of Flight) Human Presence Sensor
Installed KB5050009 OS Build 26100.2894 and KB5049622 Cumulative Update for .NET Framework in 10-15 minutes on 3 laptops, no issues, DISM online and SFC finished OK. I noticed when Power mode in Power & Battery settings is set to Best Power Efficiency the system will suspend (turn off the screen) after 2-3 minutes even when Sleep etc. is set to Never in Advanced Power settings, in Balanced mode no issues. I believe this is a new power saving feature that cannot be overridden.
 

My Computers

System One System Two

  • OS
    Windows 11 Home 24H2 build: 26100.3037
    Computer type
    Laptop
    Manufacturer/Model
    Acer Predator PHN16-71-50JG
    CPU
    Intel i5-13500HX 2500 Mhz, 14 cores, 20 l. processors
    Motherboard
    RPL, Compass RTX, V1.18
    Memory
    16 GB DDR5-4800MT/s in Dual Channel mode
    Graphics Card(s)
    Intel UHD + NVIDIA GeForce RTX 4050
    Sound Card
    RealTek + Intel Smart Sound and Nvidia HD Audio
    Monitor(s) Displays
    IPS 16", AR16:10,
    Screen Resolution
    1920x1200x165Hz
    Hard Drives
    SK Hynix 512GB PCIe NVMe Gen4x4 M.2 2280 SSD
    PSU
    Power adapter Delta 230W, 4-cell 90 Wh Li-Ion battery
    Case
    Polycarbonate with a metal panel lid
    Cooling
    2 fans
    Keyboard
    US RGB white keys
    Mouse
    Precision Trackpad
    Internet Speed
    15 Mb/s
    Browser
    Edge
    Antivirus
    Windows Defender
    Other Info
    BIOS: Insyde Software 5.44.1.18 dated: 21/8/2024
    Wi-Fi 6 AX 1650i, Gigabit Ethernet, Network (RJ-45) port
  • Operating System
    Windows 11 Home 24H2 build 26100.3037
    Computer type
    Laptop
    Manufacturer/Model
    Asus Vivobook K3502Z S15 15" OLED
    CPU
    Intel 12th Gen. i7 12700H, 14 cores, 2.3 GHz (24M Cache, up to 4.7 GHz, 6P+8E cores)
    Motherboard
    Alder Lake-H, 1700-4700 MHz clock rate
    Memory
    8GB LPDDR4 on board + 8GB LPDDR4 3200 MHz in Dual Channel.
    Graphics card(s)
    Intel Iris Xe supports up to 4096 x 2304 @ 120Hz
    Sound Card
    Harman Kardon - DTS
    Monitor(s) Displays
    OLED 15.6inch 2.8K (2880 x 1620)
    Screen Resolution
    16:9 aspect ratio 0.2ms response time 120Hz refresh rate, 550nits
    Hard Drives
    512GB M.2 NVMe Gen4 PCIe 4.0 SSD, Micron_2450_MTFDKBA512TFK
    PSU
    90-Watt USB charger (Thunderbolt4)
    Case
    Metal lid, plastic case
    Cooling
    1 fan
    Mouse
    Precision Trackpad
    Keyboard
    With adjustable backlight
    Internet Speed
    ISP provides 15 mb/s WIFI LTE (4G), laptop WIFI 6 adapter.
    Browser
    Edge
    Antivirus
    Windows Defender
    Other Info
    BIOS American Megatrends International, LLC. 10.1.2.312, 13/03/2024. Network adapter: Intel Wi-Fi 6E AX211 160 MHz
Explorer 3 dot problem drop up fixed now on my ARM laptop, but not on my AMD desktop.
 

My Computers

System One System Two

  • OS
    Windows 11
    Computer type
    PC/Desktop
    Manufacturer/Model
    Home built
    CPU
    Ryzen 3900x
    Motherboard
    Gigabyte Aorus Master x570 rel 1.0
    Memory
    32GB (2x16) @ 3600 MHz Corsair Vengeance LPX
    Graphics Card(s)
    Gigabyte Windforce RTX 2080
    Sound Card
    No separate sound card.
    Monitor(s) Displays
    Dell U2718Q
    Screen Resolution
    3840x2160
    Hard Drives
    1TB WD-Black SN850; 1TB Samsung Sata 850 Evo; 4 TB WD Blue Sata SA510 2.5''; 4TB Samsung Sata SSD 870 EVO 2.5".
    PSU
    Be Quiet Dark Power Pro 11 750W
    Case
    Lian Li PC-8FIB
    Cooling
    CPU: Noctua NH-U12A; Case: BeQuiet + Lian Li fans.
    Keyboard
    Steelseries Apex 7 brown keys.
    Mouse
    Logitech (wired) G403
    Internet Speed
    940 Mb/s down; 105 Mb/s up
    Browser
    Edge (Chromium)
    Antivirus
    Eset Internet Security
    Other Info
    Pioneer blu-ray optical drive.
  • Operating System
    Windows 11 Home (ARM version) (latest update)
    Computer type
    Laptop
    Manufacturer/Model
    Samsung Galaxy Book4 Edge 14" Copilot+ PC
    CPU
    Qualcomm Snapdragon X Elite X1E-80-100
    Memory
    16 GB LPDDR5
    Graphics card(s)
    Qualcomm Adreno
    Monitor(s) Displays
    Touch screen 14" AMOLED monitor
    Screen Resolution
    2880x1800
    Hard Drives
    512 GB eUFS
    Internet Speed
    840 Mb/s (Wifi)
    Browser
    Edge Chromium
    Antivirus
    Eset Internet Security
    Other Info
    NPU Qualcomm Hexagon
Explorer 3 dot problem drop up fixed now on my ARM laptop, but not on my AMD desktop.


You can use Vivetool to fix it on the AMD desktop.


My Computers

System One System Two

  • OS
    Win 11 Home ♦♦♦26100.3037 ♦♦♦♦♦♦♦24H2 ♦♦♦non-Insider
    Computer type
    PC/Desktop
    Manufacturer/Model
    Built by Ghot® [May 2020]
    CPU
    AMD Ryzen 7 3700X
    Motherboard
    Asus Pro WS X570-ACE (BIOS 4702)
    Memory
    G.Skill (F4-3200C14D-16GTZKW)
    Graphics Card(s)
    EVGA RTX 2070 (08G-P4-2171-KR)
    Sound Card
    Realtek ALC1220P / ALC S1220A
    Monitor(s) Displays
    Dell U3011 30"
    Screen Resolution
    2560 x 1600
    Hard Drives
    2x Samsung 860 EVO 500GB,
    WD 4TB Black FZBX - SATA III,
    WD 8TB Black FZBX - SATA III,
    DRW-24B1ST CD/DVD Burner
    PSU
    PC Power & Cooling 750W Quad EPS12V
    Case
    Cooler Master ATCS 840 Tower
    Cooling
    CM Hyper 212 EVO (push/pull)
    Keyboard
    Ducky DK9008 Shine II Blue LED
    Mouse
    Logitech Optical M-100
    Internet Speed
    300/300
    Browser
    Firefox (latest)
    Antivirus
    Bitdefender Internet Security
    Other Info
    Speakers: Klipsch Pro Media 2.1
  • Operating System
    Windows XP Pro 32bit w/SP3
    Computer type
    PC/Desktop
    Manufacturer/Model
    Built by Ghot® (not in use)
    CPU
    AMD Athlon 64 X2 5000+ (OC'd @ 3.2Ghz)
    Motherboard
    ASUS M2N32-SLI Deluxe Wireless Edition
    Memory
    TWIN2X2048-6400C4DHX (2 x 1GB, DDR2 800)
    Graphics card(s)
    EVGA 256-P2-N758-TR GeForce 8600GT SSC
    Sound Card
    Onboard
    Monitor(s) Displays
    ViewSonic G90FB Black 19" Professional (CRT)
    Screen Resolution
    up to 2048 x 1536
    Hard Drives
    WD 36GB 10,000rpm Raptor SATA
    Seagate 80GB 7200rpm SATA
    Lite-On LTR-52246S CD/RW
    Lite-On LH-18A1P CD/DVD Burner
    PSU
    PC Power & Cooling Silencer 750 Quad EPS12V
    Case
    Generic Beige case, 80mm fans
    Cooling
    ZALMAN 9500A 92mm CPU Cooler
    Mouse
    Logitech Optical M-BT96a
    Keyboard
    Logitech Classic Keybooard 200
    Internet Speed
    300/300
    Browser
    Firefox 3.x ??
    Antivirus
    Symantec (Norton)
    Other Info
    Still assembled, still runs. Haven't turned it on for 13 years?
Is this one already up on the MS download page to make a bootable USB?
 

My Computers

System One System Two

  • OS
    Windows 11 Pro x64 24H2 v26100.3037
    Computer type
    PC/Desktop
    Manufacturer/Model
    Built Myself in 2017
    CPU
    AMD Ryzen 1800X 8-Core @ 3.60GHz
    Motherboard
    Asus Crosshair VI Hero
    Memory
    16GB G.Skill Trident Z RGB Series
    Graphics Card(s)
    EVGA GeForce gtx 1660 Super
    Sound Card
    On Board
    Monitor(s) Displays
    2 X AOC 27" , PLANAR 22"
    Screen Resolution
    1920 X 1080
    Hard Drives
    ~~~~~~~~~~~~~~~~~~~~~~~~~~
    ~ P34A60 512GB NVMe PCIe Gen3x4 M.2
    ~ 6TB Toshiba HDD
    ~ 6TB HDD (Backup)
    ~ SanDisk 250GB SSD
    ~ 2 X 1TB HDD
    ~~~~~~~~~~
    PSU
    Corsair RM850 Fully Modular (850watts)
    Case
    NZXT Phantom 630 CA-PH630-W1
    Cooling
    CORSAIR iCUE H100i RGB PRO XT
    Keyboard
    Nulea RT05 Wireless Ergonomic
    Mouse
    Nulea MD280 Wireless Vertical Mouse
    Internet Speed
    761Mbps (Download) / 692Mbps (Upload)
    Browser
    Firefox
    Antivirus
    Malwarebytes
    Other Info
    *This is my Main Computer That I use*
  • Operating System
    Windows 11 Pro x64 24H2 v26100.2894
    Computer type
    PC/Desktop
    Manufacturer/Model
    HP
    CPU
    Intel Xeon E3-1246 v3 @ 3.50GHz
    Memory
    16GB
    Graphics card(s)
    AMD Radeon R7 350X
    Sound Card
    onBoard
    Monitor(s) Displays
    eMachine 22"
    Screen Resolution
    1920 X 1080
    Hard Drives
    250GB SSD
    Cooling
    Fan
    Mouse
    Nulea MD280
    Internet Speed
    752Mbps (Download) / 537Mbps (Upload)
    Browser
    Firefox
    Antivirus
    Malwarebytes
    Other Info
    I use this computer for photo/video editing and to track severe weather
I've yet to get out of 23H2 Beta... just a Q for everyone: How is your internet with 24H2? I know some people had problems with certain WiFi and Ethernet drivers when they updated to 24H2. If anyone is using Intel or Intel Killer drivers, is all fine with 24H2?

My Intel 7265 Wireless Dual Band wouldn't detect DHCP. Going into Advanced and choosing 4. for GHZ 2.4 fixed the issue.
 

My Computers

System One System Two

  • OS
    Windows 11 Pro 24H2
    Computer type
    Laptop
    Manufacturer/Model
    HP ZBook G2
    CPU
    Intel® Core i7 5500u
    Motherboard
    HP
    Memory
    8 GB
    Graphics Card(s)
    Intel HD Family Graphics AMD Firepro 4150M
    Sound Card
    Realtek High Audio
    Hard Drives
    1 TB SSD
    Mouse
    HP USB Mouse
    Antivirus
    Zone Alarm Free Antivirus/Zone Alarm Free Firewall NEXT GEN
  • Operating System
    Windows 11 Pro 24H2
    Computer type
    Laptop
    Manufacturer/Model
    HP Zbook G4
    CPU
    Xeon 1535m v6
    Motherboard
    HP
    Memory
    32 GB
    Graphics card(s)
    AMD Quadro Pro 4100
    Sound Card
    Bang and Olufson Audio
    Hard Drives
    1TB SSD
    Mouse
    HP USB Mouse
    Antivirus
    Zone Alarm Free Antivirus/Zone Alarm Free Firewall NEXT GEN
Funny Thing since the Major 24H2 Update is, that every Update after this, breaks the Component Store.

The System is working fine after a clean install with MCT but when the first Update comes in and you check with DISM after it, there´s a corruption detected. DISM can repair and everything is fine after that. With 23H2 (test with clean install) there is no such Bug.

What i have found is this Error Message:

Problemereignisame: WindowsWcpOtherFailure3
OsVersion: 10.0.26100.2890:1
File: wcp\componentstore\storelayout.cpp
Function: ComponentStore::CRawStoreLayout::OpenComponentFile
Line: 2176
Status: 800f0983
StackHash: 0xfc30e845
Betriebsystemversion: 10.0.26100.2.0.0.256.48
Gebietsschema-ID: 1031

and this:

Problemereignisame: WindowsWcpOtherFailure3
OsVersion: 10.0.26100.2592:1
File: wcp\componentstore\scavenge.cpp
Function: ComponentStore::CRawStoreLayout::RetainFileAsVersion
Line: 1977
Status: c015001b
StackHash: 0x29b7d989
Betriebsystemversion: 10.0.26100.2.0.0.256.48
Gebietsschema-ID: 1031


Imho this Error is the Culprit, because this means that the cleaning of Component Store ist not working probably.
 

My Computer

System One

  • OS
    Windows 11
    Computer type
    PC/Desktop
    CPU
    Ryzen 7 5700X3D
    Motherboard
    ASUS B550-A Gaming
    Memory
    32GB DDR4 3600 Kingston Renegade
    Graphics Card(s)
    Powercolor 7800XT
    Sound Card
    Onboard ALC1220 Realtek
    Monitor(s) Displays
    Dell S3220DGF
    Screen Resolution
    1440p
    Hard Drives
    Samsung 1TB 980Pro - NVME
    Samsung 500GB 970 Evo - NVME
    PSU
    Corsair RM750
    Case
    Bequiet Pure Base
    Cooling
    Arctic Cooling Case Fans 140 x5 / Arctic Freezer 34 for CPU
    Keyboard
    Roccat Magma
    Mouse
    Roccat Burst Pro
    Internet Speed
    1gbit
    Browser
    Edge
    Antivirus
    Defender
    Other Info
    Windows 11 24H2 - 26100.2894
You can use Vivetool to fix it on the AMD desktop.

I virtually never use the three dot option, so it isn't an issue for me.
 

My Computers

System One System Two

  • OS
    Windows 11
    Computer type
    PC/Desktop
    Manufacturer/Model
    Home built
    CPU
    Ryzen 3900x
    Motherboard
    Gigabyte Aorus Master x570 rel 1.0
    Memory
    32GB (2x16) @ 3600 MHz Corsair Vengeance LPX
    Graphics Card(s)
    Gigabyte Windforce RTX 2080
    Sound Card
    No separate sound card.
    Monitor(s) Displays
    Dell U2718Q
    Screen Resolution
    3840x2160
    Hard Drives
    1TB WD-Black SN850; 1TB Samsung Sata 850 Evo; 4 TB WD Blue Sata SA510 2.5''; 4TB Samsung Sata SSD 870 EVO 2.5".
    PSU
    Be Quiet Dark Power Pro 11 750W
    Case
    Lian Li PC-8FIB
    Cooling
    CPU: Noctua NH-U12A; Case: BeQuiet + Lian Li fans.
    Keyboard
    Steelseries Apex 7 brown keys.
    Mouse
    Logitech (wired) G403
    Internet Speed
    940 Mb/s down; 105 Mb/s up
    Browser
    Edge (Chromium)
    Antivirus
    Eset Internet Security
    Other Info
    Pioneer blu-ray optical drive.
  • Operating System
    Windows 11 Home (ARM version) (latest update)
    Computer type
    Laptop
    Manufacturer/Model
    Samsung Galaxy Book4 Edge 14" Copilot+ PC
    CPU
    Qualcomm Snapdragon X Elite X1E-80-100
    Memory
    16 GB LPDDR5
    Graphics card(s)
    Qualcomm Adreno
    Monitor(s) Displays
    Touch screen 14" AMOLED monitor
    Screen Resolution
    2880x1800
    Hard Drives
    512 GB eUFS
    Internet Speed
    840 Mb/s (Wifi)
    Browser
    Edge Chromium
    Antivirus
    Eset Internet Security
    Other Info
    NPU Qualcomm Hexagon
I virtually never use the three dot option, so it isn't an issue for me.


Vivetool is not like other 3rd party tweaking tools.
It's just a way to turn Windows features (good or bad), that are already installed... on or off. :-)
 

My Computers

System One System Two

  • OS
    Win 11 Home ♦♦♦26100.3037 ♦♦♦♦♦♦♦24H2 ♦♦♦non-Insider
    Computer type
    PC/Desktop
    Manufacturer/Model
    Built by Ghot® [May 2020]
    CPU
    AMD Ryzen 7 3700X
    Motherboard
    Asus Pro WS X570-ACE (BIOS 4702)
    Memory
    G.Skill (F4-3200C14D-16GTZKW)
    Graphics Card(s)
    EVGA RTX 2070 (08G-P4-2171-KR)
    Sound Card
    Realtek ALC1220P / ALC S1220A
    Monitor(s) Displays
    Dell U3011 30"
    Screen Resolution
    2560 x 1600
    Hard Drives
    2x Samsung 860 EVO 500GB,
    WD 4TB Black FZBX - SATA III,
    WD 8TB Black FZBX - SATA III,
    DRW-24B1ST CD/DVD Burner
    PSU
    PC Power & Cooling 750W Quad EPS12V
    Case
    Cooler Master ATCS 840 Tower
    Cooling
    CM Hyper 212 EVO (push/pull)
    Keyboard
    Ducky DK9008 Shine II Blue LED
    Mouse
    Logitech Optical M-100
    Internet Speed
    300/300
    Browser
    Firefox (latest)
    Antivirus
    Bitdefender Internet Security
    Other Info
    Speakers: Klipsch Pro Media 2.1
  • Operating System
    Windows XP Pro 32bit w/SP3
    Computer type
    PC/Desktop
    Manufacturer/Model
    Built by Ghot® (not in use)
    CPU
    AMD Athlon 64 X2 5000+ (OC'd @ 3.2Ghz)
    Motherboard
    ASUS M2N32-SLI Deluxe Wireless Edition
    Memory
    TWIN2X2048-6400C4DHX (2 x 1GB, DDR2 800)
    Graphics card(s)
    EVGA 256-P2-N758-TR GeForce 8600GT SSC
    Sound Card
    Onboard
    Monitor(s) Displays
    ViewSonic G90FB Black 19" Professional (CRT)
    Screen Resolution
    up to 2048 x 1536
    Hard Drives
    WD 36GB 10,000rpm Raptor SATA
    Seagate 80GB 7200rpm SATA
    Lite-On LTR-52246S CD/RW
    Lite-On LH-18A1P CD/DVD Burner
    PSU
    PC Power & Cooling Silencer 750 Quad EPS12V
    Case
    Generic Beige case, 80mm fans
    Cooling
    ZALMAN 9500A 92mm CPU Cooler
    Mouse
    Logitech Optical M-BT96a
    Keyboard
    Logitech Classic Keybooard 200
    Internet Speed
    300/300
    Browser
    Firefox 3.x ??
    Antivirus
    Symantec (Norton)
    Other Info
    Still assembled, still runs. Haven't turned it on for 13 years?
Don't be scared of Vivetool. :-)

It's just a way to turn Windows features, that are already installed... on or off.
Not scared, just don't feel the need.
 

My Computers

System One System Two

  • OS
    Windows 11
    Computer type
    PC/Desktop
    Manufacturer/Model
    Home built
    CPU
    Ryzen 3900x
    Motherboard
    Gigabyte Aorus Master x570 rel 1.0
    Memory
    32GB (2x16) @ 3600 MHz Corsair Vengeance LPX
    Graphics Card(s)
    Gigabyte Windforce RTX 2080
    Sound Card
    No separate sound card.
    Monitor(s) Displays
    Dell U2718Q
    Screen Resolution
    3840x2160
    Hard Drives
    1TB WD-Black SN850; 1TB Samsung Sata 850 Evo; 4 TB WD Blue Sata SA510 2.5''; 4TB Samsung Sata SSD 870 EVO 2.5".
    PSU
    Be Quiet Dark Power Pro 11 750W
    Case
    Lian Li PC-8FIB
    Cooling
    CPU: Noctua NH-U12A; Case: BeQuiet + Lian Li fans.
    Keyboard
    Steelseries Apex 7 brown keys.
    Mouse
    Logitech (wired) G403
    Internet Speed
    940 Mb/s down; 105 Mb/s up
    Browser
    Edge (Chromium)
    Antivirus
    Eset Internet Security
    Other Info
    Pioneer blu-ray optical drive.
  • Operating System
    Windows 11 Home (ARM version) (latest update)
    Computer type
    Laptop
    Manufacturer/Model
    Samsung Galaxy Book4 Edge 14" Copilot+ PC
    CPU
    Qualcomm Snapdragon X Elite X1E-80-100
    Memory
    16 GB LPDDR5
    Graphics card(s)
    Qualcomm Adreno
    Monitor(s) Displays
    Touch screen 14" AMOLED monitor
    Screen Resolution
    2880x1800
    Hard Drives
    512 GB eUFS
    Internet Speed
    840 Mb/s (Wifi)
    Browser
    Edge Chromium
    Antivirus
    Eset Internet Security
    Other Info
    NPU Qualcomm Hexagon

My Computers

System One System Two

  • OS
    Win 11 Home ♦♦♦26100.3037 ♦♦♦♦♦♦♦24H2 ♦♦♦non-Insider
    Computer type
    PC/Desktop
    Manufacturer/Model
    Built by Ghot® [May 2020]
    CPU
    AMD Ryzen 7 3700X
    Motherboard
    Asus Pro WS X570-ACE (BIOS 4702)
    Memory
    G.Skill (F4-3200C14D-16GTZKW)
    Graphics Card(s)
    EVGA RTX 2070 (08G-P4-2171-KR)
    Sound Card
    Realtek ALC1220P / ALC S1220A
    Monitor(s) Displays
    Dell U3011 30"
    Screen Resolution
    2560 x 1600
    Hard Drives
    2x Samsung 860 EVO 500GB,
    WD 4TB Black FZBX - SATA III,
    WD 8TB Black FZBX - SATA III,
    DRW-24B1ST CD/DVD Burner
    PSU
    PC Power & Cooling 750W Quad EPS12V
    Case
    Cooler Master ATCS 840 Tower
    Cooling
    CM Hyper 212 EVO (push/pull)
    Keyboard
    Ducky DK9008 Shine II Blue LED
    Mouse
    Logitech Optical M-100
    Internet Speed
    300/300
    Browser
    Firefox (latest)
    Antivirus
    Bitdefender Internet Security
    Other Info
    Speakers: Klipsch Pro Media 2.1
  • Operating System
    Windows XP Pro 32bit w/SP3
    Computer type
    PC/Desktop
    Manufacturer/Model
    Built by Ghot® (not in use)
    CPU
    AMD Athlon 64 X2 5000+ (OC'd @ 3.2Ghz)
    Motherboard
    ASUS M2N32-SLI Deluxe Wireless Edition
    Memory
    TWIN2X2048-6400C4DHX (2 x 1GB, DDR2 800)
    Graphics card(s)
    EVGA 256-P2-N758-TR GeForce 8600GT SSC
    Sound Card
    Onboard
    Monitor(s) Displays
    ViewSonic G90FB Black 19" Professional (CRT)
    Screen Resolution
    up to 2048 x 1536
    Hard Drives
    WD 36GB 10,000rpm Raptor SATA
    Seagate 80GB 7200rpm SATA
    Lite-On LTR-52246S CD/RW
    Lite-On LH-18A1P CD/DVD Burner
    PSU
    PC Power & Cooling Silencer 750 Quad EPS12V
    Case
    Generic Beige case, 80mm fans
    Cooling
    ZALMAN 9500A 92mm CPU Cooler
    Mouse
    Logitech Optical M-BT96a
    Keyboard
    Logitech Classic Keybooard 200
    Internet Speed
    300/300
    Browser
    Firefox 3.x ??
    Antivirus
    Symantec (Norton)
    Other Info
    Still assembled, still runs. Haven't turned it on for 13 years?
Is Build 26100.2894 available on the MCT?
 

My Computers

System One System Two

  • OS
    Windows 11 Pro x64 24H2 v26100.3037
    Computer type
    PC/Desktop
    Manufacturer/Model
    Built Myself in 2017
    CPU
    AMD Ryzen 1800X 8-Core @ 3.60GHz
    Motherboard
    Asus Crosshair VI Hero
    Memory
    16GB G.Skill Trident Z RGB Series
    Graphics Card(s)
    EVGA GeForce gtx 1660 Super
    Sound Card
    On Board
    Monitor(s) Displays
    2 X AOC 27" , PLANAR 22"
    Screen Resolution
    1920 X 1080
    Hard Drives
    ~~~~~~~~~~~~~~~~~~~~~~~~~~
    ~ P34A60 512GB NVMe PCIe Gen3x4 M.2
    ~ 6TB Toshiba HDD
    ~ 6TB HDD (Backup)
    ~ SanDisk 250GB SSD
    ~ 2 X 1TB HDD
    ~~~~~~~~~~
    PSU
    Corsair RM850 Fully Modular (850watts)
    Case
    NZXT Phantom 630 CA-PH630-W1
    Cooling
    CORSAIR iCUE H100i RGB PRO XT
    Keyboard
    Nulea RT05 Wireless Ergonomic
    Mouse
    Nulea MD280 Wireless Vertical Mouse
    Internet Speed
    761Mbps (Download) / 692Mbps (Upload)
    Browser
    Firefox
    Antivirus
    Malwarebytes
    Other Info
    *This is my Main Computer That I use*
  • Operating System
    Windows 11 Pro x64 24H2 v26100.2894
    Computer type
    PC/Desktop
    Manufacturer/Model
    HP
    CPU
    Intel Xeon E3-1246 v3 @ 3.50GHz
    Memory
    16GB
    Graphics card(s)
    AMD Radeon R7 350X
    Sound Card
    onBoard
    Monitor(s) Displays
    eMachine 22"
    Screen Resolution
    1920 X 1080
    Hard Drives
    250GB SSD
    Cooling
    Fan
    Mouse
    Nulea MD280
    Internet Speed
    752Mbps (Download) / 537Mbps (Upload)
    Browser
    Firefox
    Antivirus
    Malwarebytes
    Other Info
    I use this computer for photo/video editing and to track severe weather

Latest Support Threads

Back
Top Bottom