Solved W11 24h2 and old installation setup


Windows PE and Windows Setup are basically the same image, except only one of them has Setup files.
ISO/USB boot only picks the image marked with Flag = 2.

WinPE is provided for IT & system modders who write their own custom deployment tools. And is the basis for Recovery tools like WinXPE. While you can apply changes to either image, Setup is the only one that matters.

For NTLite, you only need to check boot.wim (2) from "Reapply tasks across editions". Another way to perform this, is load one of the images from boot.wim directly, and add the Registry file. "Reapply tasks across editions" is a time saver so you don't need to do this separate step every time you work on a Windows image.
for "Reapply tasks across editions":
this REG file needs to be added under the NTLite/REG section first, then only selecting 'Microsoft Windows Setup (x64)' under the 'Reapply tasks across editions' makes sense & does the job.

This is one way of doing it, but in this, there are two downsides

1. for every ISO produced via NTL, this task will be a repetitive job to perform
&
2. That REG file will be added inside the install.wim as well, without any real effect

But If I load a 24H2 vanilla (26100.1 in my case) ISO into NTLite & load the Microsoft Windows Setup (x64)
& add this REG file only to it, and create/pack the ISO, then, in that case, I can use that ISO for further modification with install.wim,
without everytime doing the 'Reapply tasks across editions'

What do you say?
 

My Computers

System One System Two

  • OS
    Windows 11 Pro Latest Retail Build
    Computer type
    PC/Desktop
    Manufacturer/Model
    Gaming-Rig (Intel 13th Gen based Self-Assembled)
    CPU
    Intel 13th Gen i5-13600KF
    Motherboard
    MSI PRO Z790-A WIFI DDR5
    Memory
    Adata XPG LANCER RGB 32GB [16x2 Dual Channel] @7400 MT/s CL:36
    Graphics Card(s)
    Nvidia GeForce RTX 4060 Ti 16GB OC
    Sound Card
    Motherboard Realtek UDA DTS Audio
    Monitor(s) Displays
    Hisense 50" 4K QLED 120Hz
    Screen Resolution
    4096 * 2160 (4K)
    Hard Drives
    1. SSD1: NVME PCI-e Gen4x4 Kingstone KC3000 [500 GB]
    2. SSD2: NVME PCI-e Gen4x4 Adata XPG S70 Blade [1 TB]
    3. HDD 1: Seagate 4 TB
    4. HDD 2: WD BLUE 2TB
    PSU
    Deepcool 750W Gold Full Modular
    Case
    Deepcool CH510 MESH DIGITAL
    Cooling
    Deepcool AK400 Zero Dark Edition CPU Cooler + Arctic Chassis Fans
    Keyboard
    Razer Cynosa V2 RGB Gaming Keyboard
    Mouse
    Logitech G304 LIGHTSPEED Wireless Gaming Mouse
    Internet Speed
    100 Mbps Fiber Broadband
    Browser
    Chrome+Firefox (Latest always)
    Antivirus
    Eset Security Ultimate (Latest)
    Other Info
    My Gaming Configurations
  • Operating System
    Windows 11 Pro Latest Build
    Computer type
    PC/Desktop
    Manufacturer/Model
    Work Desktop (Intel 12th Gen based Self-Assembled)
    CPU
    Intel 12th Gen i5-12400
    Motherboard
    MSI MAG B760 Tomahawk WIFI
    Memory
    Crucial Ballistix DDR4 32GB [16x2 Dual Channel] @3600 CL:16
    Graphics card(s)
    Integrated iGPU
    Sound Card
    Motherboard Realtek UDA DTS Audio
    Monitor(s) Displays
    Sony Bravia 32" LED TV
    Screen Resolution
    1920 * 1080 (Full HD)
    Hard Drives
    1. SSD: NVME M.2 2280 Gen3x4 WD Blue SN570 250GB
    2. HDD: WD Blue 1TB @5400
    PSU
    Cooler Master MWE V2 750W Gold Fully Modular
    Case
    Cooler Master MasterBox MB540 ARGB
    Cooling
    Intel Stock CPU Cooler + Arctic Chassis Fans
    Mouse
    Logitech K295 Wireless M&K Combo
    Keyboard
    Logitech K295 Wireless M&K Combo
    Internet Speed
    100 Mbps Optical Fiber Broadband
    Browser
    Google+Firefox (Latest)
    Antivirus
    Eset Security Ultimate (Latest)
    Other Info
    My Workbench Configuration
Just my 2 cents worth regarding the question of adding items to the autounattend.xml: If you want to add something to an answer file, consider using the "Windows System Image Manager" which is a part of the ADK. It's extremely easy to use and will position anything that you add to the correct location automatically.

My suggestion is to take note of exactly what WSIM does, maybe by comparing it to your original answer file. It won't be long before you get a feel for how the answer file is laid out. In no time at all you will be manually editing your answer files like it was just another text document :-)

Another good way of learning is to follow one of Kari's outstanding tutorials. Just follow along with this and you should get a lot more familiar with the structure of the answer file.


My Computers

System One System Two

  • OS
    Win11 Pro 24H2
    Computer type
    PC/Desktop
    Manufacturer/Model
    Self-built
    CPU
    Intel i7 11700K
    Motherboard
    ASUS Prime Z590-A MB
    Memory
    64GB (Waiting for warranty replacement of another 64GB for 128GB total)
    Graphics Card(s)
    No GPU - Built-in Intel Graphics
    Sound Card
    Integrated
    Monitor(s) Displays
    HP Envy 32
    Screen Resolution
    2560 x 1440
    Hard Drives
    1 x 1TB NVMe SSD
    1 x 2TB NVMe SSD
    1 x 4TB NVMe SSD
    3 x 512GB 2.5" SSD
    1 x 4TB 2.5" SSD
    5 x 8TB Seagate Barracuda HDD
    PSU
    Corsair HX850i
    Case
    Corsair iCUE RGB 5000X mid tower case
    Cooling
    Noctua NF-S12A chromax.black.swap case fans (Qty. 7) & Home Computer Specifications, Configuration, and Usage Notes General Specifications ASUS Prime Z590-A motherboard, serial number M1M0KC222467ARP Intel Core i7-11700K CPU (11th Gen Rocket Lake / LGA 1200 Socket) 128GB Crucial Ballistix RGB DDR4 3200 MHz DRAM (4 x 32GB) Corsair iCUE RGB 5000X mid tower case Noctua NH-D15 chromax.black CPU cooler Noctua NF-S12A chromax.black.swap case fans (Qty. 7) & Corsair LL-120 RGB Fans (Qty. 3)
    Keyboard
    Corsair K70 Max RGB Magnetic Keyboard
    Mouse
    Logitech MX Master 3
    Internet Speed
    1Gb Up / 1 Gb Down
    Browser
    Edge
    Antivirus
    Windows Defender
    Other Info
    The five 8TB drives and three 512GB SSDs are part of a DrivePool using StableBit DrivePool software. The three SSDs are devoted purely to caching for the 8TB drives. All of the important data is stored in triplicate so that I can withstand simultaneous failure of 2 disks.

    Networking: 2.5Gbps Ethernet and WiFi 6e
  • Operating System
    Win11 Pro 23H2
    Computer type
    Laptop
    Manufacturer/Model
    Lenovo ThinkBook 13x Gen 2
    CPU
    Intel i7-1255U
    Memory
    16 GB
    Graphics card(s)
    Intel Iris Xe Graphics
    Sound Card
    Realtek® ALC3306-CG codec
    Monitor(s) Displays
    13.3-inch IPS Display
    Screen Resolution
    WQXGA (2560 x 1600)
    Hard Drives
    2 TB 4 x 4 NVMe SSD
    PSU
    USB-C / Thunderbolt 4 Power / Charging
    Mouse
    Buttonless Glass Precision Touchpad
    Keyboard
    Backlit, spill resistant keyboard
    Internet Speed
    1Gb Up / 1Gb Down
    Browser
    Edge
    Antivirus
    Windows Defender
    Other Info
    WiFi 6e / Bluetooth 5.1 / Facial Recognition / Fingerprint Sensor / ToF (Time of Flight) Human Presence Sensor
Hi, "long time reader, first time poster"

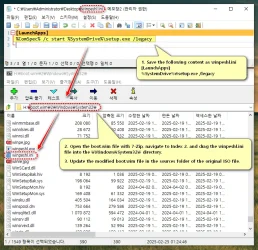
i manually added this REG fix (DISM mounted boot.wim, loaded SYSTEM hive and edited REG_SZ)

[HKEY_LOCAL_MACHINE\SYSTEM\Setup]
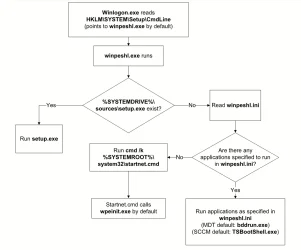
"CmdLine"="X:\\sources\\setup.exe"

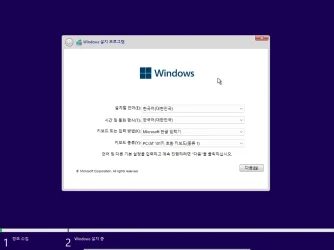
It still boots to new setup. Tips? Im playing around with ARM edition 24h2
 

My Computer

System One

  • OS
    Windows
try changing that back to winpeshl.exe

then use winpeshl.ini
 

My Computers

System One System Two

  • OS
    Win7,Win11
    Computer type
    PC/Desktop
    CPU
    i5-8400
    Motherboard
    gigabyte b365m ds3h
    Memory
    2x8gb 3200mhz
    Monitor(s) Displays
    benq gw2480
    PSU
    bequiet pure power 11 400CM
    Cooling
    cryorig m9i
  • Operating System
    win7,win11
    Computer type
    PC/Desktop
    CPU
    pentium g5400
    Motherboard
    gigabyte b365m ds3h
    Memory
    1x8gb 2400
    PSU
    xfx pro 450
Hello,

I think the forum rules are no duplicate posts but alas perhaps it's warranted here so will only link it in case someone in this thread my have ideas to solve this issue w/ audio cutouts post update to 24H2: Audio cutouts in MSFS 2020 after updating to 24H2

Thanks, and mods of course remove it if I've run afoul with this link!
 

My Computer

System One

  • OS
    Win 11 24H2
    Computer type
    PC/Desktop
    Manufacturer/Model
    OEM
    CPU
    7800X3D
    Motherboard
    MSI Pro 650-P Wifi
    Memory
    64Gb DDR5
    Graphics Card(s)
    RTX4090 FE
    Sound Card
    On motherboard, Realtek
    Monitor(s) Displays
    LG Ultragear 34" curved Gsync 3440x1440 HDR10, Dell 24" 1080P
Hello,

I think the forum rules are no duplicate posts but alas perhaps it's warranted here so will only link it in case someone in this thread my have ideas to solve this issue w/ audio cutouts post update to 24H2: Audio cutouts in MSFS 2020 after updating to 24H2

Thanks, and mods of course remove it if I've run afoul with this link!
I don't think your question is related. This thread is about running the new Setup vs. the legacy Setup client from a clean install.

If you have 24H2 issues, you can manually uninstall the audio driver and disable driver updates from Windows Updates. Reinstall an older version of the audio driver, and see if that makes any difference.
 

My Computer

System One

  • OS
    Windows 7

Latest Support Threads

Back
Top Bottom