What's the best way to clone Windows 11?


Jeepers - all these posts about sysprep. Total overkill if all devices are same.

@Ghot has provided simplest solution.

You rarely need sysprep these days on W10 or W11.
 

My Computer

System One

  • OS
    Windows 11 Pro + Win11 Canary VM.
    Computer type
    Laptop
    Manufacturer/Model
    ASUS Zenbook 14
    CPU
    I9 13th gen i9-13900H 2.60 GHZ
    Motherboard
    Yep, Laptop has one.
    Memory
    16 GB soldered
    Graphics Card(s)
    Integrated Intel Iris XE
    Sound Card
    Realtek built in
    Monitor(s) Displays
    laptop OLED screen
    Screen Resolution
    2880x1800 touchscreen
    Hard Drives
    1 TB NVME SSD (only weakness is only one slot)
    PSU
    Internal + 65W thunderbolt USB4 charger
    Case
    Yep, got one
    Cooling
    Stella Artois (UK pint cans - 568 ml) - extra cost.
    Keyboard
    Built in UK keybd
    Mouse
    Bluetooth , wireless dongled, wired
    Internet Speed
    900 mbs (ethernet), wifi 6 typical 350-450 mb/s both up and down
    Browser
    Edge
    Antivirus
    Defender
    Other Info
    TPM 2.0, 2xUSB4 thunderbolt, 1xUsb3 (usb a), 1xUsb-c, hdmi out, 3.5 mm audio out/in combo, ASUS backlit trackpad (inc. switchable number pad)

    Macrium Reflect Home V8
    Office 365 Family (6 users each 1TB onedrive space)
    Hyper-V (a vm runs almost as fast as my older laptop)
@cereberus Hi Bud, Ive only just starting getting into OS Builds for our organization and the previous methods were to use sysprep and answer file to pre-inject the KMS Volume Key's along with the driver injection via PNP so that the image covers a wide range of models. This means that when we deploy the image all we need to do is add it to the domain and do any post build actions depending upon final use of the device / which department etc.
Can I use the DISM method to do this and would it capture similar to sysprep as in generalized or if there are multiple models is it best to stick with sysprep ?
 

My Computer

System One

  • OS
    Windows 11
Jeepers - all these posts about sysprep. Total overkill if all devices are same.

@Ghot has provided simplest solution.

You rarely need sysprep these days on W10 or W11.
I've always just used Sysprep because it's quick, it's easy and it ensure that you don't have duplicate SID's. Duplicate SID's rarely do cause a problem, but this just helps ensure that they never exist to begin with.
 

My Computers

System One System Two

  • OS
    Windows 11 Pro
    Computer type
    PC/Desktop
    Manufacturer/Model
    Beelink SEI8
    CPU
    Intel Core i5-8279u
    Motherboard
    AZW SEI
    Memory
    32GB DDR4 2666Mhz
    Graphics Card(s)
    Intel Iris Plus 655
    Sound Card
    Intel SST
    Monitor(s) Displays
    Asus ProArt PA278QV
    Screen Resolution
    2560x1440
    Hard Drives
    512GB NVMe
    PSU
    NA
    Case
    NA
    Cooling
    NA
    Keyboard
    NA
    Mouse
    NA
    Internet Speed
    500/50
    Browser
    Edge
    Antivirus
    Defender
    Other Info
    Mini PC used for testing Windows 11.
  • Operating System
    Windows 10 Pro
    Computer type
    PC/Desktop
    Manufacturer/Model
    Custom
    CPU
    Ryzen 9 5900x
    Motherboard
    Asus Rog Strix X570-E Gaming
    Memory
    64GB DDR4-3600
    Graphics card(s)
    EVGA GeForce 3080 FT3 Ultra
    Sound Card
    Onboard
    Monitor(s) Displays
    ASUS TUF Gaming VG27AQ. ASUS ProArt Display PA278QV 27” WQHD
    Screen Resolution
    2560x1440
    Hard Drives
    2TB WD SN850 PCI-E Gen 4 NVMe
    2TB Sandisk Ultra 2.5" SATA SSD
    PSU
    Seasonic Focus 850
    Case
    Fractal Meshify S2 in White
    Cooling
    Dark Rock Pro CPU cooler, 3 x 140mm case fans
    Mouse
    Logitech G9 Laser Mouse
    Keyboard
    Corsiar K65 RGB Lux
    Internet Speed
    500/50
    Browser
    Chrome
    Antivirus
    Defender.
I finally got a chance to look into some of the solutions posted and I've got at least one new issue. Basically, I'm unable to remove a hard drive. It looks like one of the screws are covered by a Warranty Void sticker. Secondly, I don't have access to the necessary screwdriver to remove the hard drive. It looks like it has a star key.
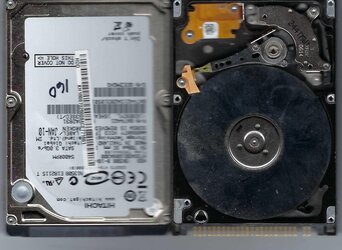
My thought on this: The sticker on the drive is there for a purpose, don't take those Torx/star-socketed screws out, not necessary to change the drive, they hold on the cover of the drive's internal works and removal of it can cause damage and best done in a "clean-room" for the purpose. An HDD or SATA SSD uses only 1 to 4 screws to mount them, may be on each edge of the drive or on the bottom and use a standard Phillips driver, maybe a #2 or a #1 tip. Some will have 6 holes for flexibility in mounting.
Notebook 2.5" drives, one with the cover missing:
 

Attachments

  • Drives.jpg
    Drives.jpg
    215.4 KB · Views: 3

My Computers

System One System Two

  • OS
    Win11 Pro RTM
    Computer type
    Laptop
    Manufacturer/Model
    Dell Vostro 3400
    CPU
    Intel Core i5 11th Gen. 2.40GHz
    Memory
    12GB
    Hard Drives
    256GB SSD NVMe M.2
  • Operating System
    Windows 11 Pro RTM x64
    Computer type
    PC/Desktop
    Manufacturer/Model
    Dell Vostro 5890
    CPU
    Intel Core i5 10th Gen. 2.90GHz
    Memory
    16GB
    Graphics card(s)
    Onboard, no VGA, using a DisplayPort-to-VGA adapter
    Monitor(s) Displays
    24" Dell
    Hard Drives
    512GB SSD NVMe, 4TB Seagate HDD
    Browser
    Firefox, Edge
    Antivirus
    Windows Defender/Microsoft Security
Back
Top Bottom