Microsoft blocks all options to bypass MS Account on new Installs


Spitz

New member
Local time
3:58 AM
Posts
2
Location
AU
OS
23H2
Hi all, newbie here (have been sitting on the sidelines watching and learning for some time tho!) please excuse my error if this appears in the wrong thread.

I have been attempting to install version 22631.2506 via ISO install to my notebook.

Previous attempts to by pass the MS Account requirement have not been an issue.

Version 23H2 appears that MS have used the anti and blocked all possible options including Rufus & NT Lite versions.

I am hoping to be proven wrong, although with my upwards of 50 attempts to by pass MS Account have been unsuccessful.

When attempting to bypass connecting to the net, or bypass NRO via CMD the system returns you back the start of the on-boarding process in a continuous loop!
 

My Computer

System One

  • OS
    23H2
Press Shift+F10 when it asks for an internet connection.

Type: OOBE\BYPASSNRO


If that doesn’t work,

Press Shift+F10 when it asks for an internet connection.
Type taskmgr and hit the Enter button.
Click on the More details button.
Find the Network Connection Flow process.
Select it and click the End task button.
Close all windows and enter your name and password to continue.


**IF YOU HAVE ALREADY CONNECTED TO THE INTERNET DURING SETUP**

Press Shift+F10 to launch Command Prompt as Administrator

Type:
netsh wlan show interfaces
annotate your network name

Type:
netsh interface set interface name="WirelessNetworkName" admin=DISABLED

*Replace “WirelessNetworkName” with your Wi-Fi Interface Name*

• Close Command Prompt

After Windows 11 Install, Go to Device Manager and Enable Wireless NIC
 
Last edited:

My Computer

System One

  • OS
    Windows 11 Pro
Have attempted all the bypass options. They do not work.

I am confident to state MS has blocked all options as stated.

No issue with Vers 22000.2506 with bypassing the MS account setup on install.

Have just attempted to install over the top of Vers 22000.2506 with IOS Ver 23H2 with the option to keep 11 Pro and keep nothing. This has also failed to work past the bypass option - even when connecting to the net option!

I am attempting to reinstall again over the top of 22000.2506 with the option to install 11 Pro and keep everything.

I have not changed any other functions using NT Lite they have all been the same process which have worked previously. With hitting this wall I have now reduced any mods via NT Lite and the brick wall keeps appearing!
 

My Computer

System One

  • OS
    23H2
It works for me still.
And a 2nd note - if using ntlite, why not just bake in the local acct, create with Microsoft acct and then delete Microsoft profile post install if you can’t get around it?

Got my 22631 iso from uup ee if that is any diff than yours
 

My Computer

System One

  • OS
    Windows 11 Pro
Well, I have installed Home 23H2 22631.2506 as an inplace upgrade over an existing 22621.2428 installation. I found no impediments to installing to a Local Account. The only (minor) nuisances I had were the usual non-transfer of font choices and home network password security again implemented for the other individual network machines. Obviously simple to edit, if slightly annoying.

The ISO file was created through UUPDUMP.CN for Home 22631.2506, bog standard procedure.

Rufus version 4.3 (portable) was used to translate the ISO to a USB drive to use as a Setup.exe inplace upgrade. Rufus offered its' usual checklist of options prior to translating the ISO to the USB drive, including the Local Account tickbox. No impediments at all.

I've now done this specific inplace upgrade twice, once on each my two Win11 home network laptops. Both times successful, so I've just done a full image backup for each machine - now back to incrementals, thank goodness.

The only suggestion I can offer here is to re-create your ISO file from either UUPDUMP.CN or UUPDUMP.NET, and use Rufus again to dump across to the USB drive.
 

My Computer

System One

  • OS
    Windows 11
    Computer type
    Laptop
    Manufacturer/Model
    HP 15s_du1xxx
    CPU
    Intel i5 10210U
    Motherboard
    85F1
    Memory
    16Gb
    Graphics Card(s)
    Intel UHD
    Sound Card
    Realtek
    Screen Resolution
    1920 x 1080
Am I surprised? They took away the option to "activate" by phone
 

My Computer

System One

  • OS
    Fedora 41 Rawhide Garuda and Windows Canary (this is on the edge)
    Computer type
    PC/Desktop
    Manufacturer/Model
    HomeBrew
    CPU
    AMD Ryzen 7 2700X Eight-Core Processo
    Motherboard
    Gigabyte
    Memory
    32GB
    Graphics Card(s)
    Nvidia
    Monitor(s) Displays
    Dell
    Hard Drives
    4 2 in Linuz raid0
    Keyboard
    Eluktronics
    Mouse
    Eluktronics
    Browser
    Firefox and Chromium
    Other Info
    Gnome 45
Other users have reported the bypass still works. If it doesn't for you, you can do one of 2 things:

1. set up using MS account, then create a new local account with administrative privileges. Restart. Login to the new account and delete the MS account.
2. Change MS account to local account settings>accounts>your info>signin with a local account instead.

IMO Option 1 is preferable if you want your local user folders default location to be on your drive under your new account name and to not have any association with Onedrive..
Using Option 2 will leave your user folder the first 5 letters of your MS account and Onedrive will still be in the mix..

However, know that some of Windows 11 features (like co-pilot) require a MS account.


My Computers

System One System Two

  • OS
    Windows 11 Pro 23H2 22631.3447
    Computer type
    PC/Desktop
    Manufacturer/Model
    Dell Optiplex 7080
    CPU
    i9-10900 10 core 20 threads
    Motherboard
    DELL 0J37VM
    Memory
    32 gb
    Graphics Card(s)
    none-Intel UHD Graphics 630
    Sound Card
    Integrated Realtek
    Monitor(s) Displays
    Benq 27
    Screen Resolution
    2560x1440
    Hard Drives
    1tb Solidigm m.2 +256gb ssd+512 gb usb m.2 sata
    PSU
    500w
    Case
    MT
    Cooling
    Dell Premium
    Keyboard
    Logitech wired
    Mouse
    Logitech wireless
    Internet Speed
    so slow I'm too embarrassed to tell
    Browser
    Firefox
    Antivirus
    Defender+MWB Premium
  • Operating System
    Windows 10 Pro 22H2 19045.3930
    Computer type
    PC/Desktop
    Manufacturer/Model
    Dell Optiplex 9020
    CPU
    i7-4770
    Memory
    24 gb
    Monitor(s) Displays
    Benq 27
    Screen Resolution
    2560x1440
    Hard Drives
    256 gb Toshiba BG4 M.2 NVE SSB and 1 tb hdd
    PSU
    500w
    Case
    MT
    Cooling
    Dell factory
    Mouse
    Logitech wireless
    Keyboard
    Logitech wired
    Internet Speed
    still not telling
    Browser
    Firefox
    Antivirus
    Defender+MWB Premium
You could also just create with Microsoft acct, change it to local and rename/create symlink for the user profile folder. There’s a tutorial here somewhere if you aren’t sure how to do that. It’s simple.
 

My Computer

System One

  • OS
    Windows 11 Pro
To use a local account when installing Windows 11, when it asks for your Microsoft credentials, use a bogus email address and password.

You will see a message, Oops, something went wrong. Continue through the process and it will setup a local account for you.
 

My Computer

System One

  • OS
    Windows 11 Pro
    Computer type
    PC/Desktop
    CPU
    Ryzen 9 3900X
    Motherboard
    ASUS ROG Strix X570-E Gaming
    Memory
    G-Skill RipjawsV F4-3600C18 (16GB x 2)
    Graphics Card(s)
    Gigabyte RX 5700 XT Gaming OC
    Sound Card
    Realtek ALC1220P
    Monitor(s) Displays
    ASUS VE278 (x 2)
    Screen Resolution
    1920x1080
    Hard Drives
    Samsung 850 Pro 256GB
    Samsung 970 Pro NVMe 512GB (x 2)
    ST10000VN0004 10TB (x 2)
    ST10000VN0008 10TB (x 2)
    ST4000VN000 4TB (x 2)
    PSU
    Corsair HX1000
    Case
    Corsair Carbide 400R
    Cooling
    AMD Wraith Prism (Stock)
    Keyboard
    Logitech G213
    Mouse
    Logitech G502
    Internet Speed
    100Mbps down / 40Mbps up
    Browser
    Firefox - Chrome - Edge
    Antivirus
    Windows Defender - Clamwin

My Computer

System One

  • OS
    Windows 10 Pro + others in VHDs
    Computer type
    Laptop
    Manufacturer/Model
    ASUS Vivobook 14
    CPU
    I7
    Motherboard
    Yep, Laptop has one.
    Memory
    16 GB
    Graphics Card(s)
    Integrated Intel Iris XE
    Sound Card
    Realtek built in
    Monitor(s) Displays
    N/A
    Screen Resolution
    1920x1080
    Hard Drives
    1 TB Optane NVME SSD, 1 TB NVME SSD
    PSU
    Yep, got one
    Case
    Yep, got one
    Cooling
    Stella Artois
    Keyboard
    Built in
    Mouse
    Bluetooth , wired
    Internet Speed
    72 Mb/s :-(
    Browser
    Edge mostly
    Antivirus
    Defender
    Other Info
    TPM 2.0
I used F10 - "oobe\bypassnro" all the time.
Sometimes it diddnt work (... if internet connection was allready established) ....

now I allways use the way trumpy81 allready stated:

type email: what@ever.com (or whatever other email).
type password: 1234 (or whatever other password).

It wont be able to log in and give you the option to create a local account.
 

My Computer

System One

  • OS
    Windows 10
    Computer type
    PC/Desktop
    Manufacturer/Model
    Custom
    CPU
    Ryzen 7 5700X
    Motherboard
    Gigabyte B550 Aorus Elite V2
    Memory
    2 x 16 GB DDR 4 - 3200 - G.Skill RipJaws V
    Graphics Card(s)
    ASUS TUF Gaming GeForce RTX 4070
    Sound Card
    OnBoard Realtek
    Monitor(s) Displays
    2 x Dell S2721DGF
    Screen Resolution
    2560 x 1440 @ 165 MHZ
    Hard Drives
    1 TB Kingston KC3000 M.2PCIe 4.0
    PSU
    be quiet! Pure Power 12 M Modular 80+ Gold
    Case
    Phanteks Eclipse P600s
    Cooling
    be quit! Dark Rock Pro 4
    Keyboard
    Logitech G213 Prodigy
    Mouse
    Logitech G502 Hero
    Internet Speed
    1000 MBit Cable DSL
    Browser
    Firefox
    Antivirus
    Microsoft Defender
I have been attempting to install version 22631.2506 via ISO install to my notebook.
Could you please clarify one detail for me? I just want to be certain that I am following your procedure correctly. Are you attempting to perform an upgrade installation or are you doing a clean install by booting from a thumb drive?

If you are doing a clean install, I have a guaranteed way to do this, but I need to make sure I understand your situation fully first.
 

My Computers

System One System Two

  • OS
    Win11 Pro 23H2
    Computer type
    PC/Desktop
    Manufacturer/Model
    Home Built
    CPU
    Intel i7-11700K
    Motherboard
    ASUS Prime Z590-A
    Memory
    128GB Crucial Ballistix 3200MHz DRAM
    Graphics Card(s)
    No GPU - CPU graphics only (for now)
    Sound Card
    Realtek (on motherboard)
    Monitor(s) Displays
    HP Envy 32
    Screen Resolution
    2560 x 1440
    Hard Drives
    1 x 1TB NVMe Gen 4 x 4 SSD
    1 x 2TB NVMe Gen 3 x 4 SSD
    2 x 512GB 2.5" SSDs
    2 x 8TB HD
    PSU
    Corsair HX850i
    Case
    Corsair iCue 5000X RGB
    Cooling
    Noctua NH-D15 chromax.black cooler + 10 case fans
    Keyboard
    CODE backlit mechanical keyboard
    Mouse
    Logitech MX Master 3
    Internet Speed
    1Gb Up / 1 Gb Down
    Browser
    Edge
    Antivirus
    Windows Defender
    Other Info
    Additional options installed:
    WiFi 6E PCIe adapter
    ASUS ThunderboltEX 4 PCIe adapter
  • Operating System
    Win11 Pro 23H2
    Computer type
    Laptop
    Manufacturer/Model
    Lenovo ThinkBook 13x Gen 2
    CPU
    Intel i7-1255U
    Memory
    16 GB
    Graphics card(s)
    Intel Iris Xe Graphics
    Sound Card
    Realtek® ALC3306-CG codec
    Monitor(s) Displays
    13.3-inch IPS Display
    Screen Resolution
    WQXGA (2560 x 1600)
    Hard Drives
    2 TB 4 x 4 NVMe SSD
    PSU
    USB-C / Thunderbolt 4 Power / Charging
    Mouse
    Buttonless Glass Precision Touchpad
    Keyboard
    Backlit, spill resistant keyboard
    Internet Speed
    1Gb Up / 1Gb Down
    Browser
    Edge
    Antivirus
    Windows Defender
    Other Info
    WiFi 6e / Bluetooth 5.1 / Facial Recognition / Fingerprint Sensor / ToF (Time of Flight) Human Presence Sensor
Your problem isn't NTLite or Rufus.

For testing purposes, I tried 22631.2361 from the Insider ISO download page. Whether it's not the final RTM or GA release doesn't matter because the bypass works the same. Enable the Bypass RNO setting from NTLite, and create your ISO.

The trick with 22H2 or later releases is Bypass RNO doesn't work if Windows finds a valid network connection. When there's a network present, it knows you're trying to cheat. 21H2 was far more trusting, and didn't care if you had network access.

Wait for the part where installation reboots from the black screen and spinning white circle. Quickly unplug the network cable, or pretend you can't use any of the listed Wi-Fi networks. You should get these screens:

Windows 10 x64-2023-10-31-01-17-51.png
Windows 10 x64-2023-10-31-01-18-12.png
Windows 10 x64-2023-10-31-01-18-28.png

If you're using NTLite, creating a Local Account in Unattended mode will skip this whole mess. But BypassRNO now requires Windows to think you don't have a working network.
 

My Computer

System One

  • OS
    Windows 7
Press Shift+F10 when it asks for an internet connection.

Type: OOBE\PASSNRO


If that doesn’t work,

Press Shift+F10 when it asks for an internet connection.
Type taskmgr and hit the Enter button.
Click on the More details button.
Find the Network Connection Flow process.
Select it and click the End task button.
Close all windows and enter your name and password to continue.


**IF YOU HAVE ALREADY CONNECTED TO THE INTERNET DURING SETUP**

Press Shift+F10 to launch Command Prompt as Administrator

Type:
netsh wlan show interfaces
annotate your network name

Type:
netsh interface set interface name="WirelessNetworkName" admin=DISABLED

*Replace “WirelessNetworkName” with your Wi-Fi Interface Name*

• Close Command Prompt

After Windows 11 Install, Go to Device Manager and Enable Wireless NIC
@dacrone, you need to use BYPASSNRO, not PASSNRO.

Also, to disable the network, couldn't you simply open a command prompt and issue an ipconfig /release?
 

My Computers

System One System Two

  • OS
    Win11 Pro 23H2
    Computer type
    PC/Desktop
    Manufacturer/Model
    Home Built
    CPU
    Intel i7-11700K
    Motherboard
    ASUS Prime Z590-A
    Memory
    128GB Crucial Ballistix 3200MHz DRAM
    Graphics Card(s)
    No GPU - CPU graphics only (for now)
    Sound Card
    Realtek (on motherboard)
    Monitor(s) Displays
    HP Envy 32
    Screen Resolution
    2560 x 1440
    Hard Drives
    1 x 1TB NVMe Gen 4 x 4 SSD
    1 x 2TB NVMe Gen 3 x 4 SSD
    2 x 512GB 2.5" SSDs
    2 x 8TB HD
    PSU
    Corsair HX850i
    Case
    Corsair iCue 5000X RGB
    Cooling
    Noctua NH-D15 chromax.black cooler + 10 case fans
    Keyboard
    CODE backlit mechanical keyboard
    Mouse
    Logitech MX Master 3
    Internet Speed
    1Gb Up / 1 Gb Down
    Browser
    Edge
    Antivirus
    Windows Defender
    Other Info
    Additional options installed:
    WiFi 6E PCIe adapter
    ASUS ThunderboltEX 4 PCIe adapter
  • Operating System
    Win11 Pro 23H2
    Computer type
    Laptop
    Manufacturer/Model
    Lenovo ThinkBook 13x Gen 2
    CPU
    Intel i7-1255U
    Memory
    16 GB
    Graphics card(s)
    Intel Iris Xe Graphics
    Sound Card
    Realtek® ALC3306-CG codec
    Monitor(s) Displays
    13.3-inch IPS Display
    Screen Resolution
    WQXGA (2560 x 1600)
    Hard Drives
    2 TB 4 x 4 NVMe SSD
    PSU
    USB-C / Thunderbolt 4 Power / Charging
    Mouse
    Buttonless Glass Precision Touchpad
    Keyboard
    Backlit, spill resistant keyboard
    Internet Speed
    1Gb Up / 1Gb Down
    Browser
    Edge
    Antivirus
    Windows Defender
    Other Info
    WiFi 6e / Bluetooth 5.1 / Facial Recognition / Fingerprint Sensor / ToF (Time of Flight) Human Presence Sensor
Okay, I just tried the procedure below with build 2506 and it worked flawlessly:

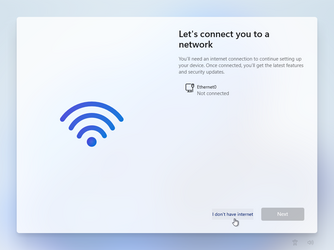
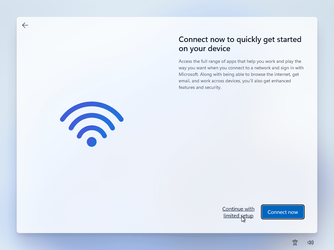
During installation, Windows will reboot. You will eventually get to a screen asking "Is this the right country or region?". At that screen, press SHIFT + F10 to open a command prompt. At the command prompt, type "OOBE\BypassNRO" and then press ENTER. The system will reboot. After the reboot, you will again arrive at the screen that asks "Is this the right country or region?". Once again, press SHIFT + F10 to open a command prompt. Run the command "ipconfig /release" and press ENTER. Close the command prompt and proceed with setup. When you get to the screen that says "Let's connect you to a network" select "I don't have internet". On the next screen, select "Continue with limited setup". Continue the installation as normal.

As I had noted before, there is another guaranteed way to accomplish this:

You can simply drop an unattended installation answer file on your installation disk. Note that you can craft an answer file that DOES NOT automate installation. It does nothing other than to create a local user account, bypassing the screen where you need to create an account.

If this is of interest to you, let me know and I will post a sample here.
 

My Computers

System One System Two

  • OS
    Win11 Pro 23H2
    Computer type
    PC/Desktop
    Manufacturer/Model
    Home Built
    CPU
    Intel i7-11700K
    Motherboard
    ASUS Prime Z590-A
    Memory
    128GB Crucial Ballistix 3200MHz DRAM
    Graphics Card(s)
    No GPU - CPU graphics only (for now)
    Sound Card
    Realtek (on motherboard)
    Monitor(s) Displays
    HP Envy 32
    Screen Resolution
    2560 x 1440
    Hard Drives
    1 x 1TB NVMe Gen 4 x 4 SSD
    1 x 2TB NVMe Gen 3 x 4 SSD
    2 x 512GB 2.5" SSDs
    2 x 8TB HD
    PSU
    Corsair HX850i
    Case
    Corsair iCue 5000X RGB
    Cooling
    Noctua NH-D15 chromax.black cooler + 10 case fans
    Keyboard
    CODE backlit mechanical keyboard
    Mouse
    Logitech MX Master 3
    Internet Speed
    1Gb Up / 1 Gb Down
    Browser
    Edge
    Antivirus
    Windows Defender
    Other Info
    Additional options installed:
    WiFi 6E PCIe adapter
    ASUS ThunderboltEX 4 PCIe adapter
  • Operating System
    Win11 Pro 23H2
    Computer type
    Laptop
    Manufacturer/Model
    Lenovo ThinkBook 13x Gen 2
    CPU
    Intel i7-1255U
    Memory
    16 GB
    Graphics card(s)
    Intel Iris Xe Graphics
    Sound Card
    Realtek® ALC3306-CG codec
    Monitor(s) Displays
    13.3-inch IPS Display
    Screen Resolution
    WQXGA (2560 x 1600)
    Hard Drives
    2 TB 4 x 4 NVMe SSD
    PSU
    USB-C / Thunderbolt 4 Power / Charging
    Mouse
    Buttonless Glass Precision Touchpad
    Keyboard
    Backlit, spill resistant keyboard
    Internet Speed
    1Gb Up / 1Gb Down
    Browser
    Edge
    Antivirus
    Windows Defender
    Other Info
    WiFi 6e / Bluetooth 5.1 / Facial Recognition / Fingerprint Sensor / ToF (Time of Flight) Human Presence Sensor
Hi there
the easiest way bar none is simply at enter / create ms account (for "attended installs")

just type at username : nobody@nobody.com
password: anythingyoulike

then at the "Oops something went wrong" message click the next button and it then asks who is going to use this computer - and will set up a local account.

can't see anything easier than that and its still working (at least on W11 PRO editions).

cheers
jimbo
 

My Computer

System One

  • OS
    Windows XP,7,10,11 Linux Arch Linux
    Computer type
    PC/Desktop
    CPU
    2 X Intel i7
I just tried ALL of the below options with Windows 11 Pro, 22621.2506 and each and every one of them work fine. In addition I tried the answer file that I noted earlier and that also works.

If you have a network connection

If your system has a network adapter such as WiFi or Ethernet, then you should perform ANY ONE of the four options below. You may want to read all options before choosing.

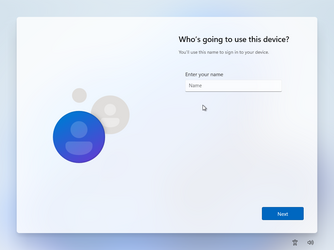
1) During installation of Windows 11, you will be presented a screen that says "Let's add your Microsoft account". At this screen, enter a fake e-mail address. Note that not every fake address will work. Try using the address "fake@fake.com". On the next screen you will be asked for a password. Enter any fake password and then click on "Sign in". On the next screen the message "Oops, something went wrong" will be displayed. Click on "Next". On the next screen you will be able to enter a local account name. Do this and proceed with installation.

2) If you have an Ethernet cable and no WiFi, unplug the cable. If your system has WiFi use one of the other options. After unplugging the cable, press SHIFT + F10 to open a command prompt. At the command prompt, type "OOBE\BypassNRO" and then press ENTER. The system will reboot. When you get to the "Let's connect you to a network" screen, you will have an option to select "I don't have internet". Choose that option. On the next screen, select "Continue with limited setup". Enter your local user account name, and then continue with setup as usual.

3) During installation, Windows will reboot. After a period of time you will be presented a screen asking "Is this the right country or region?". At that screen, press SHIFT + F10 to open a command prompt. At the command prompt, type "OOBE\BypassNRO" and then press ENTER. The system will reboot. After the reboot, you will again arrive at the screen that asks "Is this the right country or region?". Once again, press SHIFT + F10 to open a command prompt. Run the command "ipconfig /release" and press ENTER. Close the command prompt and proceed with setup. When you get to the screen that says "Let's connect you to a network" select "I don't have internet". On the next screen, select "Continue with limited setup". Continue the installation as normal.

4) Proceed with installation of Windows until you arrive at a screen where you have a choice to "Set up for personal use" or "Set up for work or school", select "Set up for work or school" and click on "Next".

On the next screen, select "Sign-in options", then "Domain join instead". Don't worry, we are not joining a domain!

On the next screen, supply the local username that you want to create and then continue through setup as normal.


If you do NOT have an Internet connection

During installation, Windows will reboot. After a period of time, you will be presented a screen asking, "Is this the right country or region?". At that screen, press SHIFT + F10 to open a command prompt. At the command prompt, type "OOBE\BypassNRO" and then press ENTER. The system will reboot. When you get to the "Let's connect you to a network" screen, you will have an option to select "I don't have internet". Choose that option. On the next screen, select "Continue with limited setup". Enter your local user account name, and then continue with setup as usual.
 

My Computers

System One System Two

  • OS
    Win11 Pro 23H2
    Computer type
    PC/Desktop
    Manufacturer/Model
    Home Built
    CPU
    Intel i7-11700K
    Motherboard
    ASUS Prime Z590-A
    Memory
    128GB Crucial Ballistix 3200MHz DRAM
    Graphics Card(s)
    No GPU - CPU graphics only (for now)
    Sound Card
    Realtek (on motherboard)
    Monitor(s) Displays
    HP Envy 32
    Screen Resolution
    2560 x 1440
    Hard Drives
    1 x 1TB NVMe Gen 4 x 4 SSD
    1 x 2TB NVMe Gen 3 x 4 SSD
    2 x 512GB 2.5" SSDs
    2 x 8TB HD
    PSU
    Corsair HX850i
    Case
    Corsair iCue 5000X RGB
    Cooling
    Noctua NH-D15 chromax.black cooler + 10 case fans
    Keyboard
    CODE backlit mechanical keyboard
    Mouse
    Logitech MX Master 3
    Internet Speed
    1Gb Up / 1 Gb Down
    Browser
    Edge
    Antivirus
    Windows Defender
    Other Info
    Additional options installed:
    WiFi 6E PCIe adapter
    ASUS ThunderboltEX 4 PCIe adapter
  • Operating System
    Win11 Pro 23H2
    Computer type
    Laptop
    Manufacturer/Model
    Lenovo ThinkBook 13x Gen 2
    CPU
    Intel i7-1255U
    Memory
    16 GB
    Graphics card(s)
    Intel Iris Xe Graphics
    Sound Card
    Realtek® ALC3306-CG codec
    Monitor(s) Displays
    13.3-inch IPS Display
    Screen Resolution
    WQXGA (2560 x 1600)
    Hard Drives
    2 TB 4 x 4 NVMe SSD
    PSU
    USB-C / Thunderbolt 4 Power / Charging
    Mouse
    Buttonless Glass Precision Touchpad
    Keyboard
    Backlit, spill resistant keyboard
    Internet Speed
    1Gb Up / 1Gb Down
    Browser
    Edge
    Antivirus
    Windows Defender
    Other Info
    WiFi 6e / Bluetooth 5.1 / Facial Recognition / Fingerprint Sensor / ToF (Time of Flight) Human Presence Sensor
I just tried ALL of the below options with Windows 11 Pro, 22621.2506 and each and every one of them work fine. In addition I tried the answer file that I noted earlier and that also works.

If you have a network connection

If your system has a network adapter such as WiFi or Ethernet, then you should perform ANY ONE of the four options below. You may want to read all options before choosing.

1) During installation of Windows 11, you will be presented a screen that says "Let's add your Microsoft account". At this screen, enter a fake e-mail address. Note that not every fake address will work. Try using the address "fake@fake.com". On the next screen you will be asked for a password. Enter any fake password and then click on "Sign in". On the next screen the message "Oops, something went wrong" will be displayed. Click on "Next". On the next screen you will be able to enter a local account name. Do this and proceed with installation.

2) If you have an Ethernet cable and no WiFi, unplug the cable. If your system has WiFi use one of the other options. After unplugging the cable, press SHIFT + F10 to open a command prompt. At the command prompt, type "OOBE\BypassNRO" and then press ENTER. The system will reboot. When you get to the "Let's connect you to a network" screen, you will have an option to select "I don't have internet". Choose that option. On the next screen, select "Continue with limited setup". Enter your local user account name, and then continue with setup as usual.

3) During installation, Windows will reboot. After a period of time you will be presented a screen asking "Is this the right country or region?". At that screen, press SHIFT + F10 to open a command prompt. At the command prompt, type "OOBE\BypassNRO" and then press ENTER. The system will reboot. After the reboot, you will again arrive at the screen that asks "Is this the right country or region?". Once again, press SHIFT + F10 to open a command prompt. Run the command "ipconfig /release" and press ENTER. Close the command prompt and proceed with setup. When you get to the screen that says "Let's connect you to a network" select "I don't have internet". On the next screen, select "Continue with limited setup". Continue the installation as normal.

4) Proceed with installation of Windows until you arrive at a screen where you have a choice to "Set up for personal use" or "Set up for work or school", select "Set up for work or school" and click on "Next".

On the next screen, select "Sign-in options", then "Domain join instead". Don't worry, we are not joining a domain!

On the next screen, supply the local username that you want to create and then continue through setup as normal.


If you do NOT have an Internet connection

During installation, Windows will reboot. After a period of time, you will be presented a screen asking, "Is this the right country or region?". At that screen, press SHIFT + F10 to open a command prompt. At the command prompt, type "OOBE\BypassNRO" and then press ENTER. The system will reboot. When you get to the "Let's connect you to a network" screen, you will have an option to select "I don't have internet". Choose that option. On the next screen, select "Continue with limited setup". Enter your local user account name, and then continue with setup as usual.
Hi there
All those work currently at least on Windows PRO (I don't have Windows Home so I can't test that - but some posters seem to think you have to have an internet connection to install Windows Home).

However as in real life so many people are so biased in their own ways that they just ignore even TRYING any solution or even suggestion but just moan. That's human nature unfortunately. Perhaps they should kick the dog more often etc. instead.

cheers
jimbo
 

My Computer

System One

  • OS
    Windows XP,7,10,11 Linux Arch Linux
    Computer type
    PC/Desktop
    CPU
    2 X Intel i7
some posters seem to think you have to have an internet connection to install Windows Home
Testing with Home edition now. But I already know for 100% sure that one of the methods will work with Home Edition, and that is the answer file. I'll post back results shortly.
 

My Computers

System One System Two

  • OS
    Win11 Pro 23H2
    Computer type
    PC/Desktop
    Manufacturer/Model
    Home Built
    CPU
    Intel i7-11700K
    Motherboard
    ASUS Prime Z590-A
    Memory
    128GB Crucial Ballistix 3200MHz DRAM
    Graphics Card(s)
    No GPU - CPU graphics only (for now)
    Sound Card
    Realtek (on motherboard)
    Monitor(s) Displays
    HP Envy 32
    Screen Resolution
    2560 x 1440
    Hard Drives
    1 x 1TB NVMe Gen 4 x 4 SSD
    1 x 2TB NVMe Gen 3 x 4 SSD
    2 x 512GB 2.5" SSDs
    2 x 8TB HD
    PSU
    Corsair HX850i
    Case
    Corsair iCue 5000X RGB
    Cooling
    Noctua NH-D15 chromax.black cooler + 10 case fans
    Keyboard
    CODE backlit mechanical keyboard
    Mouse
    Logitech MX Master 3
    Internet Speed
    1Gb Up / 1 Gb Down
    Browser
    Edge
    Antivirus
    Windows Defender
    Other Info
    Additional options installed:
    WiFi 6E PCIe adapter
    ASUS ThunderboltEX 4 PCIe adapter
  • Operating System
    Win11 Pro 23H2
    Computer type
    Laptop
    Manufacturer/Model
    Lenovo ThinkBook 13x Gen 2
    CPU
    Intel i7-1255U
    Memory
    16 GB
    Graphics card(s)
    Intel Iris Xe Graphics
    Sound Card
    Realtek® ALC3306-CG codec
    Monitor(s) Displays
    13.3-inch IPS Display
    Screen Resolution
    WQXGA (2560 x 1600)
    Hard Drives
    2 TB 4 x 4 NVMe SSD
    PSU
    USB-C / Thunderbolt 4 Power / Charging
    Mouse
    Buttonless Glass Precision Touchpad
    Keyboard
    Backlit, spill resistant keyboard
    Internet Speed
    1Gb Up / 1Gb Down
    Browser
    Edge
    Antivirus
    Windows Defender
    Other Info
    WiFi 6e / Bluetooth 5.1 / Facial Recognition / Fingerprint Sensor / ToF (Time of Flight) Human Presence Sensor

Latest Tutorials

Back
Top Bottom