Questions on SSD problem


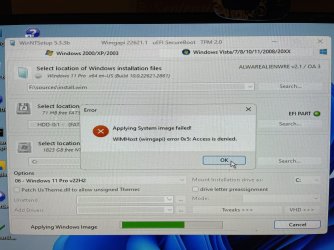
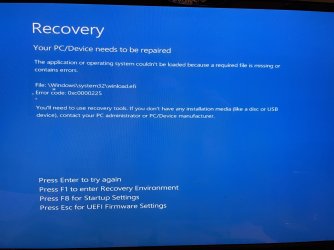
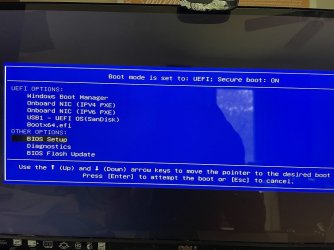
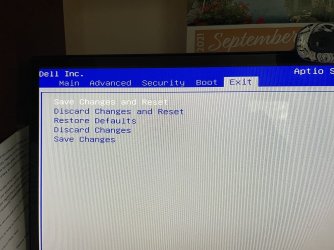
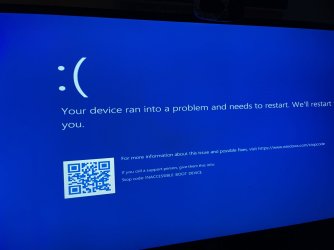
Yes, I did re-boot and check BIOS settings. What is confusing is that when I first get to the BIOS screen, it shows the PXEs as UEFI options but when I go into BIOS setup from here (2nd screenshot), they show as disabled. Another thing that is a bit confusing is on exiting BIOS, you can 'save changes and reset', or 'save changes'. I'm not sure what reset means in this context. If I made changes, why would I reset? I tried it both ways but am still getting the blue screen after WinnTsetup applies the image and reboots, although I no longer see the "Start PXE over IPV4..." message befor the frown blue screen appears (as it did in my post #52). Maybe this means it's now some other problem than PXE?
 

Attachments

  • IMG_4398.jpg
    IMG_4398.jpg
    85.1 KB · Views: 5
  • IMG_4399.jpg
    IMG_4399.jpg
    137.7 KB · Views: 4
  • IMG_4400.jpg
    IMG_4400.jpg
    132 KB · Views: 5
  • IMG_4374.jpg
    IMG_4374.jpg
    182.7 KB · Views: 5

My Computer

System One

  • OS
    Windows 11 pro
    Computer type
    PC/Desktop
    Manufacturer/Model
    Dell XPS8960
    CPU
    Intel Core i7-13700
    Memory
    32GB DDR5 RAM
When a computer boots, it looks to Bios and goes through the various Boot options. If the M.2 or HDD are missing or failed, or Windows is corrupted, it will go to the next boot device, which is PXE Boot. This is used to install Windows from a Network drive, that many big companies use. As long as PXE boot is lowest in the boot order, it shouldn't matter. The only reason your computer is trying to Boot from the PXE boot, is because there are no other Boot devices.

A few things to change In the second picture #61, Enable boot option #2 BootX64.EFI This is the boot partition on the M.2.
Also, in the second picture of Post #59 Dell computers in the Bios Advanced/NvME/SATA Operation Mode usually set to RAID, but you may try changing it to AHCI. If that fails, you can boot back to the Bios and reset it back to RAID.

To boot to a USB Flash drive installer, if burned properly. Put the Flash drive start the computer pressing F12 repeatedly. Select the Flash Drive from the boot menu. If this doesn't boot the computer, the flash drive wasn't burned correctly.

If the installer starts, choose your Language, then choose Install Now then Custom Install. In Where would you like to install Windows? it should show your M.2. If so, Delete ALL Partitions until the drive is all Unallocated Space. Then Press Next. Windows will do the rest.

If it doesn't show your M.2 drive, and says Load Drivers, then you need to download the IRST driver
On another computer, download this file and extract this to the root of your USB Flash drive installer. When it asks for Drivers, browse it to the Flash Drive to the IRST file. This will now show your M.2 and you can continue the install .
 

My Computer

System One

  • OS
    Windows 11 Pro 64 bit 24H2
    Computer type
    PC/Desktop
    Manufacturer/Model
    Gigabyte Z390 UD
    CPU
    Intel Core i7 77000 3.60
    Motherboard
    Gigabyte Z390 UD
    Memory
    16 GB
    Graphics Card(s)
    nVidia GEForce RTX 2060 Super
    Sound Card
    onboard
    Monitor(s) Displays
    Two 27" Dell 4K monitors
    Screen Resolution
    3840 x 2160
    Hard Drives
    M.2 NVME SSD, 500 GB; Two 2TB Mechanical HDD's
    PSU
    850w PSU
    Case
    Cyberpower PC
    Cooling
    Water cooled
    Keyboard
    Backlit Cyberpower gamiong keyboard
    Mouse
    Backlit Cyberpower gaming mouse
    Internet Speed
    1 GB mbps
    Browser
    Brave
    Antivirus
    Windows Security
Hi Spunk, thank you for your input. I don't know if you looked back in this thread to where I wasn't able to boot to Windows at all until SIW2 offered his bootable 23V7.iso which has the DEll suplied drivers already integrated. With this, I was able to finally get to a Windows screen (as shown in post #22) and it is from here that I'm running WinnTsetup, as he suggested, to try and install a Windows 11 (I have the Windows 11.iso on a external drive plugged into a usb). WinnTsetup starts and runs, applies the image of the Windows 11 iso and at that point needs to reboot to then continue in set up. This is where I keep running into the "inaccessible boot device". When I first got it to runn this far, prior to the blue screen message (inaccessible boot device), I was getting a screen text message saying "Start PXE over IPV4..." (as shown in post #52). Now that I've disabled PXE, I no longer see that message but still end up at "inaccessible boot device".
 

My Computer

System One

  • OS
    Windows 11 pro
    Computer type
    PC/Desktop
    Manufacturer/Model
    Dell XPS8960
    CPU
    Intel Core i7-13700
    Memory
    32GB DDR5 RAM
That error can be the result of the wrong mode in bios.

have a look and change it to whatever is the other one

from AHCI/NVMe to RAID ON or from RAID ON to AHCI/NVMe
 

My Computers

System One System Two

  • OS
    Win7,Win11
    Computer type
    PC/Desktop
    CPU
    i5-8400
    Motherboard
    gigabyte b365m ds3h
    Memory
    2x8gb 3200mhz
    Monitor(s) Displays
    benq gw2480
    PSU
    bequiet pure power 11 400CM
    Cooling
    cryorig m9i
  • Operating System
    win7,win11
    Computer type
    PC/Desktop
    CPU
    pentium g5400
    Motherboard
    gigabyte b365m ds3h
    Memory
    1x8gb 2400
    PSU
    xfx pro 450
Well, you guys were right, changing it out of RAID mode and it was almost there... WinnTsetup made it past applying the image and rebooting into phase 2. I was answering set up question and reached the one that asked if I wanted to verify my Windows install by having the code emailed to my Microsoft account. I thought, sure. I had logged into the account a couple days ago, so I knew it worked. Well, I kept looking for the email and it never came. In the meantime, the machine went into screen saver mode and wouldn't come back (I wasn't watching when it happened). I waited a few minutes and it was clear that it wasn't coming back. I shut it off via power butttton and rebootedn (no F keys). The first screen shot came up. I assume the lack of an emailed code is linked to this. I rebooted again, went to the bootable usb. I opened DiskGenius and reformatted ESP(0) and C: and tried again. The 2nd screen shot was the result. I then went into BOIS to see if anything had changed and it hadn't. I'd like to try again and but wait until it is fully installed and connected to internet, etc. before validating the license... (it didn't occur to me that the machine wasn't yet set up to request the code). But how do I clear the decks so I can try again?
 

Attachments

  • IMG_4401.jpg
    IMG_4401.jpg
    615 KB · Views: 5
  • IMG_4402.jpg
    IMG_4402.jpg
    353.4 KB · Views: 5

My Computer

System One

  • OS
    Windows 11 pro
    Computer type
    PC/Desktop
    Manufacturer/Model
    Dell XPS8960
    CPU
    Intel Core i7-13700
    Memory
    32GB DDR5 RAM
My suggestion is to start again, but do not use the WinNT Setup to install Windows.

First, Unplug ALL other drives, like USB and internal drives except your M.2 that you are going to install Windows to.
If you still have the Windows 11 ISO that was burned to a USB Flash drive with the Media Creation Tool, Or better yet burn the ISO with Rufus use that. If you can, add the IRST driver to this Windows installer


Attach USB, start computer pressing F12. Select the Flash Drive with the Windows 11 Installer. on it Choose your Language, Custom Install, Browse for IRST driver if necessary.
Do a Clean Install At Where Would Like to Install Windows? Delete All Partitions, until the drive is all Unallocated Space. Then Press Next, Windows will do the rest.

Go through the install. When it comes to the part where it asks to connect to the internet, Hold down the Shift key + F10 to start the Command Prompt type
Code:
oobe\bypassnro
and press enter. By passing the need for an MS Account. The computer will restart. It should pickup the Setup where you left off
Disable your Wifi and disconnect your Ethernet cable, so there is no Internet.
in that windows You now click you have NO Internet. This will allow you to create a Local Account with a name and password you make up. After that you can connect to the internet again.

How to Set Up Windows 11 Without a Microsoft Account

Later if you like you can covert the Local account to an MS account if you want.
 
Last edited:

My Computer

System One

  • OS
    Windows 11 Pro 64 bit 24H2
    Computer type
    PC/Desktop
    Manufacturer/Model
    Gigabyte Z390 UD
    CPU
    Intel Core i7 77000 3.60
    Motherboard
    Gigabyte Z390 UD
    Memory
    16 GB
    Graphics Card(s)
    nVidia GEForce RTX 2060 Super
    Sound Card
    onboard
    Monitor(s) Displays
    Two 27" Dell 4K monitors
    Screen Resolution
    3840 x 2160
    Hard Drives
    M.2 NVME SSD, 500 GB; Two 2TB Mechanical HDD's
    PSU
    850w PSU
    Case
    Cyberpower PC
    Cooling
    Water cooled
    Keyboard
    Backlit Cyberpower gamiong keyboard
    Mouse
    Backlit Cyberpower gaming mouse
    Internet Speed
    1 GB mbps
    Browser
    Brave
    Antivirus
    Windows Security
Thanks Spunk, I'll try that if I can get past the current problem... The drive is BitLocked but the recovery key isn't working... I checked it many times. I logged onto my Microsft account and double checked the numbers. It looks like there are a few methods to try and bypass bitlocker but they all assume your main drive is still able to operate windows.
 

My Computer

System One

  • OS
    Windows 11 pro
    Computer type
    PC/Desktop
    Manufacturer/Model
    Dell XPS8960
    CPU
    Intel Core i7-13700
    Memory
    32GB DDR5 RAM
A follow up. Since I had already recovered my personal data from the drive, I had nothing to lose by trying to format it and reinstall Windows 11 Pro. I was unable to format from the comman prompt, but I forget precise reason why, but it had something to do with the drive being Bitlocked. I booted into 23V7.iso and just for the hell of it, opened File Explorer, navigated to the C drive, right click, format, and it worked. I unchecked the quick format box, if that made any difference. It took a few hours (2 TB drive) but was successful. I tried installing via WinnTsetup and got much further along than last time (past the MS account code) but eventually, while answering set up questions, the screen went blank and machine became unresponsive. I think the question was 'do you want to save any apps, personal files, etc.' and I answered yes, (forgetting that I had wiped the drive). Would this have been enough to make the installer lose its lunch? or maybe this indicates a problem with the drive itself? Anyway, I decided it was time to send the machine back to seller for repair.
 

My Computer

System One

  • OS
    Windows 11 pro
    Computer type
    PC/Desktop
    Manufacturer/Model
    Dell XPS8960
    CPU
    Intel Core i7-13700
    Memory
    32GB DDR5 RAM
OK, you are making this a lot harder then it has to be.
If you want to do a Clean Install of Windows 11. Unplug any other external or internal drives other than the drive you want to install Windows on, so you don't get confused.

Boot the computer from the Windows 11 Installer USB Flash drive. it should have been made from the Windows 11 ISO using the Media Creation Tool on the same page.

Once booted to the flash drive, in the Installer, Choose Your Language, Install Now, then Custom Install.
In Where Do You want to install Windows? If you have more than one drive, select the drive you want to install Windows on.
If there are Partitions on this disk, Delete ALL of them until the whole drive is Unallocated Space.
Press Next. Windows will create partitions and format them during the Windows 11 install.
 

My Computer

System One

  • OS
    Windows 11 Pro 64 bit 24H2
    Computer type
    PC/Desktop
    Manufacturer/Model
    Gigabyte Z390 UD
    CPU
    Intel Core i7 77000 3.60
    Motherboard
    Gigabyte Z390 UD
    Memory
    16 GB
    Graphics Card(s)
    nVidia GEForce RTX 2060 Super
    Sound Card
    onboard
    Monitor(s) Displays
    Two 27" Dell 4K monitors
    Screen Resolution
    3840 x 2160
    Hard Drives
    M.2 NVME SSD, 500 GB; Two 2TB Mechanical HDD's
    PSU
    850w PSU
    Case
    Cyberpower PC
    Cooling
    Water cooled
    Keyboard
    Backlit Cyberpower gamiong keyboard
    Mouse
    Backlit Cyberpower gaming mouse
    Internet Speed
    1 GB mbps
    Browser
    Brave
    Antivirus
    Windows Security
Thank you for the input. I was under the impression that the Windows 11 image (iso) had to be on another drive or DVD to load from. I guess I could have gotten a larger usb and put the whole shooting match on there. But I am sure that I had the correct drive selected for the iso (external HD) and that the install was to be on the only other drive (C drive). And the install was working up until I answered 'yes' to the question 'do you want to save any of your apps, personal files, etc. ?' I had formatted the drive, so there was nothing to save. Is it a coincidence that the installation crashed then? By formatting C, I assumed there were no partitions left. If the machine was past it's warranty, I would have kept trying, but this machine is only 3 months old. So I contacted the retailer and they said 'send it in' and provided a shipping label. It was shipped back a week later and when booting it up, it did the exact same thing as before (would not complete boot, stopped at same point). I then took a close look at the box (the OEM box it came in). It was clear that the box had never been opened while in their possession (I recoginzed the tape patterns from when I shipped it back, and they hadn't been cut and re-taped). They wouldn't admit that but sent me another shipping label to send it in again. If it comes back with the same issue, I'll take another stab at it.
 

My Computer

System One

  • OS
    Windows 11 pro
    Computer type
    PC/Desktop
    Manufacturer/Model
    Dell XPS8960
    CPU
    Intel Core i7-13700
    Memory
    32GB DDR5 RAM
The install was working up until I answered 'yes' to the question 'do you want to save any of your apps, personal files, etc. ?'
This is not a Clean Install, this is a Windows Reset/Refresh. I suggest doing a Clean Install
If you still have the computer in your possession, then please follow the instructions in Post #69.

As stated, you want to Burn the Windows 11 ISO image to a USB Flash drive using the Media Creation Tool. You can add the Intel IRST drive to the root of the Flash drive if you like. You cannot use an external USB HDD.
You then would insert the Windows installer into the computer and start the computer. Press F12 continuously. You should see a one time Boot menu with all bootable options on your computer. Select your USB Flash drive of the Windows 11 installer.
The computer should boot into the Installer, unless you didn't burn it correctly.
Then just follow the steps in Post #69
 

My Computer

System One

  • OS
    Windows 11 Pro 64 bit 24H2
    Computer type
    PC/Desktop
    Manufacturer/Model
    Gigabyte Z390 UD
    CPU
    Intel Core i7 77000 3.60
    Motherboard
    Gigabyte Z390 UD
    Memory
    16 GB
    Graphics Card(s)
    nVidia GEForce RTX 2060 Super
    Sound Card
    onboard
    Monitor(s) Displays
    Two 27" Dell 4K monitors
    Screen Resolution
    3840 x 2160
    Hard Drives
    M.2 NVME SSD, 500 GB; Two 2TB Mechanical HDD's
    PSU
    850w PSU
    Case
    Cyberpower PC
    Cooling
    Water cooled
    Keyboard
    Backlit Cyberpower gamiong keyboard
    Mouse
    Backlit Cyberpower gaming mouse
    Internet Speed
    1 GB mbps
    Browser
    Brave
    Antivirus
    Windows Security
Well, Something funny is going on... I ended up using Rufus, since it had step by step instructions that were easier to follow. I successfully created the bootable usb and 'burned' the iso for Windows 11 (Win11_23H2_English_x64v2.iso) that I had previously downloaded. I was able to boot up the machine with this, delete all partitions and perfrom Windows installation (seemingly successful). I made sure it was the 'custom' install for a new PC. I followed the link posted in #66 with the exception that I couldn't get the Microsoft bypass to work. When I tried it, I got to the command window but the keyboard wouldn't work. I thought maybe it had to do with using a wireless keyboard, but trying again with a cable keyboard did the same thing. I was able to successfully get the one time passcode for my MS account and installation completed. First thing I did was go to Windows update and began downloading several updates. After a minute or so, the screen went blank and no response from the machine... What do you make of that?
Forgot to add, when I try a regular boot, it gets to the Dell logo and then goes blank, no response. So whatever was installed isn't working....
 
Last edited:

My Computer

System One

  • OS
    Windows 11 pro
    Computer type
    PC/Desktop
    Manufacturer/Model
    Dell XPS8960
    CPU
    Intel Core i7-13700
    Memory
    32GB DDR5 RAM
When you do a Clean Install of Windows 11, it loads files from the Flash drive then does its first Reboot. At this stage, you can remove the Flash drive and the computer should boot off of the SSD and finish the install. If you get this far, than there shouldn't be an issue with the SSD.

Another way to avoid the Microsoft Account login, is to unplug the Ethernet cable, and/or Do not connect to the Wireless connection, turn it off if possible. Or if it asks for an Email address just type in fake Email like Noone@nowhere.com.
In the section "Lets Connect You to a Network" Hold down the Shift key and press F10 to take you to the Command Prompt. Here type OOBE\BYPASSNRO and press Enter, then restart. In that same windows you should get a link for I don't have internet, where you can create a Local User Profile.

If you got too the Desktop, the install was successful. Before doing any Windows Update, please Reboot. If it fails, go back into Setup (Bios) go to the Boot Tab. Make sure UEFI Bios is selected. Make sure HDD mode is set to AHCI. The First Boot device should be Windows Boot Manager showing your SSD. Make sure this is selected.

If a reboot is successful, then go to Windows Update. If after that reboot fails, Boot off of the Windows Installer Flash drive. Choose Your Language. In the next windows click the link for Repair Your Computer. This will bring up the Troubleshooting menu. Here choose Advanced.
Here you can first try Startup Repair. You can also choose System Restore. When you booted the computer normally, if it felt like the computer was booted but the screen was black, here you can choose Advanced Startup and choose Enable Low Resolution Mode. Or Safe Mode, start normally without the flash drive.
Then install the Graphics driver for your video card from the Manufacturer.
 

My Computer

System One

  • OS
    Windows 11 Pro 64 bit 24H2
    Computer type
    PC/Desktop
    Manufacturer/Model
    Gigabyte Z390 UD
    CPU
    Intel Core i7 77000 3.60
    Motherboard
    Gigabyte Z390 UD
    Memory
    16 GB
    Graphics Card(s)
    nVidia GEForce RTX 2060 Super
    Sound Card
    onboard
    Monitor(s) Displays
    Two 27" Dell 4K monitors
    Screen Resolution
    3840 x 2160
    Hard Drives
    M.2 NVME SSD, 500 GB; Two 2TB Mechanical HDD's
    PSU
    850w PSU
    Case
    Cyberpower PC
    Cooling
    Water cooled
    Keyboard
    Backlit Cyberpower gamiong keyboard
    Mouse
    Backlit Cyberpower gaming mouse
    Internet Speed
    1 GB mbps
    Browser
    Brave
    Antivirus
    Windows Security
Thnks, Spunk. In the section "Lets Connect You to a Network" Hold down the Shift key and press F10 to take you to the Command Prompt. Here type OOBE\BYPASSNRO and press Enter, then restart. In that same windows you should get a link for I don't have internet, where you can create a Local User Profile., I was able to get the command prompt but I could not get keyboard to work. First time was with wireless keyboard, Re-re-installed and tried again with a usb keyboard; still wouldn't work.
I'll take a look at BIOS and see if it's booting from Windows boot manager.
 

My Computer

System One

  • OS
    Windows 11 pro
    Computer type
    PC/Desktop
    Manufacturer/Model
    Dell XPS8960
    CPU
    Intel Core i7-13700
    Memory
    32GB DDR5 RAM
UEFI Bios is selected. Make sure HDD mode is set to AHCI. The First Boot device should be Windows Boot Manager showing your SSD. Make sure this is selected.
This all checked out but reboot did not work. I booted off flash drive and selected Repair, then Start Up Repair. I got to 'attempting repair' before the screen went dark a few seconds later. Ugh.
 

My Computer

System One

  • OS
    Windows 11 pro
    Computer type
    PC/Desktop
    Manufacturer/Model
    Dell XPS8960
    CPU
    Intel Core i7-13700
    Memory
    32GB DDR5 RAM
I tried it again and this time if completed the attempt and 'could not repair'. I'm trying the 'reset PC with Windows 11 from the cloud. What the hell, worth a try...
 

My Computer

System One

  • OS
    Windows 11 pro
    Computer type
    PC/Desktop
    Manufacturer/Model
    Dell XPS8960
    CPU
    Intel Core i7-13700
    Memory
    32GB DDR5 RAM
That didn't work either... It reset everything, but failed fully boot. Could it be a hardware issue? I went ahead and reinstalled from my Rufus usb (clean install but with using MS account code number). It made it all the way through to desktop. Without touching it, about 2 minutes later, screen went dark. No response to mouse of keyboard. I'm not sure if this is a problem coming out of sleep mode or something else. This is repeatable behavior...
 

My Computer

System One

  • OS
    Windows 11 pro
    Computer type
    PC/Desktop
    Manufacturer/Model
    Dell XPS8960
    CPU
    Intel Core i7-13700
    Memory
    32GB DDR5 RAM
That definitely sounds like a hardware issue.

When it goes black screen, are you seeing a blinking cursor at the top left? If so, check your GPU. If not, check your CPU (and associated cooling of each component).

Some modern UEFI firmware also have a section that might be referred to as "Board monitor" or some such, where you can do things like adjust fans and such - if yours has one, try opening it and checking the various temps on the components it may have listed there.

After powering off the somputer and letting it sit for about 10 minutes or so, power it on and go straight into the UEFI settings. From there, find that board monitor section, if you have one, and see if anything is spiking dangerously high (in UEFI, for example, the CPU should be 50°C or less, being mostly at idle, and your GPU should be around that, too. Anything over 70°C when in your UEFI settings page.

If, after checking both of those, next thing I would test is the PSU to see if it is going bad.
 

My Computers

System One System Two

  • OS
    Windows 11 23H2 Current build
    Computer type
    PC/Desktop
    Manufacturer/Model
    HomeBrew
    CPU
    AMD Ryzen 9 3950X
    Motherboard
    MSI MEG X570 GODLIKE
    Memory
    4 * 32 GB - Corsair Vengeance 3600 MHz
    Graphics Card(s)
    EVGA GeForce RTX 3080 Ti XC3 ULTRA GAMING (12G-P5-3955-KR)
    Sound Card
    Realtek® ALC1220 Codec
    Monitor(s) Displays
    2x Eve Spectrum ES07D03 4K Gaming Monitor (Matte) | Eve Spectrum ES07DC9 4K Gaming Monitor (Glossy)
    Screen Resolution
    3x 3840 x 2160
    Hard Drives
    3x Samsung 980 Pro NVMe PCIe 4 M.2 2 TB SSD (MZ-V8P2T0B/AM) } 3x Sabrent Rocket NVMe 4.0 1 TB SSD (USB)
    PSU
    PC Power & Cooling’s Silencer Series 1050 Watt, 80 Plus Platinum
    Case
    Fractal Design Define 7 XL Dark ATX Full Tower Case
    Cooling
    Arctic Liquid Freezer III 420 RGB + Air 3x 140mm case fans (pull front) + 1x 120 mm (push back) and 1 x 120 mm (pull bottom)
    Keyboard
    SteelSeries Apex Pro Wired Gaming Keyboard
    Mouse
    Logitech MX Master 3S | MX Master 3 for Business
    Internet Speed
    AT&T LightSpeed Gigabit Duplex Ftth
    Browser
    Nightly (default) + Firefox (stable), Chrome, Edge , Arc
    Antivirus
    Defender + MB 5 Beta
  • Operating System
    ChromeOS Flex Dev Channel (current)
    Computer type
    Laptop
    Manufacturer/Model
    Dell Latitude E5470
    CPU
    Intel(R) Core(TM) i5-6300U CPU @ 2.40GHz, 2501 Mhz, 2 Core(s), 4 Logical Processor(s)
    Motherboard
    Dell
    Memory
    16 GB
    Graphics card(s)
    Intel(R) HD Graphics 520
    Sound Card
    Intel(R) HD Graphics 520 + RealTek Audio
    Monitor(s) Displays
    Dell laptop display 15"
    Screen Resolution
    1920 * 1080
    Hard Drives
    Toshiba 128GB M.2 22300 drive
    INTEL Cherryville 520 Series SSDSC2CW180A 180 GB SATA III SSD
    PSU
    Dell
    Case
    Dell
    Cooling
    Dell
    Mouse
    Logitech MX Master 3S (shared w. Sys 1) | Dell TouchPad
    Keyboard
    Dell
    Internet Speed
    AT&T LightSpeed Gigabit Duplex Ftth
Thanks, John. No blinking cursor at top left. I think the UEFI settings you refer to are accessed within Windows. I don't think it will run long enough to access anything. I think I'm going to send it back a 3rd time and demand a refund if they can't fix it. They give me pre-paid shipping labels, but not gas money to UPS...
 

My Computer

System One

  • OS
    Windows 11 pro
    Computer type
    PC/Desktop
    Manufacturer/Model
    Dell XPS8960
    CPU
    Intel Core i7-13700
    Memory
    32GB DDR5 RAM
The UEFI that JohnGalt suggest can be found in thew computer Bios.
Sending it back under warranty is the way you should go. I don't know what part of the world you are in, but here in the USA, there are UPS stores all over town. If you have a prepaid shipping label use it.
If you get it back and it still doesn't work, do not try to fix it yourself, send it back get it fixed or get a refund.
 
Last edited:

My Computer

System One

  • OS
    Windows 11 Pro 64 bit 24H2
    Computer type
    PC/Desktop
    Manufacturer/Model
    Gigabyte Z390 UD
    CPU
    Intel Core i7 77000 3.60
    Motherboard
    Gigabyte Z390 UD
    Memory
    16 GB
    Graphics Card(s)
    nVidia GEForce RTX 2060 Super
    Sound Card
    onboard
    Monitor(s) Displays
    Two 27" Dell 4K monitors
    Screen Resolution
    3840 x 2160
    Hard Drives
    M.2 NVME SSD, 500 GB; Two 2TB Mechanical HDD's
    PSU
    850w PSU
    Case
    Cyberpower PC
    Cooling
    Water cooled
    Keyboard
    Backlit Cyberpower gamiong keyboard
    Mouse
    Backlit Cyberpower gaming mouse
    Internet Speed
    1 GB mbps
    Browser
    Brave
    Antivirus
    Windows Security

Latest Support Threads

Back
Top Bottom