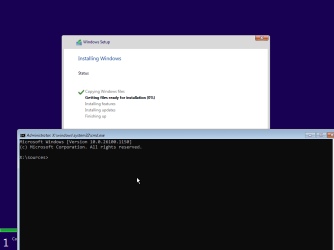
Solved W11 24h2 and old installation setup


Let's keep things simple. Create a standard Windows 11 23H2 USB flash drive, then replace install.wim (or install.esd) with that from 24H2 ISO. Now boot with this hybrid Windows 11 23H2/24H2 USB to install Windows 11 24H2.
 

My Computers

System One System Two

  • OS
    Windows 11 Pro 23H2 (build 22631.4249) test laptop, Windows 11 Pro v24H2 (build 26100.2894) main PC
    Computer type
    Laptop
    Manufacturer/Model
    Acer Extensa 5630EZ
    CPU
    Mobile DualCore Intel Core 2 Duo T7250, 2000 MHz
    Motherboard
    Acer Extensa 5630
    Memory
    4GB
    Graphics Card(s)
    Mobile Intel(R) GMA 4500M (Mobile 4 series)
    Sound Card
    Realtek ALC268 @ Intel 82801IB ICH9 - High Definition Audio Controller
    Monitor(s) Displays
    1
    Screen Resolution
    1280x800
    Hard Drives
    Samsung SSD 850 EVO 250GB SATA Device (250 GB, SATA-III)
    Internet Speed
    VDSL 50 Mbps
    Browser
    MICROSOFT EDGE
    Antivirus
    WINDOWS DEFENDER
    Other Info
    Legacy MBR installation, no TPM, no Secure Boot, no WDDM 2.0 graphics drivers, no SSE4.2, cannot get more unsupported ;) This is only my test laptop. I had installed Windows 11 here before upgrading my main PC. For my main PC I use everyday see my 2nd system specs.
  • Operating System
    Windows 11 Pro v24H2 (build 26100.2894)
    Computer type
    PC/Desktop
    Manufacturer/Model
    Custom-built PC
    CPU
    Intel Core-i7 3770 3.40GHz s1155 (3rd generation)
    Motherboard
    Asus P8H61 s1155 ATX
    Memory
    2x Kingston Hyper-X Blu 8GB DDR3-1600
    Graphics card(s)
    Gainward NE5105T018G1-1070F (nVidia GeForce GTX 1050Ti 4GB GDDR5)
    Sound Card
    Realtek HD audio (ALC887)
    Monitor(s) Displays
    Sony Bravia KDL-19L4000 19" LCD TV via VGA
    Screen Resolution
    1440x900 32-bit 60Hz
    Hard Drives
    WD Blue SA510 2.5 1000GB SSD as system disk, Western Digital Caviar Purple 4TB SATA III (WD40PURZ) as second
    PSU
    Thermaltake Litepower RGB 550W Full Wired
    Case
    SUPERCASE MIDI-TOWER
    Cooling
    Deepcool Gamma Archer CPU cooler, 1x 8cm fan at the back
    Mouse
    Sunnyline OptiEye PS/2
    Keyboard
    Mitsumi 101-key PS/2
    Internet Speed
    100Mbps
    Browser
    Microsoft Edge, Mozilla Firefox
    Antivirus
    Microsoft Windows Defender
    Other Info
    Legacy BIOS (MBR) installation, no TPM, no Secure Boot, WDDM 3.0 graphics drivers, WEI score 7.4
While it sounds easy, this workaround doesn't address the Black Lotus UEFI security hole. We know the 24H2 ISO has the updated boot files, but 23H2 or earlier ISO's don't. So if you care about the vulnerability, it's up to you to fix the host ISO.

Simply moving the install image around doesn't update the host ISO's boot.wim.
 

My Computer

System One

  • OS
    Windows 7
I'm wondering if the difference between the old and new setup is basically just the look and feel of the dialog screens during setup. It looks to me like the end result is all the same, so it may simply be stylistic differences.

Since unattended setup is going to bypass all of this, I wonder if there is simply no need to switch between an old and new setup in unattended setup.

In any case, both the old and new setups work flawlessly for me now, as does unattended setup.
 

My Computers

System One System Two

  • OS
    Win11 Pro 24H2
    Computer type
    PC/Desktop
    Manufacturer/Model
    Kamrui Mini PC, Model CK10
    CPU
    Intel i5-12450H
    Memory
    32GB
    Graphics Card(s)
    No GPU - Built-in Intel Graphics
    Sound Card
    Integrated
    Monitor(s) Displays
    HP Envy 32
    Screen Resolution
    2560 x 1440
    Hard Drives
    1 x 2TB NVMe SSD
    1 x 4TB NVMe SSD
    1 x 4TB 2.5" SSD
    PSU
    120W "Brick"
    Keyboard
    Corsair K70 Mechanical Keyboard
    Mouse
    Logitech MX Master 3
    Internet Speed
    1Gb Up / 1 Gb Down
    Browser
    Edge
    Antivirus
    Windows Defender
  • Operating System
    Win11 Pro 23H2
    Computer type
    Laptop
    Manufacturer/Model
    Lenovo ThinkBook 13x Gen 2
    CPU
    Intel i7-1255U
    Memory
    16 GB
    Graphics card(s)
    Intel Iris Xe Graphics
    Sound Card
    Realtek® ALC3306-CG codec
    Monitor(s) Displays
    13.3-inch IPS Display
    Screen Resolution
    WQXGA (2560 x 1600)
    Hard Drives
    2 TB 4 x 4 NVMe SSD
    PSU
    USB-C / Thunderbolt 4 Power / Charging
    Mouse
    Buttonless Glass Precision Touchpad
    Keyboard
    Backlit, spill resistant keyboard
    Internet Speed
    1Gb Up / 1Gb Down
    Browser
    Edge
    Antivirus
    Windows Defender
    Other Info
    WiFi 6e / Bluetooth 5.1 / Facial Recognition / Fingerprint Sensor / ToF (Time of Flight) Human Presence Sensor
The whole point of creating a hybrid USB is because the 24H2 bootloader is UEFI only, it doesn't boot in Legacy BIOS mode. So if you want to create a Legacy BIOS (MBR) installation you need this hybrid USB. Because Windows Setup will install the new 24H2 bootloader, you have to replace it with the 23H2 one after each restart until the installation is complete. Also have in mind that any Windows update might replace the bootloader and render the system unbootable. So you need to replace it again to boot into your Legacy BIOS installation. The same is true for upgrading from Legacy 23H2 installation to 24H2. You must replace the bootloader after each restart until the upgrade is complete. Also others might have an UEFI mode (GPT) installation but prefer the old Setup interface, especially if their unattended scripts don't work with the new Setup.
 

My Computers

System One System Two

  • OS
    Windows 11 Pro 23H2 (build 22631.4249) test laptop, Windows 11 Pro v24H2 (build 26100.2894) main PC
    Computer type
    Laptop
    Manufacturer/Model
    Acer Extensa 5630EZ
    CPU
    Mobile DualCore Intel Core 2 Duo T7250, 2000 MHz
    Motherboard
    Acer Extensa 5630
    Memory
    4GB
    Graphics Card(s)
    Mobile Intel(R) GMA 4500M (Mobile 4 series)
    Sound Card
    Realtek ALC268 @ Intel 82801IB ICH9 - High Definition Audio Controller
    Monitor(s) Displays
    1
    Screen Resolution
    1280x800
    Hard Drives
    Samsung SSD 850 EVO 250GB SATA Device (250 GB, SATA-III)
    Internet Speed
    VDSL 50 Mbps
    Browser
    MICROSOFT EDGE
    Antivirus
    WINDOWS DEFENDER
    Other Info
    Legacy MBR installation, no TPM, no Secure Boot, no WDDM 2.0 graphics drivers, no SSE4.2, cannot get more unsupported ;) This is only my test laptop. I had installed Windows 11 here before upgrading my main PC. For my main PC I use everyday see my 2nd system specs.
  • Operating System
    Windows 11 Pro v24H2 (build 26100.2894)
    Computer type
    PC/Desktop
    Manufacturer/Model
    Custom-built PC
    CPU
    Intel Core-i7 3770 3.40GHz s1155 (3rd generation)
    Motherboard
    Asus P8H61 s1155 ATX
    Memory
    2x Kingston Hyper-X Blu 8GB DDR3-1600
    Graphics card(s)
    Gainward NE5105T018G1-1070F (nVidia GeForce GTX 1050Ti 4GB GDDR5)
    Sound Card
    Realtek HD audio (ALC887)
    Monitor(s) Displays
    Sony Bravia KDL-19L4000 19" LCD TV via VGA
    Screen Resolution
    1440x900 32-bit 60Hz
    Hard Drives
    WD Blue SA510 2.5 1000GB SSD as system disk, Western Digital Caviar Purple 4TB SATA III (WD40PURZ) as second
    PSU
    Thermaltake Litepower RGB 550W Full Wired
    Case
    SUPERCASE MIDI-TOWER
    Cooling
    Deepcool Gamma Archer CPU cooler, 1x 8cm fan at the back
    Mouse
    Sunnyline OptiEye PS/2
    Keyboard
    Mitsumi 101-key PS/2
    Internet Speed
    100Mbps
    Browser
    Microsoft Edge, Mozilla Firefox
    Antivirus
    Microsoft Windows Defender
    Other Info
    Legacy BIOS (MBR) installation, no TPM, no Secure Boot, WDDM 3.0 graphics drivers, WEI score 7.4
I'm wondering if the difference between the old and new setup is basically just the look and feel of the dialog screens during setup. It looks to me like the end result is all the same, so it may simply be stylistic differences.

Since unattended setup is going to bypass all of this, I wonder if there is simply no need to switch between an old and new setup in unattended setup.

In any case, both the old and new setups work flawlessly for me now, as does unattended setup.
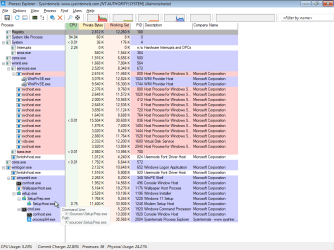
No, it's very different now. Running ProcMon in 23H2, you only see a single process: setup.exe

Windows 11 x64-2024-07-17-22-08-59.png

Running ProcMon in 24H2:

Windows 11 x64-2024-07-17-22-14-28.png

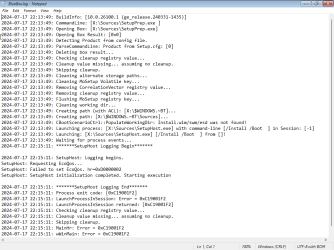
When you switch to legacy mode, 24H2 logs refers to the old setup.exe as BlueBox (because "New Coke" is White, and "Old Coke" is Blue).

Windows 11 x64-2024-07-17-22-15-53.png


MS rarely makes any changes to the Unattended file format. While it's backwards compatible the UI and the progress indicators are far different. I imagine there's other changes under the hood. SetupPrep.exe has always there for in-place upgrades, but we're running a clean install.
 

My Computer

System One

  • OS
    Windows 7
No, it's very different now. Running ProcMon in 23H2, you only see a single process: setup.exe

View attachment 101605

Running ProcMon in 24H2:

View attachment 101606

When you switch to legacy mode, 24H2 logs refers to the old setup.exe as BlueBox (because "New Coke" is White, and "Old Coke" is Blue).

View attachment 101607


MS rarely makes any changes to the Unattended file format. While it's backwards compatible the UI and the progress indicators are far different. I imagine there's other changes under the hood. SetupPrep.exe has always there for in-place upgrades, but we're running a clean install.

Thanks, Garlin. That's a great summary.

One other thing that I have noticed:

I always update my Windows images by injecting the latest Patch Tuesday updates. This includes the latest cumulative update / SSU, SafeOS update, Setup update, .NET update, etc. When I do this with 24H2 release preview builds, the resulting media simply doesn't work for a clean install. It's possible that not all the updates needed are being made available on the Microsoft Update Catalog. I'm just hoping that it is not something greater that is going to cause me great difficulties in the future once the final x64 builds are released.
 

My Computers

System One System Two

  • OS
    Win11 Pro 24H2
    Computer type
    PC/Desktop
    Manufacturer/Model
    Kamrui Mini PC, Model CK10
    CPU
    Intel i5-12450H
    Memory
    32GB
    Graphics Card(s)
    No GPU - Built-in Intel Graphics
    Sound Card
    Integrated
    Monitor(s) Displays
    HP Envy 32
    Screen Resolution
    2560 x 1440
    Hard Drives
    1 x 2TB NVMe SSD
    1 x 4TB NVMe SSD
    1 x 4TB 2.5" SSD
    PSU
    120W "Brick"
    Keyboard
    Corsair K70 Mechanical Keyboard
    Mouse
    Logitech MX Master 3
    Internet Speed
    1Gb Up / 1 Gb Down
    Browser
    Edge
    Antivirus
    Windows Defender
  • Operating System
    Win11 Pro 23H2
    Computer type
    Laptop
    Manufacturer/Model
    Lenovo ThinkBook 13x Gen 2
    CPU
    Intel i7-1255U
    Memory
    16 GB
    Graphics card(s)
    Intel Iris Xe Graphics
    Sound Card
    Realtek® ALC3306-CG codec
    Monitor(s) Displays
    13.3-inch IPS Display
    Screen Resolution
    WQXGA (2560 x 1600)
    Hard Drives
    2 TB 4 x 4 NVMe SSD
    PSU
    USB-C / Thunderbolt 4 Power / Charging
    Mouse
    Buttonless Glass Precision Touchpad
    Keyboard
    Backlit, spill resistant keyboard
    Internet Speed
    1Gb Up / 1Gb Down
    Browser
    Edge
    Antivirus
    Windows Defender
    Other Info
    WiFi 6e / Bluetooth 5.1 / Facial Recognition / Fingerprint Sensor / ToF (Time of Flight) Human Presence Sensor
I would avoid injecting updates just in case the Setup is affected like you said. I would download all the updates from Microsoft Update Catalog and save to a folder in the Windows 11 Setup USB. So after I install Windows 11 I don't have to download them again, just install them. It is safer. The only think I would inject would be drivers, but again these can become outdated. Why not download them in a folder so you can update them as needed? That's what I do since Windows 95. Download all drivers in C:\DRIVERS and replace as needed.
 

My Computers

System One System Two

  • OS
    Windows 11 Pro 23H2 (build 22631.4249) test laptop, Windows 11 Pro v24H2 (build 26100.2894) main PC
    Computer type
    Laptop
    Manufacturer/Model
    Acer Extensa 5630EZ
    CPU
    Mobile DualCore Intel Core 2 Duo T7250, 2000 MHz
    Motherboard
    Acer Extensa 5630
    Memory
    4GB
    Graphics Card(s)
    Mobile Intel(R) GMA 4500M (Mobile 4 series)
    Sound Card
    Realtek ALC268 @ Intel 82801IB ICH9 - High Definition Audio Controller
    Monitor(s) Displays
    1
    Screen Resolution
    1280x800
    Hard Drives
    Samsung SSD 850 EVO 250GB SATA Device (250 GB, SATA-III)
    Internet Speed
    VDSL 50 Mbps
    Browser
    MICROSOFT EDGE
    Antivirus
    WINDOWS DEFENDER
    Other Info
    Legacy MBR installation, no TPM, no Secure Boot, no WDDM 2.0 graphics drivers, no SSE4.2, cannot get more unsupported ;) This is only my test laptop. I had installed Windows 11 here before upgrading my main PC. For my main PC I use everyday see my 2nd system specs.
  • Operating System
    Windows 11 Pro v24H2 (build 26100.2894)
    Computer type
    PC/Desktop
    Manufacturer/Model
    Custom-built PC
    CPU
    Intel Core-i7 3770 3.40GHz s1155 (3rd generation)
    Motherboard
    Asus P8H61 s1155 ATX
    Memory
    2x Kingston Hyper-X Blu 8GB DDR3-1600
    Graphics card(s)
    Gainward NE5105T018G1-1070F (nVidia GeForce GTX 1050Ti 4GB GDDR5)
    Sound Card
    Realtek HD audio (ALC887)
    Monitor(s) Displays
    Sony Bravia KDL-19L4000 19" LCD TV via VGA
    Screen Resolution
    1440x900 32-bit 60Hz
    Hard Drives
    WD Blue SA510 2.5 1000GB SSD as system disk, Western Digital Caviar Purple 4TB SATA III (WD40PURZ) as second
    PSU
    Thermaltake Litepower RGB 550W Full Wired
    Case
    SUPERCASE MIDI-TOWER
    Cooling
    Deepcool Gamma Archer CPU cooler, 1x 8cm fan at the back
    Mouse
    Sunnyline OptiEye PS/2
    Keyboard
    Mitsumi 101-key PS/2
    Internet Speed
    100Mbps
    Browser
    Microsoft Edge, Mozilla Firefox
    Antivirus
    Microsoft Windows Defender
    Other Info
    Legacy BIOS (MBR) installation, no TPM, no Secure Boot, WDDM 3.0 graphics drivers, WEI score 7.4
I'm talking about this (what else could it be?)

View attachment 98290

And my question is in the 1st post
Hi There,

if your HDD setting in BIOS is Raid mode, you shall use the "Previous Version Setup", otherwise after setup start, it won't boot due to no bootable driver.
 

My Computer

System One

  • OS
    windows 11 22H2
    Computer type
    PC/Desktop
    Manufacturer/Model
    Dell Optiplex 7400 AIO
    CPU
    i5-12500
    Memory
    16MB
    Screen Resolution
    1920x1080
After playing around, the workaround was rather simple. Just run the old version, X:\sources\setup.exe

You can insert this XML block into your answer file:
Code:
        <settings pass="windowsPE">
                <component name="Microsoft-Windows-Setup" processorArchitecture="amd64" publicKeyToken="31bf3856ad364e35" language="neutral" versionScope="nonSxS" xmlns:wcm="http://schemas.microsoft.com/WMIConfig/2002/State" xmlns:xsi="http://www.w3.org/2001/XMLSchema-instance">
                        <RunSynchronous>
                                <RunSynchronousCommand wcm:action="add">
                                        <Description>Switch to legacy Setup</Description>
                                        <Order>1</Order>
                                        <Path>reg add "HKEY_LOCAL_MACHINE\SYSTEM\Setup" /v CmdLine /t REG_SZ /d "X:\sources\setup.exe" /f</Path>
                                </RunSynchronousCommand>
                        </RunSynchronous>
                </component>
        </settings>

If you're not using an answer file, you'll need to integrate the same reg value into your 24H2 boot.wim.
Code:
[HKEY_LOCAL_MACHINE\SYSTEM\Setup]
"CmdLine"="X:\\sources\\setup.exe"

Windows 11 x64-2024-07-18-00-07-09.png
 

My Computer

System One

  • OS
    Windows 7
I would avoid injecting updates just in case the Setup is affected like you said.
So, let's put aside 24H2 for one brief moment. In editions prior to 24H2, Microsoft posts "Setup Dynamic Updates" when needed. So, I make sure to include that when updating a Windows image. Put another way, it doesn't matter if setup is affected because the updates for setup are included in my image updates.
 

My Computers

System One System Two

  • OS
    Win11 Pro 24H2
    Computer type
    PC/Desktop
    Manufacturer/Model
    Kamrui Mini PC, Model CK10
    CPU
    Intel i5-12450H
    Memory
    32GB
    Graphics Card(s)
    No GPU - Built-in Intel Graphics
    Sound Card
    Integrated
    Monitor(s) Displays
    HP Envy 32
    Screen Resolution
    2560 x 1440
    Hard Drives
    1 x 2TB NVMe SSD
    1 x 4TB NVMe SSD
    1 x 4TB 2.5" SSD
    PSU
    120W "Brick"
    Keyboard
    Corsair K70 Mechanical Keyboard
    Mouse
    Logitech MX Master 3
    Internet Speed
    1Gb Up / 1 Gb Down
    Browser
    Edge
    Antivirus
    Windows Defender
  • Operating System
    Win11 Pro 23H2
    Computer type
    Laptop
    Manufacturer/Model
    Lenovo ThinkBook 13x Gen 2
    CPU
    Intel i7-1255U
    Memory
    16 GB
    Graphics card(s)
    Intel Iris Xe Graphics
    Sound Card
    Realtek® ALC3306-CG codec
    Monitor(s) Displays
    13.3-inch IPS Display
    Screen Resolution
    WQXGA (2560 x 1600)
    Hard Drives
    2 TB 4 x 4 NVMe SSD
    PSU
    USB-C / Thunderbolt 4 Power / Charging
    Mouse
    Buttonless Glass Precision Touchpad
    Keyboard
    Backlit, spill resistant keyboard
    Internet Speed
    1Gb Up / 1Gb Down
    Browser
    Edge
    Antivirus
    Windows Defender
    Other Info
    WiFi 6e / Bluetooth 5.1 / Facial Recognition / Fingerprint Sensor / ToF (Time of Flight) Human Presence Sensor
After playing around, the workaround was rather simple.

I can't wait to try this in the morning to see if this also works with media that I patch.

As always, extremely grateful for the info.

By any chance, do you mind sharing where all your knowledge on this comes from? I'm always impressed by all the info you have :-).

Are there any online resources that you find especially helpful? I know just enough to be dangerous, but there are still a lot of gaps in my knowledge.
 

My Computers

System One System Two

  • OS
    Win11 Pro 24H2
    Computer type
    PC/Desktop
    Manufacturer/Model
    Kamrui Mini PC, Model CK10
    CPU
    Intel i5-12450H
    Memory
    32GB
    Graphics Card(s)
    No GPU - Built-in Intel Graphics
    Sound Card
    Integrated
    Monitor(s) Displays
    HP Envy 32
    Screen Resolution
    2560 x 1440
    Hard Drives
    1 x 2TB NVMe SSD
    1 x 4TB NVMe SSD
    1 x 4TB 2.5" SSD
    PSU
    120W "Brick"
    Keyboard
    Corsair K70 Mechanical Keyboard
    Mouse
    Logitech MX Master 3
    Internet Speed
    1Gb Up / 1 Gb Down
    Browser
    Edge
    Antivirus
    Windows Defender
  • Operating System
    Win11 Pro 23H2
    Computer type
    Laptop
    Manufacturer/Model
    Lenovo ThinkBook 13x Gen 2
    CPU
    Intel i7-1255U
    Memory
    16 GB
    Graphics card(s)
    Intel Iris Xe Graphics
    Sound Card
    Realtek® ALC3306-CG codec
    Monitor(s) Displays
    13.3-inch IPS Display
    Screen Resolution
    WQXGA (2560 x 1600)
    Hard Drives
    2 TB 4 x 4 NVMe SSD
    PSU
    USB-C / Thunderbolt 4 Power / Charging
    Mouse
    Buttonless Glass Precision Touchpad
    Keyboard
    Backlit, spill resistant keyboard
    Internet Speed
    1Gb Up / 1Gb Down
    Browser
    Edge
    Antivirus
    Windows Defender
    Other Info
    WiFi 6e / Bluetooth 5.1 / Facial Recognition / Fingerprint Sensor / ToF (Time of Flight) Human Presence Sensor
By any chance, do you mind sharing where all your knowledge on this comes from? I'm always impressed by all the info you have :-).

Are there any online resources that you find especially helpful? I know just enough to be dangerous, but there are still a lot of gaps in my knowledge.
Here's a short list of my favorite technical resources. Most of them are fairly advanced, but it's like Zen -- you can absorb background details by osmosis.

Out of Office Hours
Windows PE startup sequence explained
SetupComplete.cmd & Related Registry Values
Back to Basics – Driver Installation Order in WinPE Matters

Eventually one day, something they wrote finally makes sense for a problem you're looking at. Folks who work on MDT/OSD projects, even though it's a different deployment technology, often have a great deal of technical insight into the Windows install workflow.
 

My Computer

System One

  • OS
    Windows 7
Here's a short list of my favorite technical resources.
Garlin, thank you so much this. I really do appreciate it.
 

My Computers

System One System Two

  • OS
    Win11 Pro 24H2
    Computer type
    PC/Desktop
    Manufacturer/Model
    Kamrui Mini PC, Model CK10
    CPU
    Intel i5-12450H
    Memory
    32GB
    Graphics Card(s)
    No GPU - Built-in Intel Graphics
    Sound Card
    Integrated
    Monitor(s) Displays
    HP Envy 32
    Screen Resolution
    2560 x 1440
    Hard Drives
    1 x 2TB NVMe SSD
    1 x 4TB NVMe SSD
    1 x 4TB 2.5" SSD
    PSU
    120W "Brick"
    Keyboard
    Corsair K70 Mechanical Keyboard
    Mouse
    Logitech MX Master 3
    Internet Speed
    1Gb Up / 1 Gb Down
    Browser
    Edge
    Antivirus
    Windows Defender
  • Operating System
    Win11 Pro 23H2
    Computer type
    Laptop
    Manufacturer/Model
    Lenovo ThinkBook 13x Gen 2
    CPU
    Intel i7-1255U
    Memory
    16 GB
    Graphics card(s)
    Intel Iris Xe Graphics
    Sound Card
    Realtek® ALC3306-CG codec
    Monitor(s) Displays
    13.3-inch IPS Display
    Screen Resolution
    WQXGA (2560 x 1600)
    Hard Drives
    2 TB 4 x 4 NVMe SSD
    PSU
    USB-C / Thunderbolt 4 Power / Charging
    Mouse
    Buttonless Glass Precision Touchpad
    Keyboard
    Backlit, spill resistant keyboard
    Internet Speed
    1Gb Up / 1Gb Down
    Browser
    Edge
    Antivirus
    Windows Defender
    Other Info
    WiFi 6e / Bluetooth 5.1 / Facial Recognition / Fingerprint Sensor / ToF (Time of Flight) Human Presence Sensor
The whole point of creating a hybrid USB is because the 24H2 bootloader is UEFI only, it doesn't boot in Legacy BIOS mode.

I just recently installed Windows 11 24H2 on an MBR disk (VMware Workstation 17 Player). A clean installation is possible on an MBR disk if you skip the system requirements check, e.g. with a Rufus USB stick.
 

My Computer

System One

  • OS
    Windows 11 Pro
I cannot confirm it as I haven't got my hands on 24H2, I wait for the standard release in October or November 2024. However, I had read in some sites that 24H2 doesn't boot in Legacy BIOS mode. Probably they didn't bypass compatibility check.
 

My Computers

System One System Two

  • OS
    Windows 11 Pro 23H2 (build 22631.4249) test laptop, Windows 11 Pro v24H2 (build 26100.2894) main PC
    Computer type
    Laptop
    Manufacturer/Model
    Acer Extensa 5630EZ
    CPU
    Mobile DualCore Intel Core 2 Duo T7250, 2000 MHz
    Motherboard
    Acer Extensa 5630
    Memory
    4GB
    Graphics Card(s)
    Mobile Intel(R) GMA 4500M (Mobile 4 series)
    Sound Card
    Realtek ALC268 @ Intel 82801IB ICH9 - High Definition Audio Controller
    Monitor(s) Displays
    1
    Screen Resolution
    1280x800
    Hard Drives
    Samsung SSD 850 EVO 250GB SATA Device (250 GB, SATA-III)
    Internet Speed
    VDSL 50 Mbps
    Browser
    MICROSOFT EDGE
    Antivirus
    WINDOWS DEFENDER
    Other Info
    Legacy MBR installation, no TPM, no Secure Boot, no WDDM 2.0 graphics drivers, no SSE4.2, cannot get more unsupported ;) This is only my test laptop. I had installed Windows 11 here before upgrading my main PC. For my main PC I use everyday see my 2nd system specs.
  • Operating System
    Windows 11 Pro v24H2 (build 26100.2894)
    Computer type
    PC/Desktop
    Manufacturer/Model
    Custom-built PC
    CPU
    Intel Core-i7 3770 3.40GHz s1155 (3rd generation)
    Motherboard
    Asus P8H61 s1155 ATX
    Memory
    2x Kingston Hyper-X Blu 8GB DDR3-1600
    Graphics card(s)
    Gainward NE5105T018G1-1070F (nVidia GeForce GTX 1050Ti 4GB GDDR5)
    Sound Card
    Realtek HD audio (ALC887)
    Monitor(s) Displays
    Sony Bravia KDL-19L4000 19" LCD TV via VGA
    Screen Resolution
    1440x900 32-bit 60Hz
    Hard Drives
    WD Blue SA510 2.5 1000GB SSD as system disk, Western Digital Caviar Purple 4TB SATA III (WD40PURZ) as second
    PSU
    Thermaltake Litepower RGB 550W Full Wired
    Case
    SUPERCASE MIDI-TOWER
    Cooling
    Deepcool Gamma Archer CPU cooler, 1x 8cm fan at the back
    Mouse
    Sunnyline OptiEye PS/2
    Keyboard
    Mitsumi 101-key PS/2
    Internet Speed
    100Mbps
    Browser
    Microsoft Edge, Mozilla Firefox
    Antivirus
    Microsoft Windows Defender
    Other Info
    Legacy BIOS (MBR) installation, no TPM, no Secure Boot, WDDM 3.0 graphics drivers, WEI score 7.4
I cannot confirm it as I haven't got my hands on 24H2, I wait for the standard release in October or November 2024. However, I had read in some sites that 24H2 doesn't boot in Legacy BIOS mode. Probably they didn't bypass compatibility check.
Using the bypass, I can install 26100.1150 on a MBR disk.
 

My Computer

System One

  • OS
    Windows 7
After playing around, the workaround was rather simple. Just run the old version, X:\sources\setup.exe

You can insert this XML block into your answer file:
Code:
        <settings pass="windowsPE">
                <component name="Microsoft-Windows-Setup" processorArchitecture="amd64" publicKeyToken="31bf3856ad364e35" language="neutral" versionScope="nonSxS" xmlns:wcm="http://schemas.microsoft.com/WMIConfig/2002/State" xmlns:xsi="http://www.w3.org/2001/XMLSchema-instance">
                        <RunSynchronous>
                                <RunSynchronousCommand wcm:action="add">
                                        <Description>Switch to legacy Setup</Description>
                                        <Order>1</Order>
                                        <Path>reg add "HKEY_LOCAL_MACHINE\SYSTEM\Setup" /v CmdLine /t REG_SZ /d "X:\sources\setup.exe" /f</Path>
                                </RunSynchronousCommand>
                        </RunSynchronous>
                </component>
        </settings>

If you're not using an answer file, you'll need to integrate the same reg value into your 24H2 boot.wim.
Code:
[HKEY_LOCAL_MACHINE\SYSTEM\Setup]
"CmdLine"="X:\\sources\\setup.exe"

View attachment 101612
@garlin
Is this XML for the autounattend.xml?

Any specific area to put this? Or just simply put this anywhere i.e. at the end of the file?
 

My Computers

System One System Two

  • OS
    Windows 11 Pro Latest Retail Build
    Computer type
    PC/Desktop
    Manufacturer/Model
    Gaming-Rig (Intel 13th Gen based Self-Assembled)
    CPU
    Intel 13th Gen i5-13600KF
    Motherboard
    MSI PRO Z790-A WIFI DDR5
    Memory
    Adata XPG LANCER RGB 32GB [16x2 Dual Channel] @7400 MT/s CL:36
    Graphics Card(s)
    Nvidia GeForce RTX 4060 Ti 16GB OC
    Sound Card
    Motherboard Realtek UDA DTS Audio
    Monitor(s) Displays
    Hisense 50" 4K QLED 120Hz
    Screen Resolution
    4096 * 2160 (4K)
    Hard Drives
    1. SSD1: NVME PCI-e Gen4x4 Kingstone KC3000 [500 GB]
    2. SSD2: NVME PCI-e Gen4x4 Adata XPG S70 Blade [1 TB]
    3. HDD 1: Seagate 4 TB
    4. HDD 2: WD BLUE 2TB
    PSU
    Deepcool 750W Gold Full Modular
    Case
    Deepcool CH510 MESH DIGITAL
    Cooling
    Deepcool AK400 Zero Dark Edition CPU Cooler + Arctic Chassis Fans
    Keyboard
    Razer Cynosa V2 RGB Gaming Keyboard
    Mouse
    Logitech G304 LIGHTSPEED Wireless Gaming Mouse
    Internet Speed
    100 Mbps Fiber Broadband
    Browser
    Chrome+Firefox (Latest always)
    Antivirus
    Eset Security Ultimate (Latest)
    Other Info
    My Gaming Configurations
  • Operating System
    Windows 11 Pro Latest Build
    Computer type
    PC/Desktop
    Manufacturer/Model
    Work Desktop (Intel 12th Gen based Self-Assembled)
    CPU
    Intel 12th Gen i5-12400
    Motherboard
    MSI MAG B760 Tomahawk WIFI
    Memory
    Crucial Ballistix DDR4 32GB [16x2 Dual Channel] @3600 CL:16
    Graphics card(s)
    Integrated iGPU
    Sound Card
    Motherboard Realtek UDA DTS Audio
    Monitor(s) Displays
    Sony Bravia 32" LED TV
    Screen Resolution
    1920 * 1080 (Full HD)
    Hard Drives
    1. SSD: NVME M.2 2280 Gen3x4 WD Blue SN570 250GB
    2. HDD: WD Blue 1TB @5400
    PSU
    Cooler Master MWE V2 750W Gold Fully Modular
    Case
    Cooler Master MasterBox MB540 ARGB
    Cooling
    Intel Stock CPU Cooler + Arctic Chassis Fans
    Mouse
    Logitech K295 Wireless M&K Combo
    Keyboard
    Logitech K295 Wireless M&K Combo
    Internet Speed
    100 Mbps Optical Fiber Broadband
    Browser
    Google+Firefox (Latest)
    Antivirus
    Eset Security Ultimate (Latest)
    Other Info
    My Workbench Configuration
I won't take the time to explain how an Unattended XML layout works, but here's the clear instructions:

1. If you have an existing "windowsPE / Microsoft-Windows-Setup" section, then only insert the block of lines for <RunSychronous>.
Check that the <Order> doesn't overlap any other RunSynchronousCommand.​

2. If you don't have a "windowsPE" section, then insert the entire block anywhere. Including the end of the file.

3. If you don't have any answer file, this is the bare minimum file:
Code:
<?xml version="1.0" encoding="utf-8"?>
<unattend xmlns="urn:schemas-microsoft-com:unattend">
        <settings pass="windowsPE">
                <component name="Microsoft-Windows-Setup" processorArchitecture="amd64" publicKeyToken="31bf3856ad364e35" language="neutral" versionScope="nonSxS" xmlns:wcm="http://schemas.microsoft.com/WMIConfig/2002/State" xmlns:xsi="http://www.w3.org/2001/XMLSchema-instance">
                        <RunSynchronous>
                                <RunSynchronousCommand wcm:action="add">
                                        <Description>Switch to legacy Setup</Description>
                                        <Order>1</Order>
                                        <Path>reg add "HKEY_LOCAL_MACHINE\SYSTEM\Setup" /v CmdLine /t REG_SZ /d "X:\sources\setup.exe" /f</Path>
                                </RunSynchronousCommand>
                        </RunSynchronous>
                        <UserData>
                                <ProductKey>
                                        <Key></Key>
                                </ProductKey>
                        </UserData>
                </component>
        </settings>
</unattend>

4. If you have NTLite (which you do), just import the reg file into boot.wim. Then it's always there, no matter what's inside the autounattend.xml.
 

My Computer

System One

  • OS
    Windows 7
I won't take the time to explain how an Unattended XML layout works, but here's the clear instructions:

1. If you have an existing "windowsPE / Microsoft-Windows-Setup" section, then only insert the block of lines for <RunSychronous>.
Check that the <Order> doesn't overlap any other RunSynchronousCommand.​

2. If you don't have a "windowsPE" section, then insert the entire block anywhere. Including the end of the file.

3. If you don't have any answer file, this is the bare minimum file:
Code:
<?xml version="1.0" encoding="utf-8"?>
<unattend xmlns="urn:schemas-microsoft-com:unattend">
        <settings pass="windowsPE">
                <component name="Microsoft-Windows-Setup" processorArchitecture="amd64" publicKeyToken="31bf3856ad364e35" language="neutral" versionScope="nonSxS" xmlns:wcm="http://schemas.microsoft.com/WMIConfig/2002/State" xmlns:xsi="http://www.w3.org/2001/XMLSchema-instance">
                        <RunSynchronous>
                                <RunSynchronousCommand wcm:action="add">
                                        <Description>Switch to legacy Setup</Description>
                                        <Order>1</Order>
                                        <Path>reg add "HKEY_LOCAL_MACHINE\SYSTEM\Setup" /v CmdLine /t REG_SZ /d "X:\sources\setup.exe" /f</Path>
                                </RunSynchronousCommand>
                        </RunSynchronous>
                        <UserData>
                                <ProductKey>
                                        <Key></Key>
                                </ProductKey>
                        </UserData>
                </component>
        </settings>
</unattend>

4. If you have NTLite (which you do), just import the reg file into boot.wim. Then it's always there, no matter what's inside the autounattend.xml.
I use NTLite & you know that very well.

I initially thought to edit the autounattend.xml created/generated by the NTLite unattended section, to add this code you shared. That's why asked, where to put those lines exactly.

Now, as you're suggesting just import the REG to boot.wim, which one precisely?
1. Microsoft Windows PE (x64)
or
2. Microsoft Windows Setup (x64)?
or in both?

1.png

& do I need to add the REG in the NTLite/Registry section first, then add the from the 'reapply tasks across editions', like this?
2.png

Or is there any other way to add the REG directly/separately only in to (any of) the boot.wim (1 or 2 or both)?
 

My Computers

System One System Two

  • OS
    Windows 11 Pro Latest Retail Build
    Computer type
    PC/Desktop
    Manufacturer/Model
    Gaming-Rig (Intel 13th Gen based Self-Assembled)
    CPU
    Intel 13th Gen i5-13600KF
    Motherboard
    MSI PRO Z790-A WIFI DDR5
    Memory
    Adata XPG LANCER RGB 32GB [16x2 Dual Channel] @7400 MT/s CL:36
    Graphics Card(s)
    Nvidia GeForce RTX 4060 Ti 16GB OC
    Sound Card
    Motherboard Realtek UDA DTS Audio
    Monitor(s) Displays
    Hisense 50" 4K QLED 120Hz
    Screen Resolution
    4096 * 2160 (4K)
    Hard Drives
    1. SSD1: NVME PCI-e Gen4x4 Kingstone KC3000 [500 GB]
    2. SSD2: NVME PCI-e Gen4x4 Adata XPG S70 Blade [1 TB]
    3. HDD 1: Seagate 4 TB
    4. HDD 2: WD BLUE 2TB
    PSU
    Deepcool 750W Gold Full Modular
    Case
    Deepcool CH510 MESH DIGITAL
    Cooling
    Deepcool AK400 Zero Dark Edition CPU Cooler + Arctic Chassis Fans
    Keyboard
    Razer Cynosa V2 RGB Gaming Keyboard
    Mouse
    Logitech G304 LIGHTSPEED Wireless Gaming Mouse
    Internet Speed
    100 Mbps Fiber Broadband
    Browser
    Chrome+Firefox (Latest always)
    Antivirus
    Eset Security Ultimate (Latest)
    Other Info
    My Gaming Configurations
  • Operating System
    Windows 11 Pro Latest Build
    Computer type
    PC/Desktop
    Manufacturer/Model
    Work Desktop (Intel 12th Gen based Self-Assembled)
    CPU
    Intel 12th Gen i5-12400
    Motherboard
    MSI MAG B760 Tomahawk WIFI
    Memory
    Crucial Ballistix DDR4 32GB [16x2 Dual Channel] @3600 CL:16
    Graphics card(s)
    Integrated iGPU
    Sound Card
    Motherboard Realtek UDA DTS Audio
    Monitor(s) Displays
    Sony Bravia 32" LED TV
    Screen Resolution
    1920 * 1080 (Full HD)
    Hard Drives
    1. SSD: NVME M.2 2280 Gen3x4 WD Blue SN570 250GB
    2. HDD: WD Blue 1TB @5400
    PSU
    Cooler Master MWE V2 750W Gold Fully Modular
    Case
    Cooler Master MasterBox MB540 ARGB
    Cooling
    Intel Stock CPU Cooler + Arctic Chassis Fans
    Mouse
    Logitech K295 Wireless M&K Combo
    Keyboard
    Logitech K295 Wireless M&K Combo
    Internet Speed
    100 Mbps Optical Fiber Broadband
    Browser
    Google+Firefox (Latest)
    Antivirus
    Eset Security Ultimate (Latest)
    Other Info
    My Workbench Configuration
Windows PE and Windows Setup are basically the same image, except only one of them has Setup files.
ISO/USB boot only picks the image marked with Flag = 2.

WinPE is provided for IT & system modders who write their own custom deployment tools. And is the basis for Recovery tools like WinXPE. While you can apply changes to either image, Setup is the only one that matters.

For NTLite, you only need to check boot.wim (2) from "Reapply tasks across editions". Another way to perform this, is load one of the images from boot.wim directly, and add the Registry file. "Reapply tasks across editions" is a time saver so you don't need to do this separate step every time you work on a Windows image.
 

My Computer

System One

  • OS
    Windows 7

Latest Support Threads

Back
Top Bottom