Okay to confirm I need Windows 11 Pro to use Bitlocker without the need to sign into a MS account?
There actually is a way to do this with a local account and without getting win11 Pro, but it's quite convoluted. Probably easier to use VeraCrypt. That being said, here's how I got it to work:
First, here's our starting point. At Settings > Privacy & Security > Device Encryption, "Device encryption" is turned on, but there is a yellow warning above the toggle that says "Sign in with your Microsoft account to finish encrypting this device".
Checking bitlocker status, we also see that Encryption is 'on', but Protection is "off" and Key Protectors is "None found".
This tutorial will show you how to check the current status if BitLocker Drive Encryption for a drive in Windows 10 and Windows 11. BitLocker Drive Encryption is a data protection feature that integrates with the operating system and addresses the threats of data theft or exposure from lost...

www.elevenforum.com

This means the device is not being encrypted because we're using a local file and have no microsoft file associated (
BitLocker overview and
BitLocker Protection Off?).
To get this to work, we need to add 2 key protectors (TPM and Recovery Password) then we need to turn protection "on".
First we open a powershell terminal with administrative privileges. We are now going to manually add TPM as a key protector by entering the following command:
Get-BitLockerVolume -MountPoint X | Add-BitLockerKeyProtector -TPMProtector
(X is your target drive. I used <C> for mine):

(syntax here:
Add-BitLockerKeyProtector (BitLocker))
Check bitlocker drive status again, using either of:
manage-bde -status
Get-BitLockerVolume -MountPoint X | Format-List

You'll see that we now have a designated Key Protector: {Tpm}
But we need a recovery password in case we run into trouble in the future. We can confirm there is currently no recovery password set by entering the following into our elevated PowerShell terminal:
(Get-BitLockerVolume -MountPoint X).KeyProtector

BitLocker Recovery passwords are 48 numeric characters, split into 8 blocks of 6 numeric characters each. Unfortunately, I couldn't find any way to get windows to generate this password for us. Additionally, Bitlocker will not accept the password unless it meets specific requirements (namely, each 6 number block must be divisible by 11). See this post followed by Microsoft's explanation for how they generate these passwords:
I am automating the installation of BitLocker. As part of this task, a Recovery Password is being added.Instead of using the auto-generated password I want to provide my own password.However, not all

superuser.com
So, to generate your our own valid password (while still ensuring enough entropy), we start with a random 128bit binary string. I used KeePass (
KeePass Password Safe) to do this, but you need to use custom commands to ensure there are 128 characters and they are all either a '1' or a '0'. You do this by adding a new entry, opening password generator, selecting "Generate using pattern", and entering the following:
[\1,0]{128}

The [\1\0] part establishes the character set and the {128} part indicates how many characters you'll generate. (See
Password Generator - KeePass). Key pass estimates that this is a strong password:

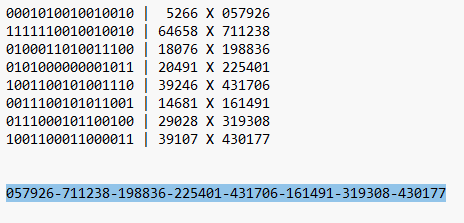
Now you need to copy this 128bit binary string and split it into 8 blocks of 16 bits each. You then need to convert each 16 bit block into a decimal number. One way to do it is to paste the entire 128 bit binary number string into a txt file and manually convert each 16 bit block into a decimal one by one (there are numerous binary to decimal converters online or, if you want, try to do DIY
Please visit wikiHow directly). With my sample / test 128 bit binary string, I got the following:

But we're not done yet. Now we need to multiply all the decimals we got by 11 and if any of the resulting number blocks have less than 6 digits, we need to pad them with zeros so we end up with 8 blocks of 6 digits each:

Noted that we added a '0' to the first number block because even after multiplying the original number (5266) by 11, we still had only 5 digits (57926).
Now we compile our 8 blocks into one recovery password, with each of the six number blocks delneated by a '-'. We want to save this compiled number back in our password manager, because we need to keep this:

Now we go back to our elevated powershell terminal, and add our recovery password as a second KeyProtector by entering:
Get-BitLockerVolume -MountPoint X | Add-BitLockerKeyProtector -RecoveryPasswordProtector -RecoveryPassword "[paste our decimal recovery password string here]"

We can already see that there are now 2 Key protectors (Tpm, Recovery Password) but to confirm, we check status again with either of:
manage-bde -status
Get-BitLockerVolume -MountPoint X | Format-List

But, protection is still 'off'. We need to manually enable, by entering the following:
manage-bde -protectors -enable C:

Once we restart our windows, we will now see that Protection is "On" and that, despite still using a local account, there is no longer any warning in Settings > Privacy & Security > Device Encryption