Windows 11 24H2 Update Error


@LurkingCrayon You should mention which version of Windows 11 (regarding 21H2, 23H2, etc), and also build number. It may help give insight into your issue.

inside windows defender > device security > core isolation, turn off Memory Integrity and then try to rerun the in-place upgrade
Tried this just now, same issue unfortunately
 

My Computer

System One

  • OS
    Windows 11 Pro
    Computer type
    PC/Desktop
    Manufacturer/Model
    Custom
    CPU
    AMD Ryzen 5-5500
    Motherboard
    MSI x570 PRO-A
    Memory
    16GB DDR4
    Graphics Card(s)
    MSI RTX 2060
time to partition. burn the 24h2 iso with rufus and make it dual boot. definitely curious to see if it will even install a fresh copy bypassing as requirements. if not you'll have a serious issue on your hands. would be good just to test that
 

My Computer

System One

  • OS
    Windows 11 Pro
time to partition. burn the 24h2 iso with rufus and make it dual boot. definitely curious to see if it will even install a fresh copy bypassing as requirements. if not you'll have a serious issue on your hands. would be good just to test that
Yea I’m at a losss at this point, is there a way to hide it in win update cuz it keeps trying to install, and till I get the chance to spend time to move and install everything
 

My Computer

System One

  • OS
    Windows 11 Pro
    Computer type
    PC/Desktop
    Manufacturer/Model
    Custom
    CPU
    AMD Ryzen 5-5500
    Motherboard
    MSI x570 PRO-A
    Memory
    16GB DDR4
    Graphics Card(s)
    MSI RTX 2060

or

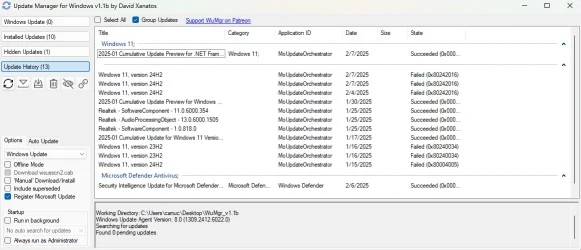
use this portable app. its a gui. just search for updates, check the box of the one you dont want to install and click the hide button.
 

My Computer

System One

  • OS
    Windows 11 Pro

My Computer

System One

  • OS
    Windows 11 Pro
    Computer type
    PC/Desktop
    Manufacturer/Model
    Custom
    CPU
    AMD Ryzen 5-5500
    Motherboard
    MSI x570 PRO-A
    Memory
    16GB DDR4
    Graphics Card(s)
    MSI RTX 2060

its cool. releases is on the left. thats the link to it directly. download and extract the .zip. run the .exe inside (its portable, no installation necessary)

1738956532662.webp
 

My Computer

System One

  • OS
    Windows 11 Pro

its cool. releases is on the left. thats the link to it directly. download and extract the .zip. run the .exe inside (its portable, no installation necessary)

View attachment 124640
when i downloaded the releases it doesnt have a EXE in it, i was able to get the first 1 to work with some palying around, the weird thing is it shows the update as 90GB which is weird.

Win Update.webp
 

My Computer

System One

  • OS
    Windows 11 Pro
    Computer type
    PC/Desktop
    Manufacturer/Model
    Custom
    CPU
    AMD Ryzen 5-5500
    Motherboard
    MSI x570 PRO-A
    Memory
    16GB DDR4
    Graphics Card(s)
    MSI RTX 2060
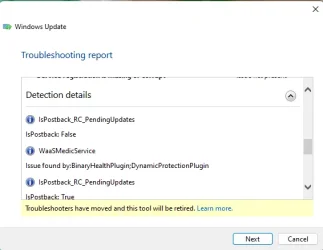
Win Update Trbshoot.webp also this is what win update troubleshooting shows as a issue potently? IDK if this is helpfull
 

My Computer

System One

  • OS
    Windows 11 Pro
    Computer type
    PC/Desktop
    Manufacturer/Model
    Custom
    CPU
    AMD Ryzen 5-5500
    Motherboard
    MSI x570 PRO-A
    Memory
    16GB DDR4
    Graphics Card(s)
    MSI RTX 2060

My Computer

System One

  • OS
    Windows 11 Pro
    Computer type
    PC/Desktop
    Manufacturer/Model
    Custom
    CPU
    AMD Ryzen 5-5500
    Motherboard
    MSI x570 PRO-A
    Memory
    16GB DDR4
    Graphics Card(s)
    MSI RTX 2060
good deal. you can google the (0x......) codes to see what each number means. may stumble onto something but more times than not those are pretty broad codes..
 

My Computer

System One

  • OS
    Windows 11 Pro
good deal. you can google the (0x......) codes to see what each number means. may stumble onto something but more times than not those are pretty broad codes..
yea seems generic, IDK what the troubleshooter code that i sent before (post 89) means, also the update is hidden but still is showing as "needs attention" in windows update unfortunately
 

My Computer

System One

  • OS
    Windows 11 Pro
    Computer type
    PC/Desktop
    Manufacturer/Model
    Custom
    CPU
    AMD Ryzen 5-5500
    Motherboard
    MSI x570 PRO-A
    Memory
    16GB DDR4
    Graphics Card(s)
    MSI RTX 2060
in the settings app > windows updates > click Pause Updates > reboot > resume updates. it wont show anymore
 

My Computer

System One

  • OS
    Windows 11 Pro
in the settings app > windows updates > click Pause Updates > reboot > resume updates. it wont show anymore
worked, thank you
 

My Computer

System One

  • OS
    Windows 11 Pro
    Computer type
    PC/Desktop
    Manufacturer/Model
    Custom
    CPU
    AMD Ryzen 5-5500
    Motherboard
    MSI x570 PRO-A
    Memory
    16GB DDR4
    Graphics Card(s)
    MSI RTX 2060
your specs say MSI gpu, but do you have AMD graphics drivers for onboard graphics?
 

My Computer

System One

  • OS
    Windows 11 Pro
your specs say MSI gpu, but do you have AMD graphics drivers for onboard graphics?
No, Mobo has no onboard and my CPU isn't a G model
 

My Computer

System One

  • OS
    Windows 11 Pro
    Computer type
    PC/Desktop
    Manufacturer/Model
    Custom
    CPU
    AMD Ryzen 5-5500
    Motherboard
    MSI x570 PRO-A
    Memory
    16GB DDR4
    Graphics Card(s)
    MSI RTX 2060
search in C:\Windows\System32\DriverStore for "amdkmdag.sys"
post back whether it exists or not
 

My Computer

System One

  • OS
    Windows 11 Pro
search in C:\Windows\System32\DriverStore for "amdkmdag.sys"
post back whether it exists or not
No Results found in that folder
 

My Computer

System One

  • OS
    Windows 11 Pro
    Computer type
    PC/Desktop
    Manufacturer/Model
    Custom
    CPU
    AMD Ryzen 5-5500
    Motherboard
    MSI x570 PRO-A
    Memory
    16GB DDR4
    Graphics Card(s)
    MSI RTX 2060
was worth a shot. came up in results to
Issue found by:BinaryHealthPlugin;DynamicProtectionPlugin

i'll keeping digging

EDIT (to avoid double posting) @LurkingCrayon - some more details to look into:


IsPostback_RC_PendingUpdates
IsPostback: False


WaaSMedicService
Issue found by:BinaryHealthPlugin;DynamicProtectionPlugin


IsPostback_RC_PendingUpdates
IsPostback: True


Service Status
Problem with BITS service : The requested service has already been started. System.Management.Automation.RemoteException More help is available by typing NET HELPMSG 2182. System.Management.Automation.RemoteException


Service Status
Problem with BITS service : The requested service has already been started. System.Management.Automation.RemoteException More help is available by typing NET HELPMSG 2182. System.Management.Automation.RemoteException

EDIT 2 @LurkingCrayon i'm curious if we have you do an in-place upgrade with the EXACT build number you currently have. run "winver" and tell me the exact number of the build (including all decimals). i'll find the .iso for that exact build

also - try clean boot and running the 24h2 iso upgrade:


This article does not apply to Inspiron 3721
Check out other resources

Change Product

Instructions​


Clean Boot with MSConfig​


Duration: 00:55
Closed captions: English only

What is a Windows Clean Boot?

Troubleshooting Windows 10 and Windows 11 can be a complex process due to the many different drivers, settings, and programs interacting simultaneously. This varied environment may lead to software conflicts that manifest in several ways, oftentimes as Windows struggling to start up properly or updates failing to install. Performing a clean boot can help with locating the conflict by booting only Windows applications and drivers.


How to perform a Clean Boot:​

  1. Right-click the Start button.
  2. Click Search
  3. Type 'msconfig' and press Enter.
  4. Click Services.
  5. Click the Hide all Microsoft services checkbox.
  6. Click Disable all.
  7. Click Startup.
  8. Click Open Task Manager.
  9. Click any startup program that you suspect might be interfering.
  10. Click Disable.
    Repeat steps 9 and 10 for all Startup programs.
  11. Click the X to close Task Manager.
  12. Click OK in the System Configuration window.
  13. Restart the system.

How to restart normally:​

  1. Right-click the Start button.
  2. Click Search.
  3. Type 'msconfig' and press Enter.
  4. Click Services.
  5. Click the Hide all Microsoft services checkbox.
  6. Click Enable all.
  7. Click the checkbox for the conflicting startup service to clear it.
  8. Click Startup.
  9. Click Open Task Manager.
  10. Click a startup program.
  11. Click Enable.
    Repeat steps 10-11 for all startup programs.
  12. Click the X to close Task Manager.
  13. Click OK in the System Configuration window.
  14. Click Restart.
 
Last edited:

My Computer

System One

  • OS
    Windows 11 Pro

Latest Support Threads

Back
Top Bottom